
I don’t know about you, but according to me, lately upcycling projects are more chic than ever. So let’s do that, let’s help the planet by transforming something we don’t like a lot into something we want to wear. And something that feels refreshing and unique.
Let’s start from the beginning. What is upcycling? So, let’s give Urban Dictionary the chance to enlighten us:
Upcycling: The practice of converting waste materials into products of greater value. Urban Dictionary
In this case, however, I have to say that these scarves by no means -even considering that the fabric doesn’t have great quality- are trash or waste. I actually had the option to donate them to people that could actually add them to their closet and love them for years. But another cool thing about upcycling -even though it is not the most important one- is that it gives you the freedom to be creative and wear unique pieces of clothing. And that is what I am doing here.
By doing this upcycling project, instead of taking these scarves out of my closet into someone else’s, they are actually staying, but transformed.
Do you help the planet by doing a project like mine? Yes according to me, if you don’t do something like this you may buy new shorts and contribute to the -out of control- industry of fast-fashion. So next time you need new shorts, consider following this “tutorial”.
UPCYCLING PROJECT INSPIRED BY CHRISTIAN DIOR MEN
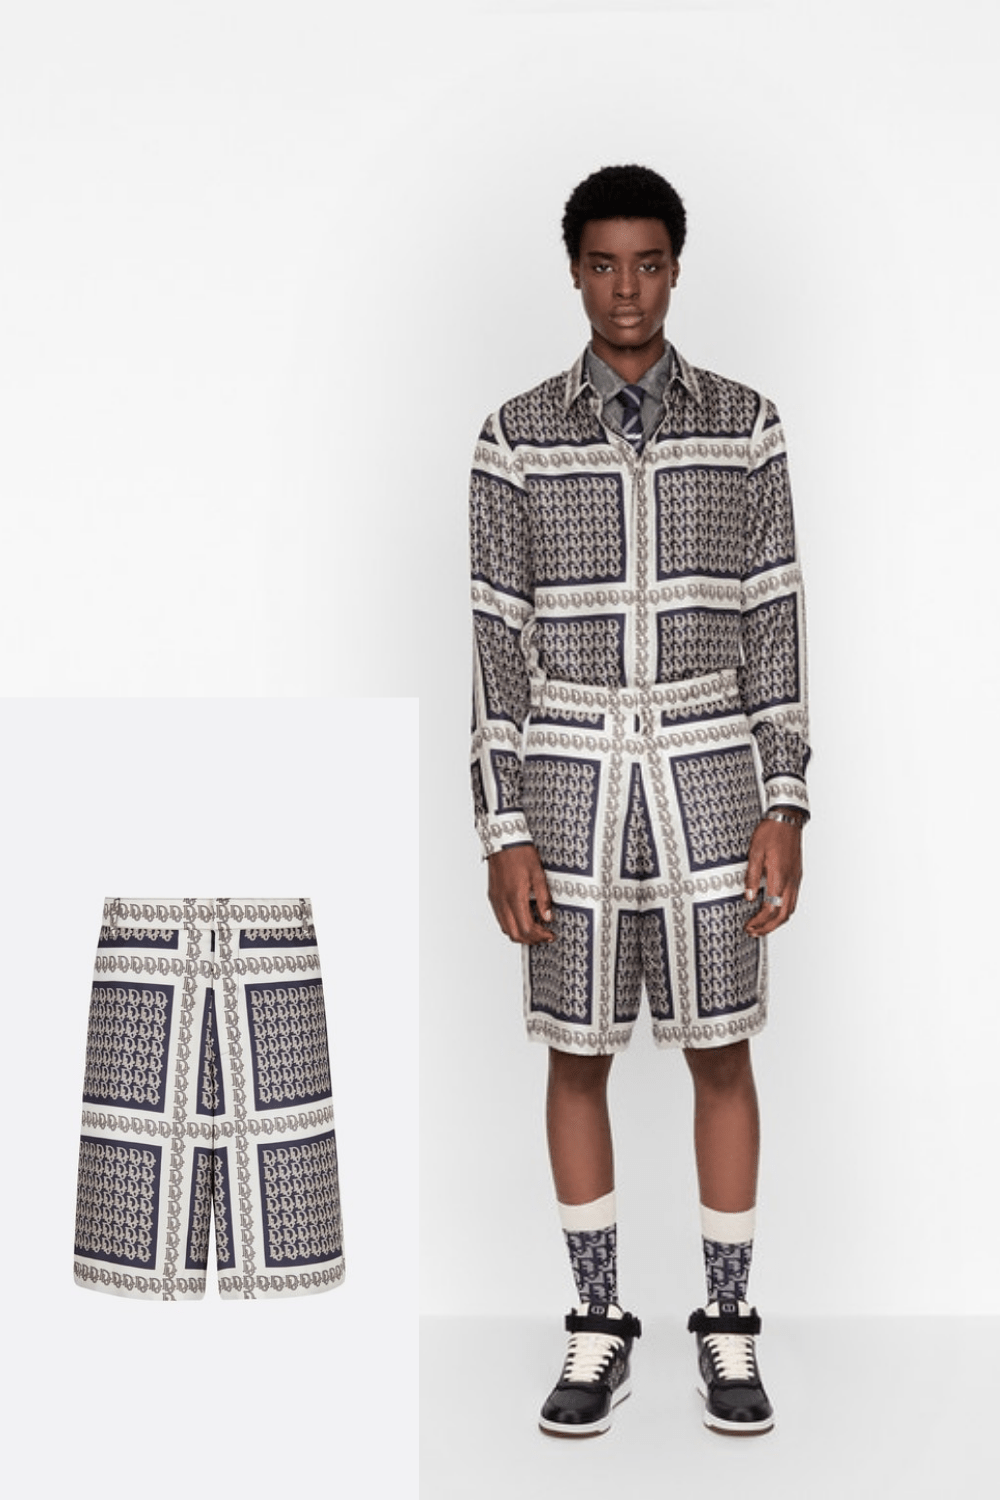
If you know anything about me it should be that I’ve lived a good part of my life inspired by the work of Mr. Christian Dior himself, this is not new. The work that Kim Jones has been doing in the last years for their men collections is also of great respect and inspiration to me.
This time it was not the exception. When I saw these shorts I instantly wanted them. However being realistic, their price is not even close to my budget. But that doesn’t mean that I -or you, if that is also your case- can’t wear something like that, because upcycling projects are in our side.
The shine of the silk in this pants took my eyes directly to those two ASOS scarves that I was not really planing to wear again. The fabric of these scarves is by no means even close to the quality of the one on the DIOR shorts, but it shines. So it’s perfect and I don’t have to spend more money.
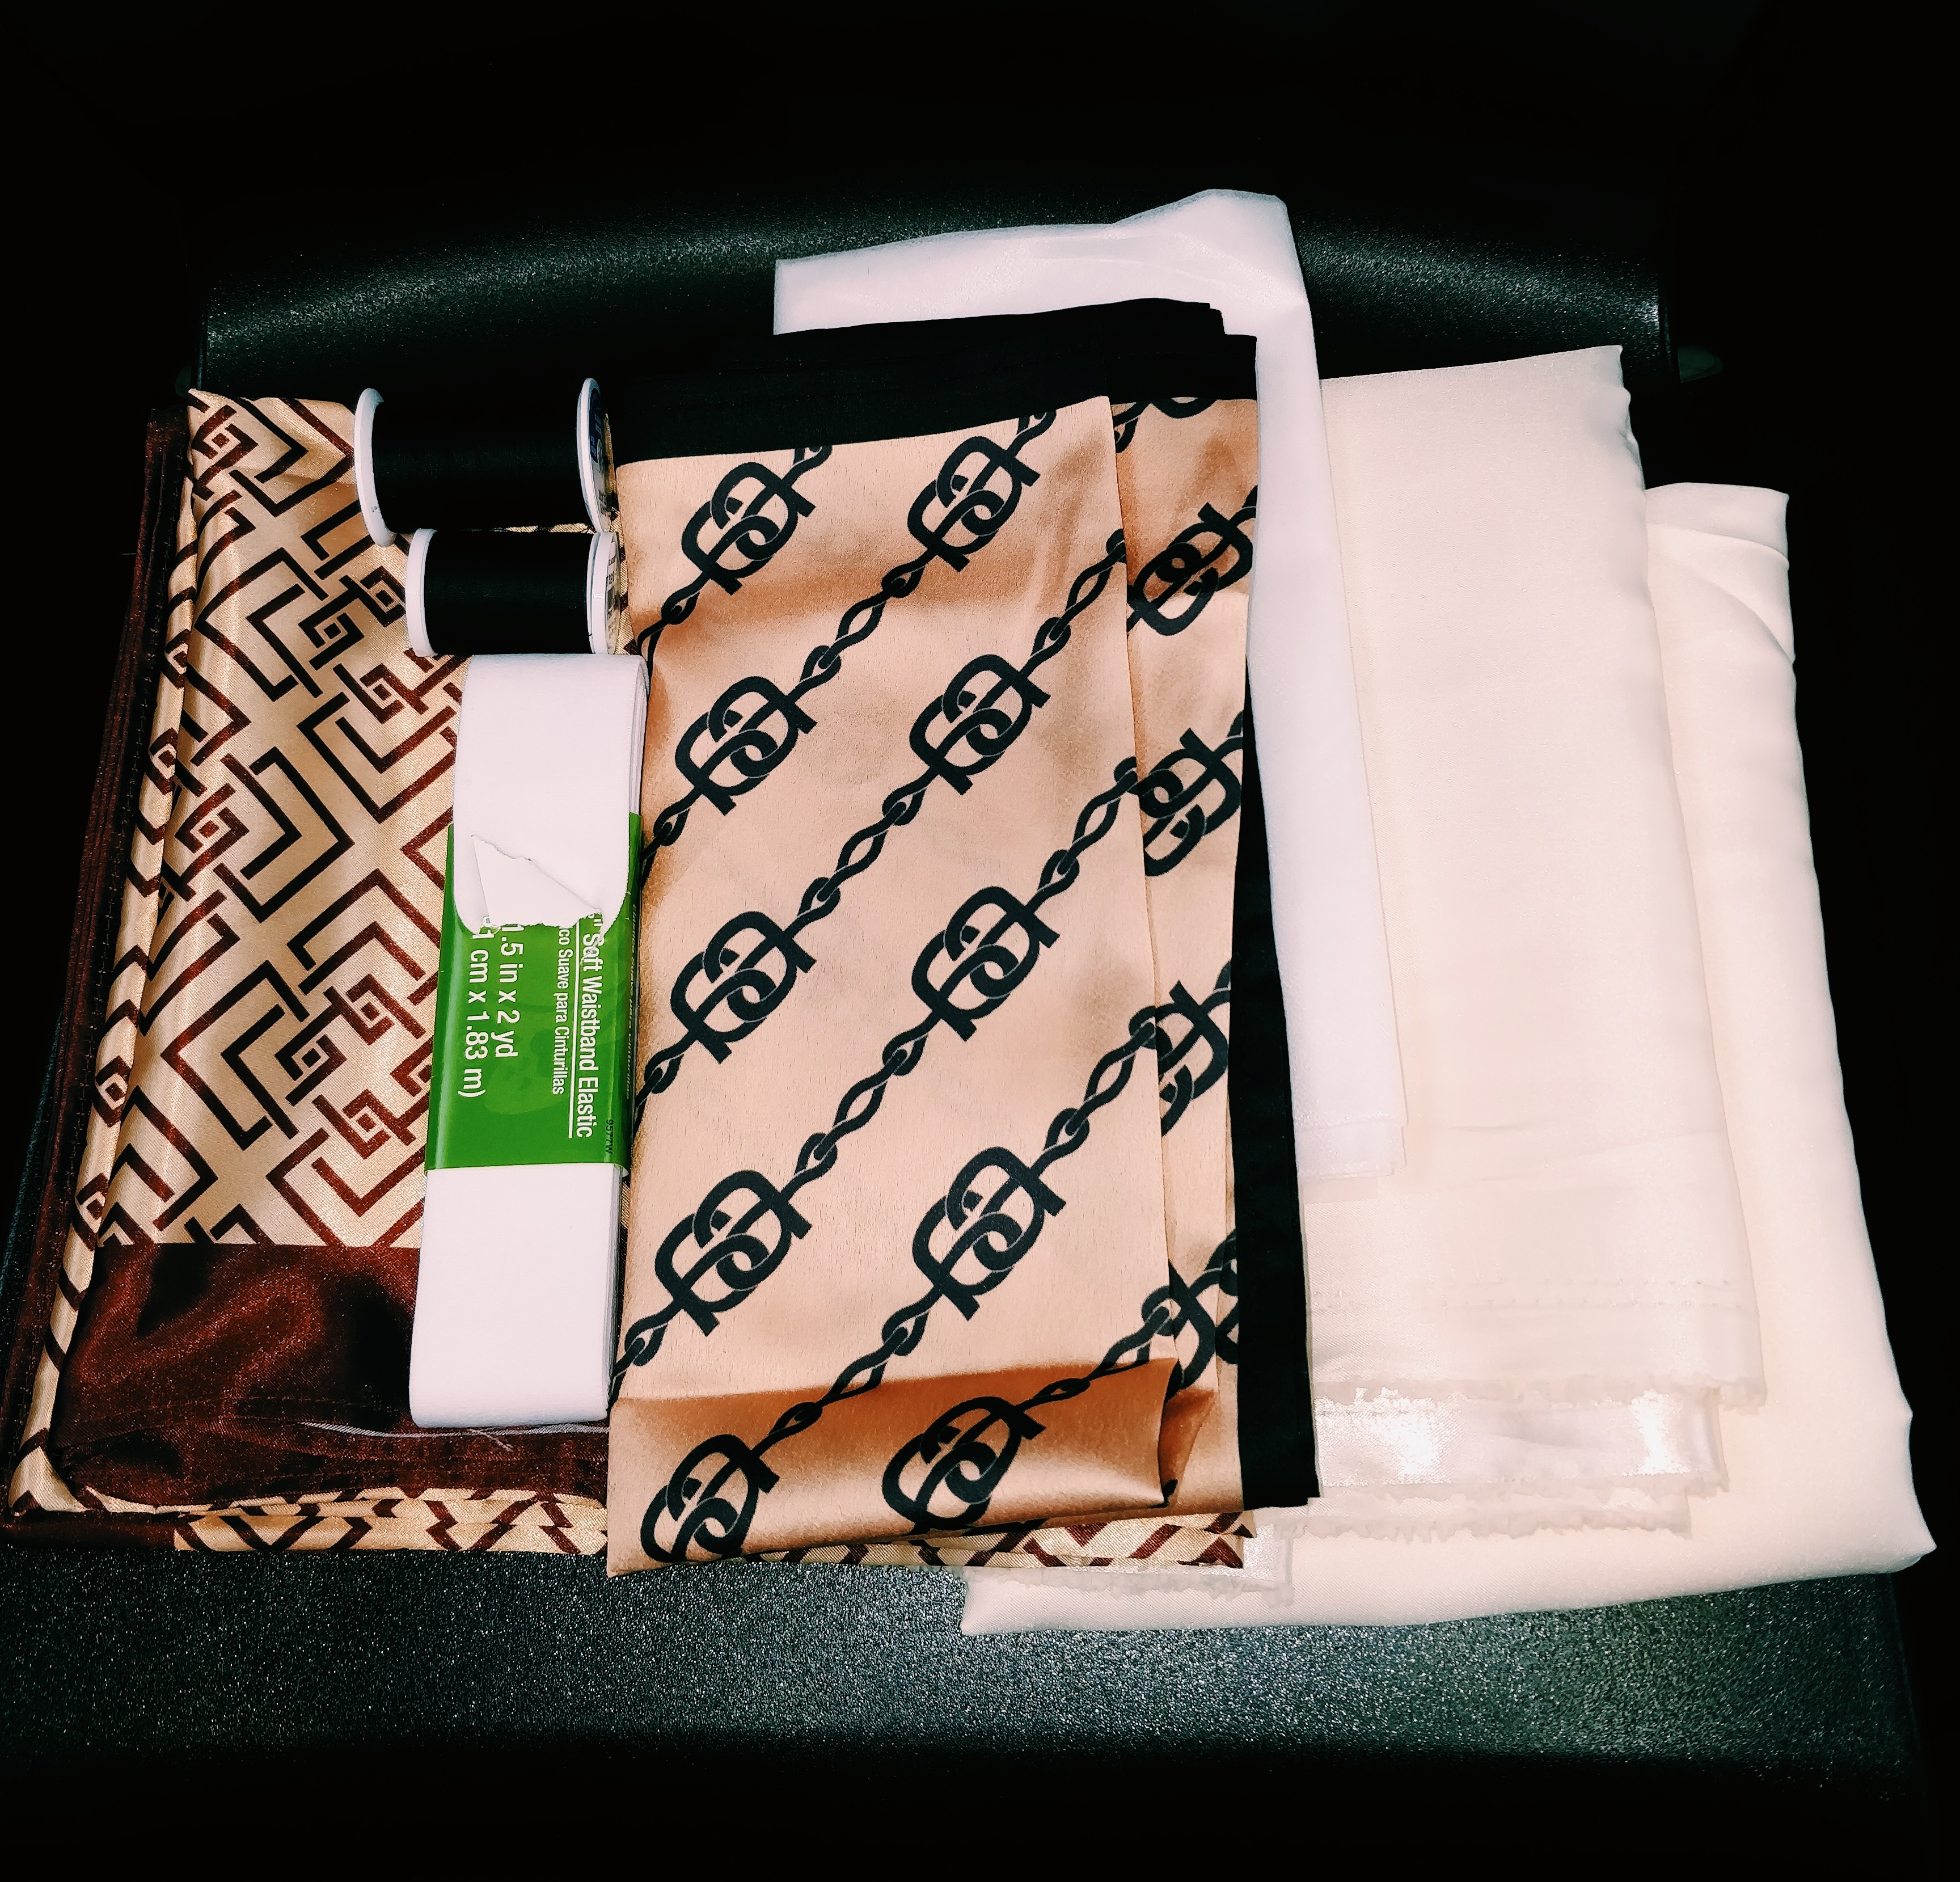
MATERIALS I USED
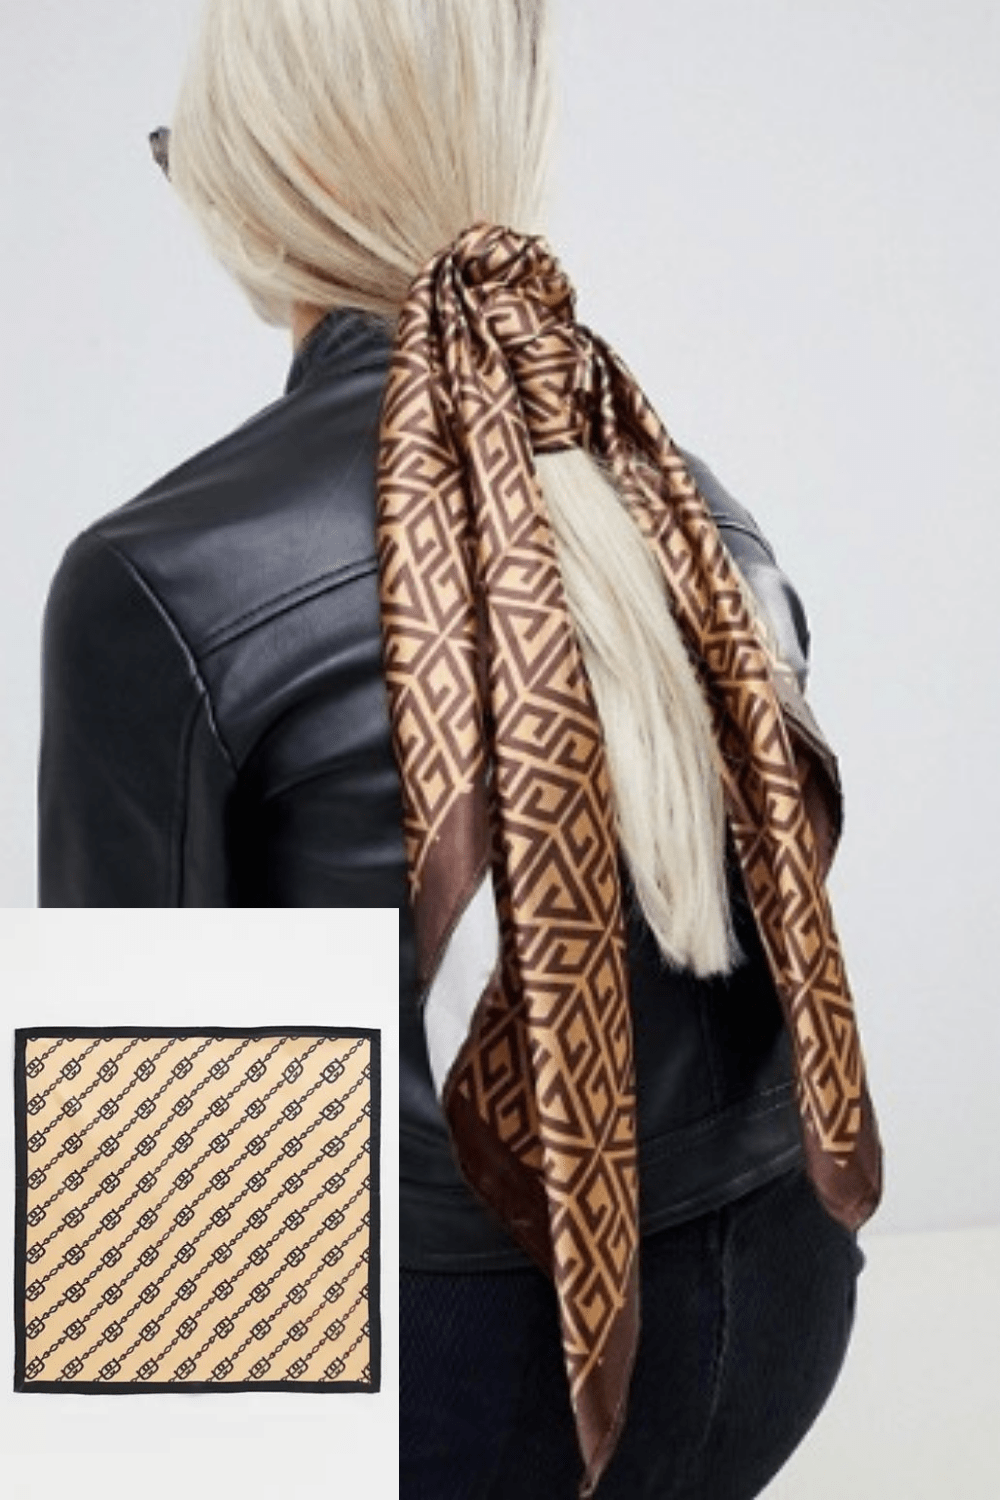
The base of my project are these two gorgeous scarves from ASOS. The first one is golden and brown and much bigger than the second one, the fabric is actually a polyester satin. Click here if you want to check a look I styled using the same scarf. The second one is also a polyester satin in black and beige, much smaller.
And even if they don’t have the same print, to my opinion they compliment each other pretty well.
In the pants that I have made before, I always like to add lining, especially for this ones, since the fabric is so thin and fragile. So I got ivory polyester satin and even fusible interfacing to make the whole thing stronger. Also an elastic waistband. I have to say that the DIOR bermudas do not have an elastic waistband, but mine do because I wanted to make the whole project as easy, fast and cheap as possible.
In materials, including the price of shipping and the scarves that I already had, I didn’t spend more than 40 dollars.
Again, as you see in the colors of the scarves and the different pattern I am not going for the exact copy of the Dior shorts. I just want shiny bermudas, like those ones.
With that said, time for the “tutorial”, I will just share my process. Keep in mind that I am by no means an expert sewer, in fact, I am the whole opposite. I am learning -on my own and some YouTube videos- with this projects, so I make a lot of mistakes. But I made it work at the end, which matters the most.
UPCYCLING PROJECT. HOW TO TURN SCARVES INTO SHORTS
These are the steps I took to complete this upcycling project. If you want, you can follow it as a tutorial.
I. COPY THE PATTERN
This is something I like to do constantly. Sometimes you don’t want to spend money on a pattern or you want to modify the pattern too much and it seams better to start from zero. A great idea is to trace your existing garments over paper to create a pattern, in this case I picked some shorts I made in the past. They are not that great, but they have the fit I was looking for. Check this article to check the fit of those shorts.
You can literally copy any garment you own. And you can use any type of paper. In my case I recycle some gift tissue paper. I like to use this paper because is pretty alike the paper of the patterns you buy.
So let’s make our own pattern for this upcycling shorts.
How to trace shorts to make a pattern
- Fold the shorts on the seam between both legs. Make sure they are well folded. First do it leaving the front part of the shorts to the outside, put them over the paper and trace around. Mark them as “front” and add seam allowance -like an inch. Do the same again, but now with the shorts folded to the back and mark them as “back”.
You also have to copy the back and side pockets. I didn’t do it like this, but maybe a good idea for the back pocket is to measure them with a ruler. And for the side pocket you can trace them from the inside of the shorts, try to make this one bigger than you think. In my case I failed and the side pockets ended up being way too small for my hand. Mark them as “side pockets” and “back pockets”. Note: If you are going to use an elastic waistband like I did, you probably have to make the pattern higher on the top, since you will have to fold the top around the waistband. - Cut the pieces of the pattern. In total you need to have 4.
Save the pattern for later.
II. PATCHWORK. AN UPCYCLING STATEMENT
If you are using only one big scarf you can probably skip this. In my case, I didn’t want my shorts to be only the print from top to bottom. And the only lines I was able to play with to break the print were the brown ones on the borders, so doing patchwork -for the first time ever- was the way to go for me. Also because I was using two scarves with different prints. Let’s explore my process.
GET CREATIVE!
- Play with the fabric. Move it in different ways until you get an idea of how you can play with the graphics of the scarf.
- Once you get a first idea, start cutting. In my case I cut right in the middle as I wanted to bring the brown lines from the borders to the center of my material.
- Repeat the process. Play and cut again as many times you want until you find a graphic that you like. If you need some ideas of how to play with fabric, maybe check some quilting tutorials too.
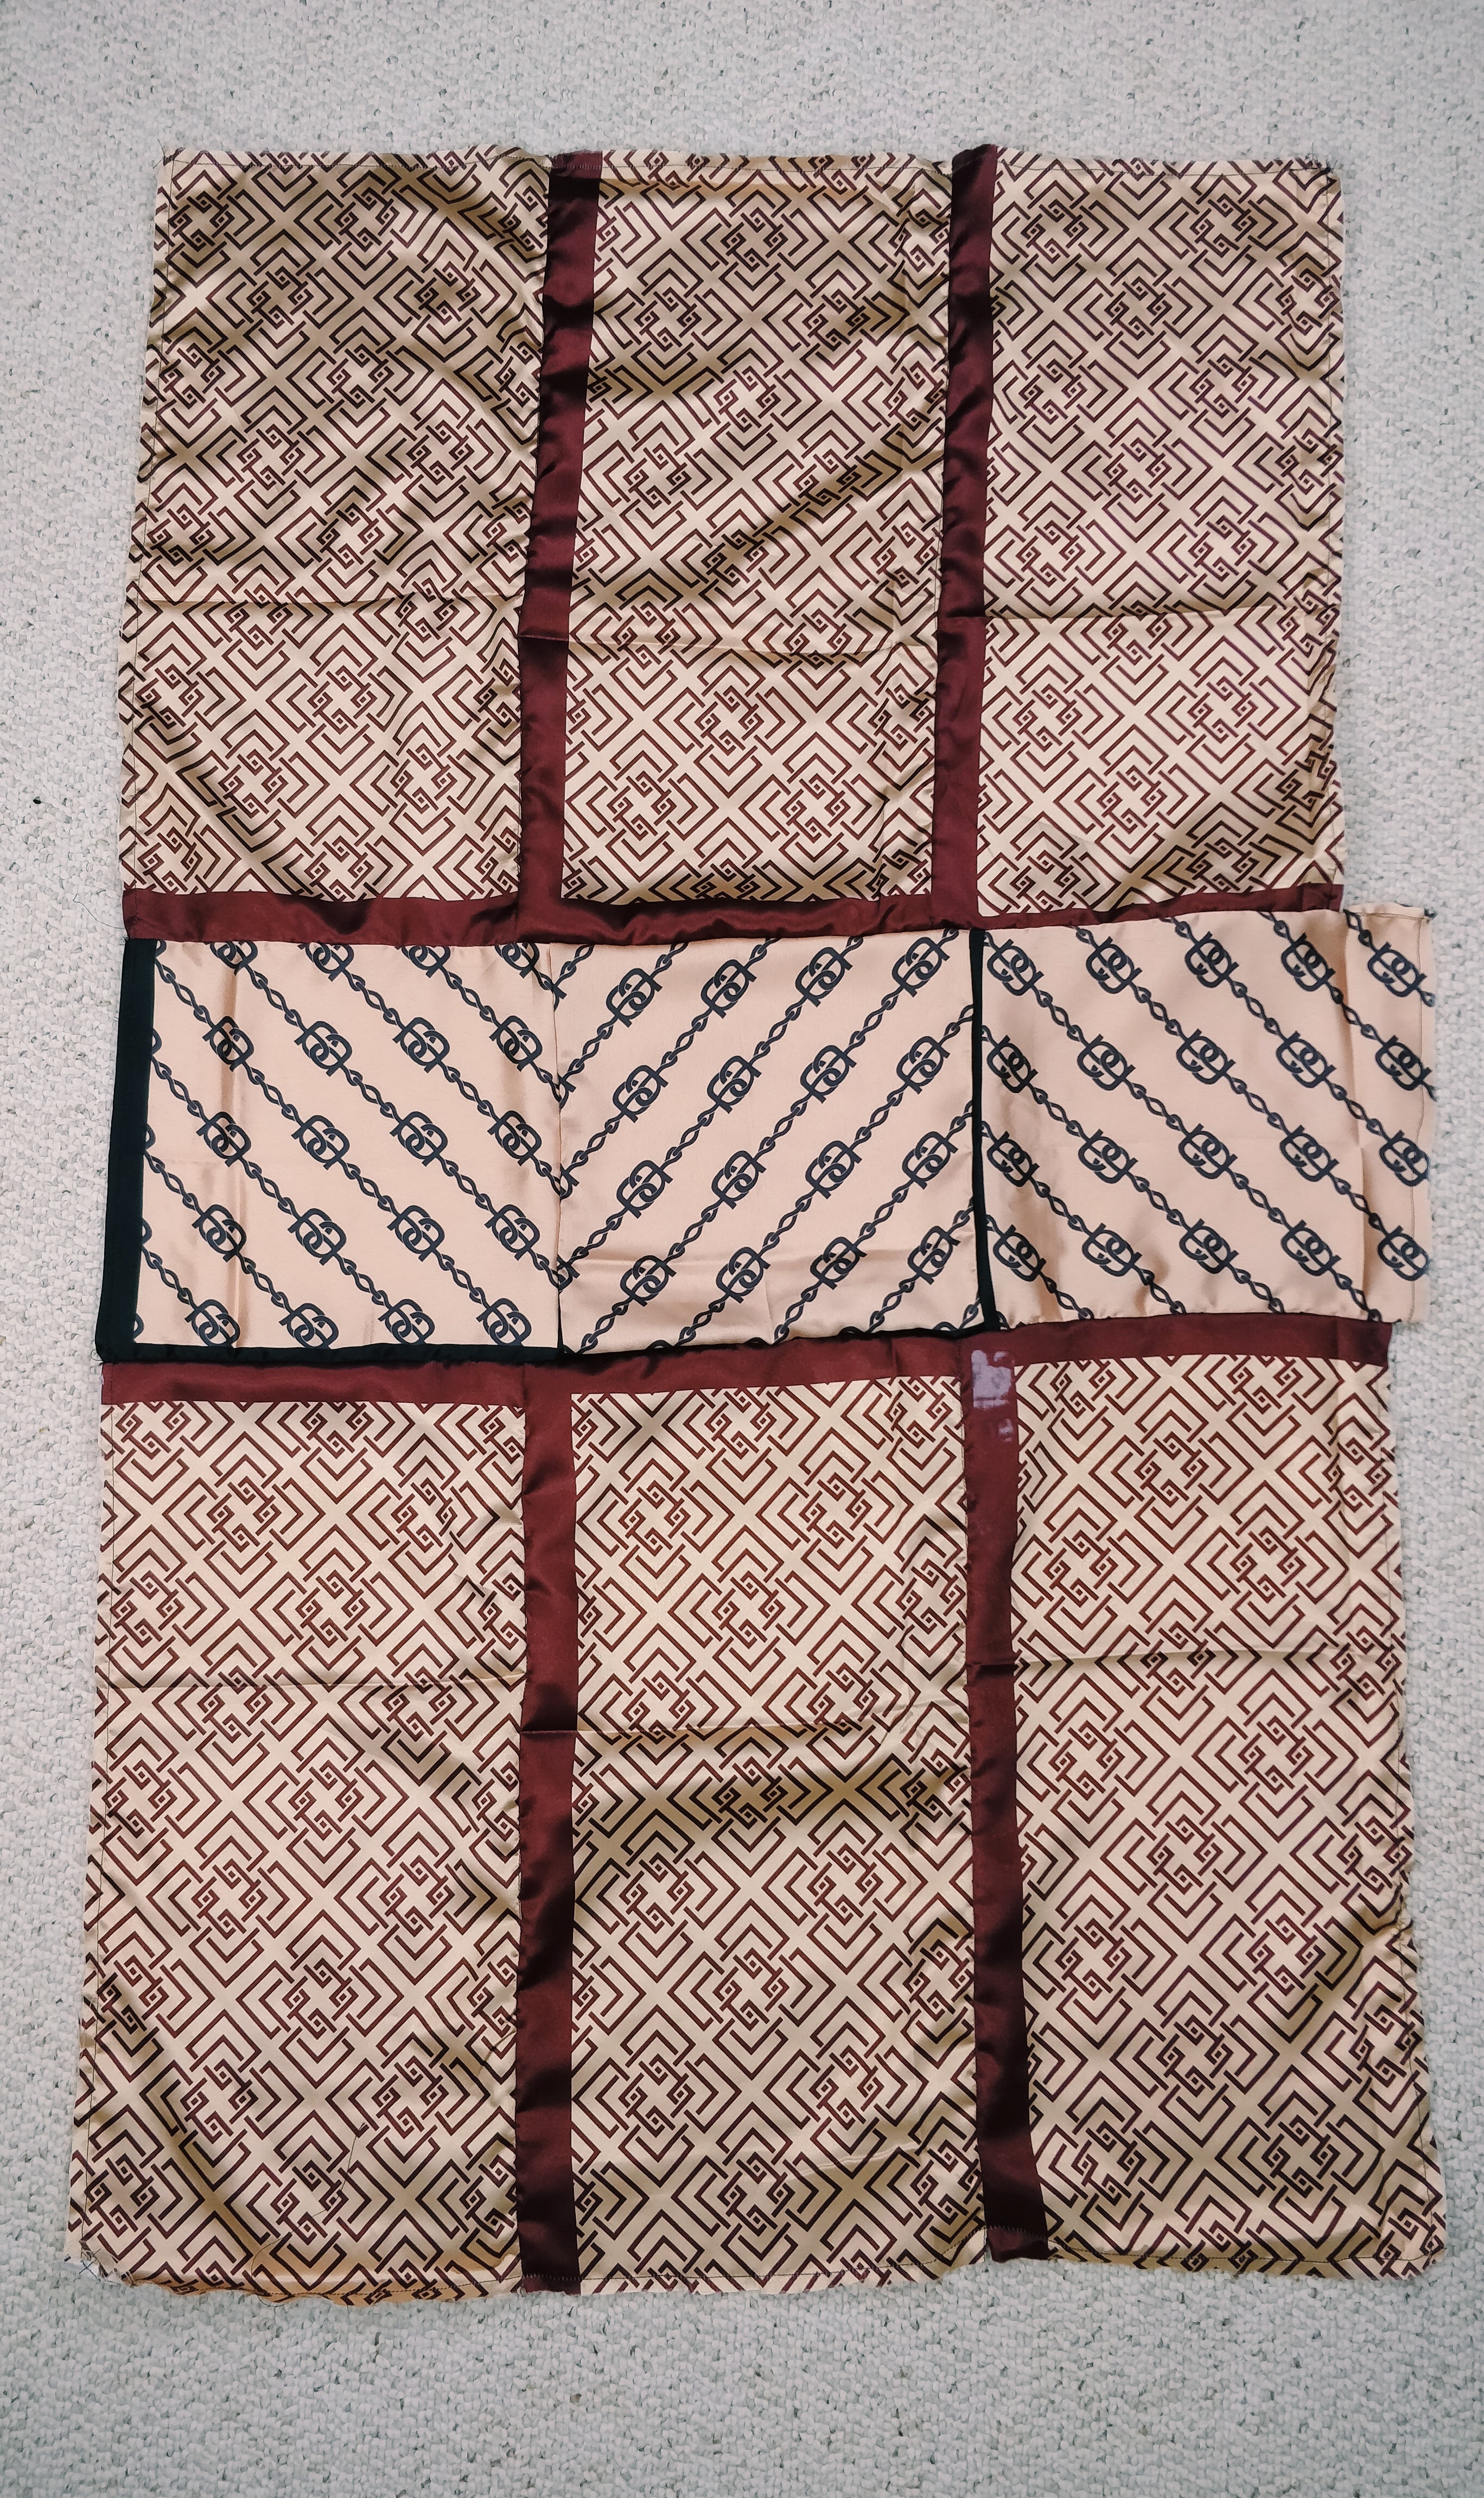
In my case what I did was cutting the whole scarf into 4 long rectangles and organize them in a way in which the brown lines came to the center of the piece of fabric. However, you can keep cutting it in many more pieces and then put the puzzle back together in different ways to make the print -and the shorts- more interesting and unique.
Puzzle Time!
- First you need to stay stitch all the borders that need it. And believe me, if you are using a fabric like this, you need to stay stitch because this fabric frays like crazy. If you have a serger, maybe you can use it here, but that is not my case. Now, pin and stitch the pieces of the puzzle together. When I finished putting three of those rectangles together -I didn’t use the fourth one- I cut that piece of fabric in the middle to bring the side borders to the center too. After that, I got this:
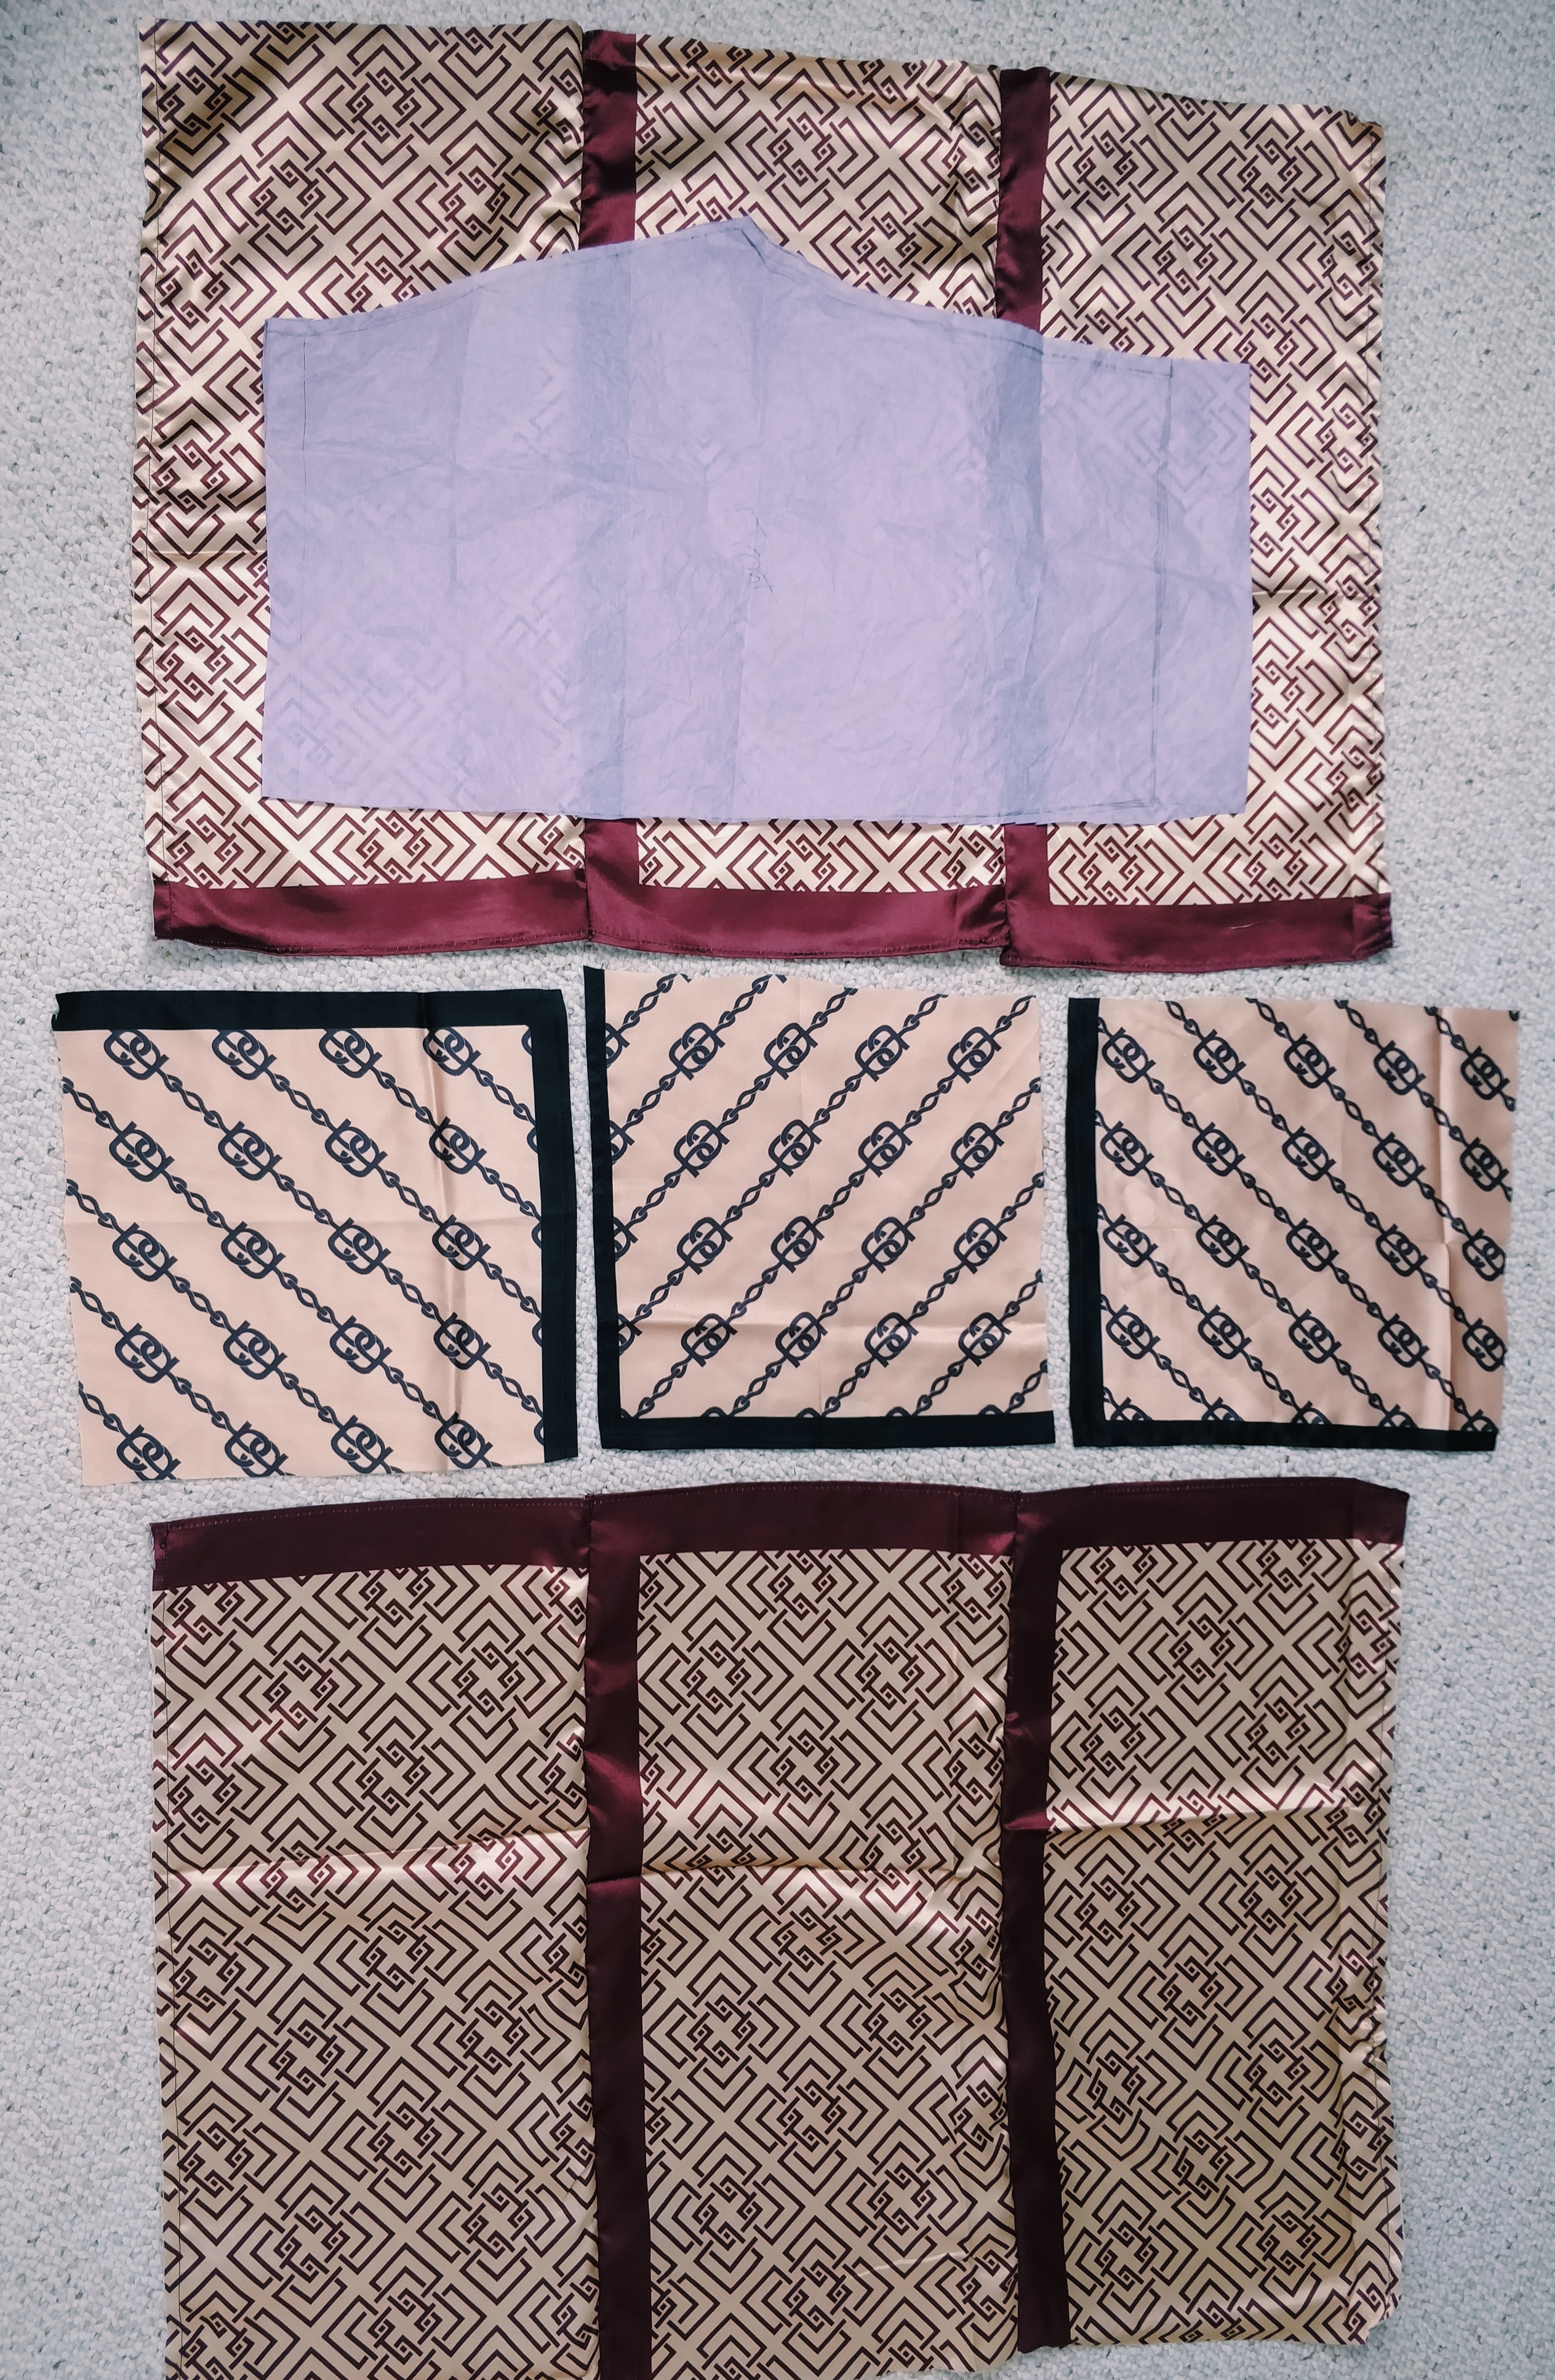
Then, I did the same with the second scarf. I cut it in 4 squares and used three. Then I kept playing with the print and put then in the middle of the two panels I had ready. Stay stitch them and sew them two. After that, I got this:
A. Patchwork completed, no interfacing. 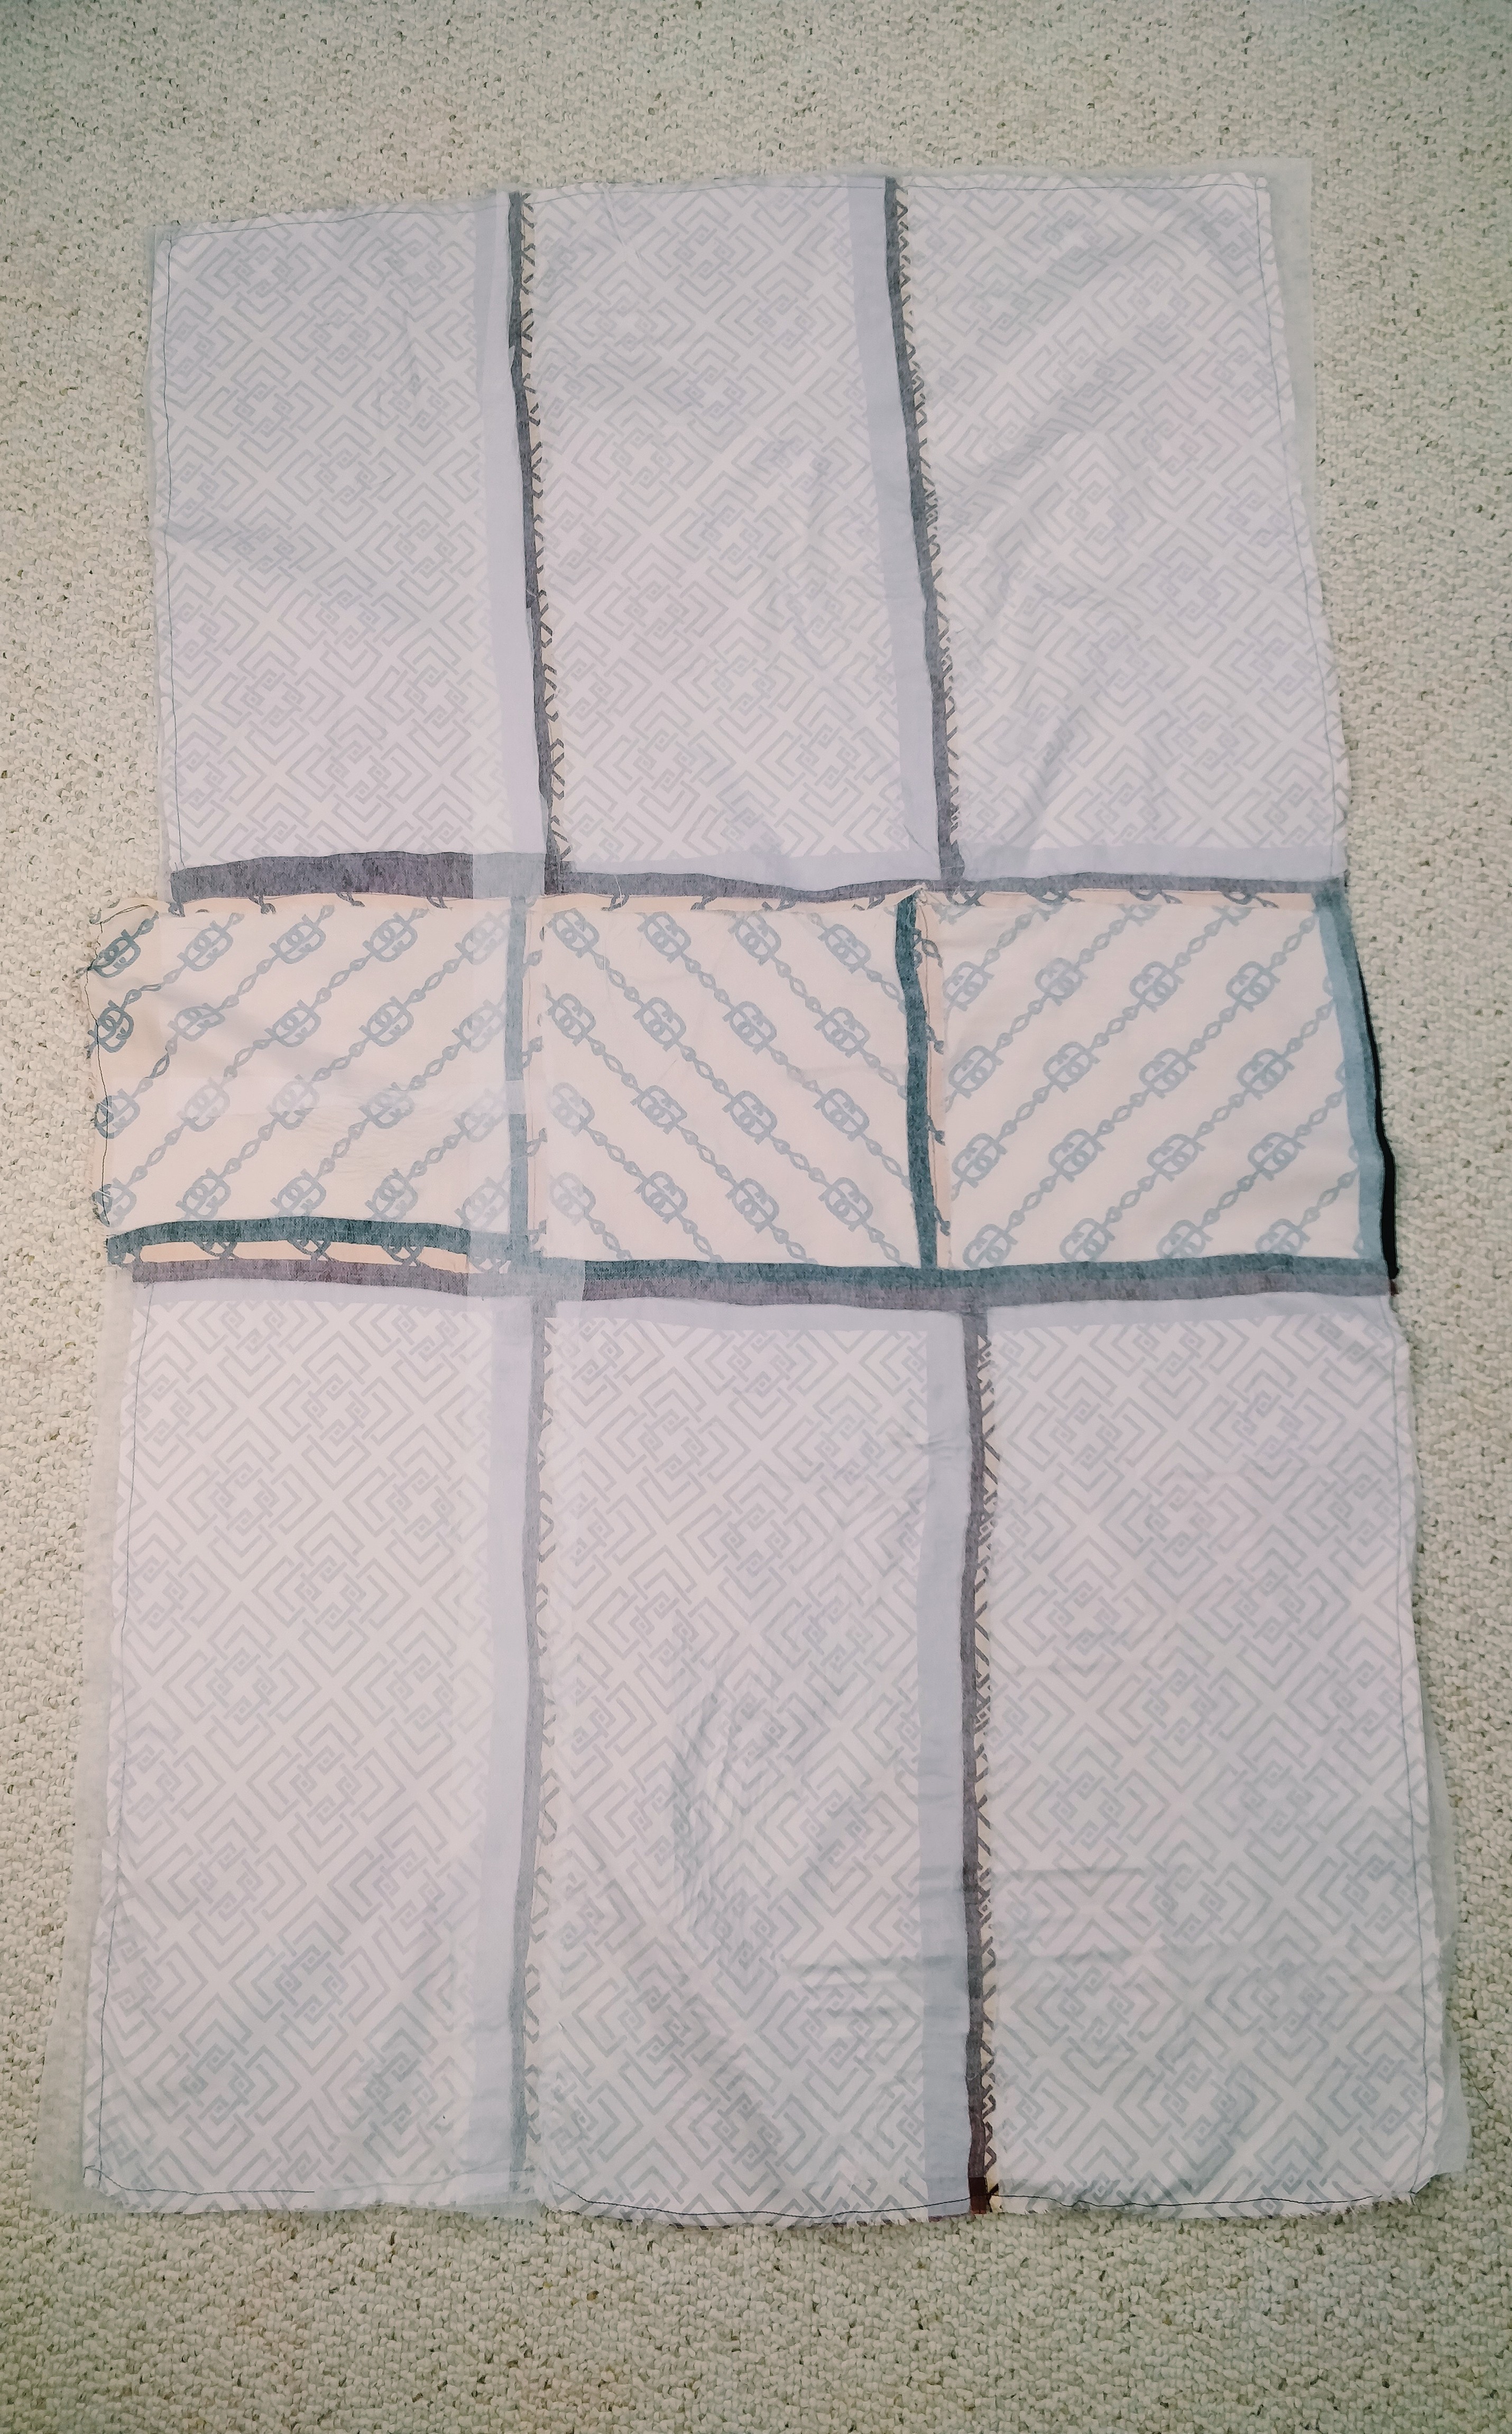
B. Patchwork completed with fused interfacing (Back) 
C. Patchwork completed with fused interfacing (Front) 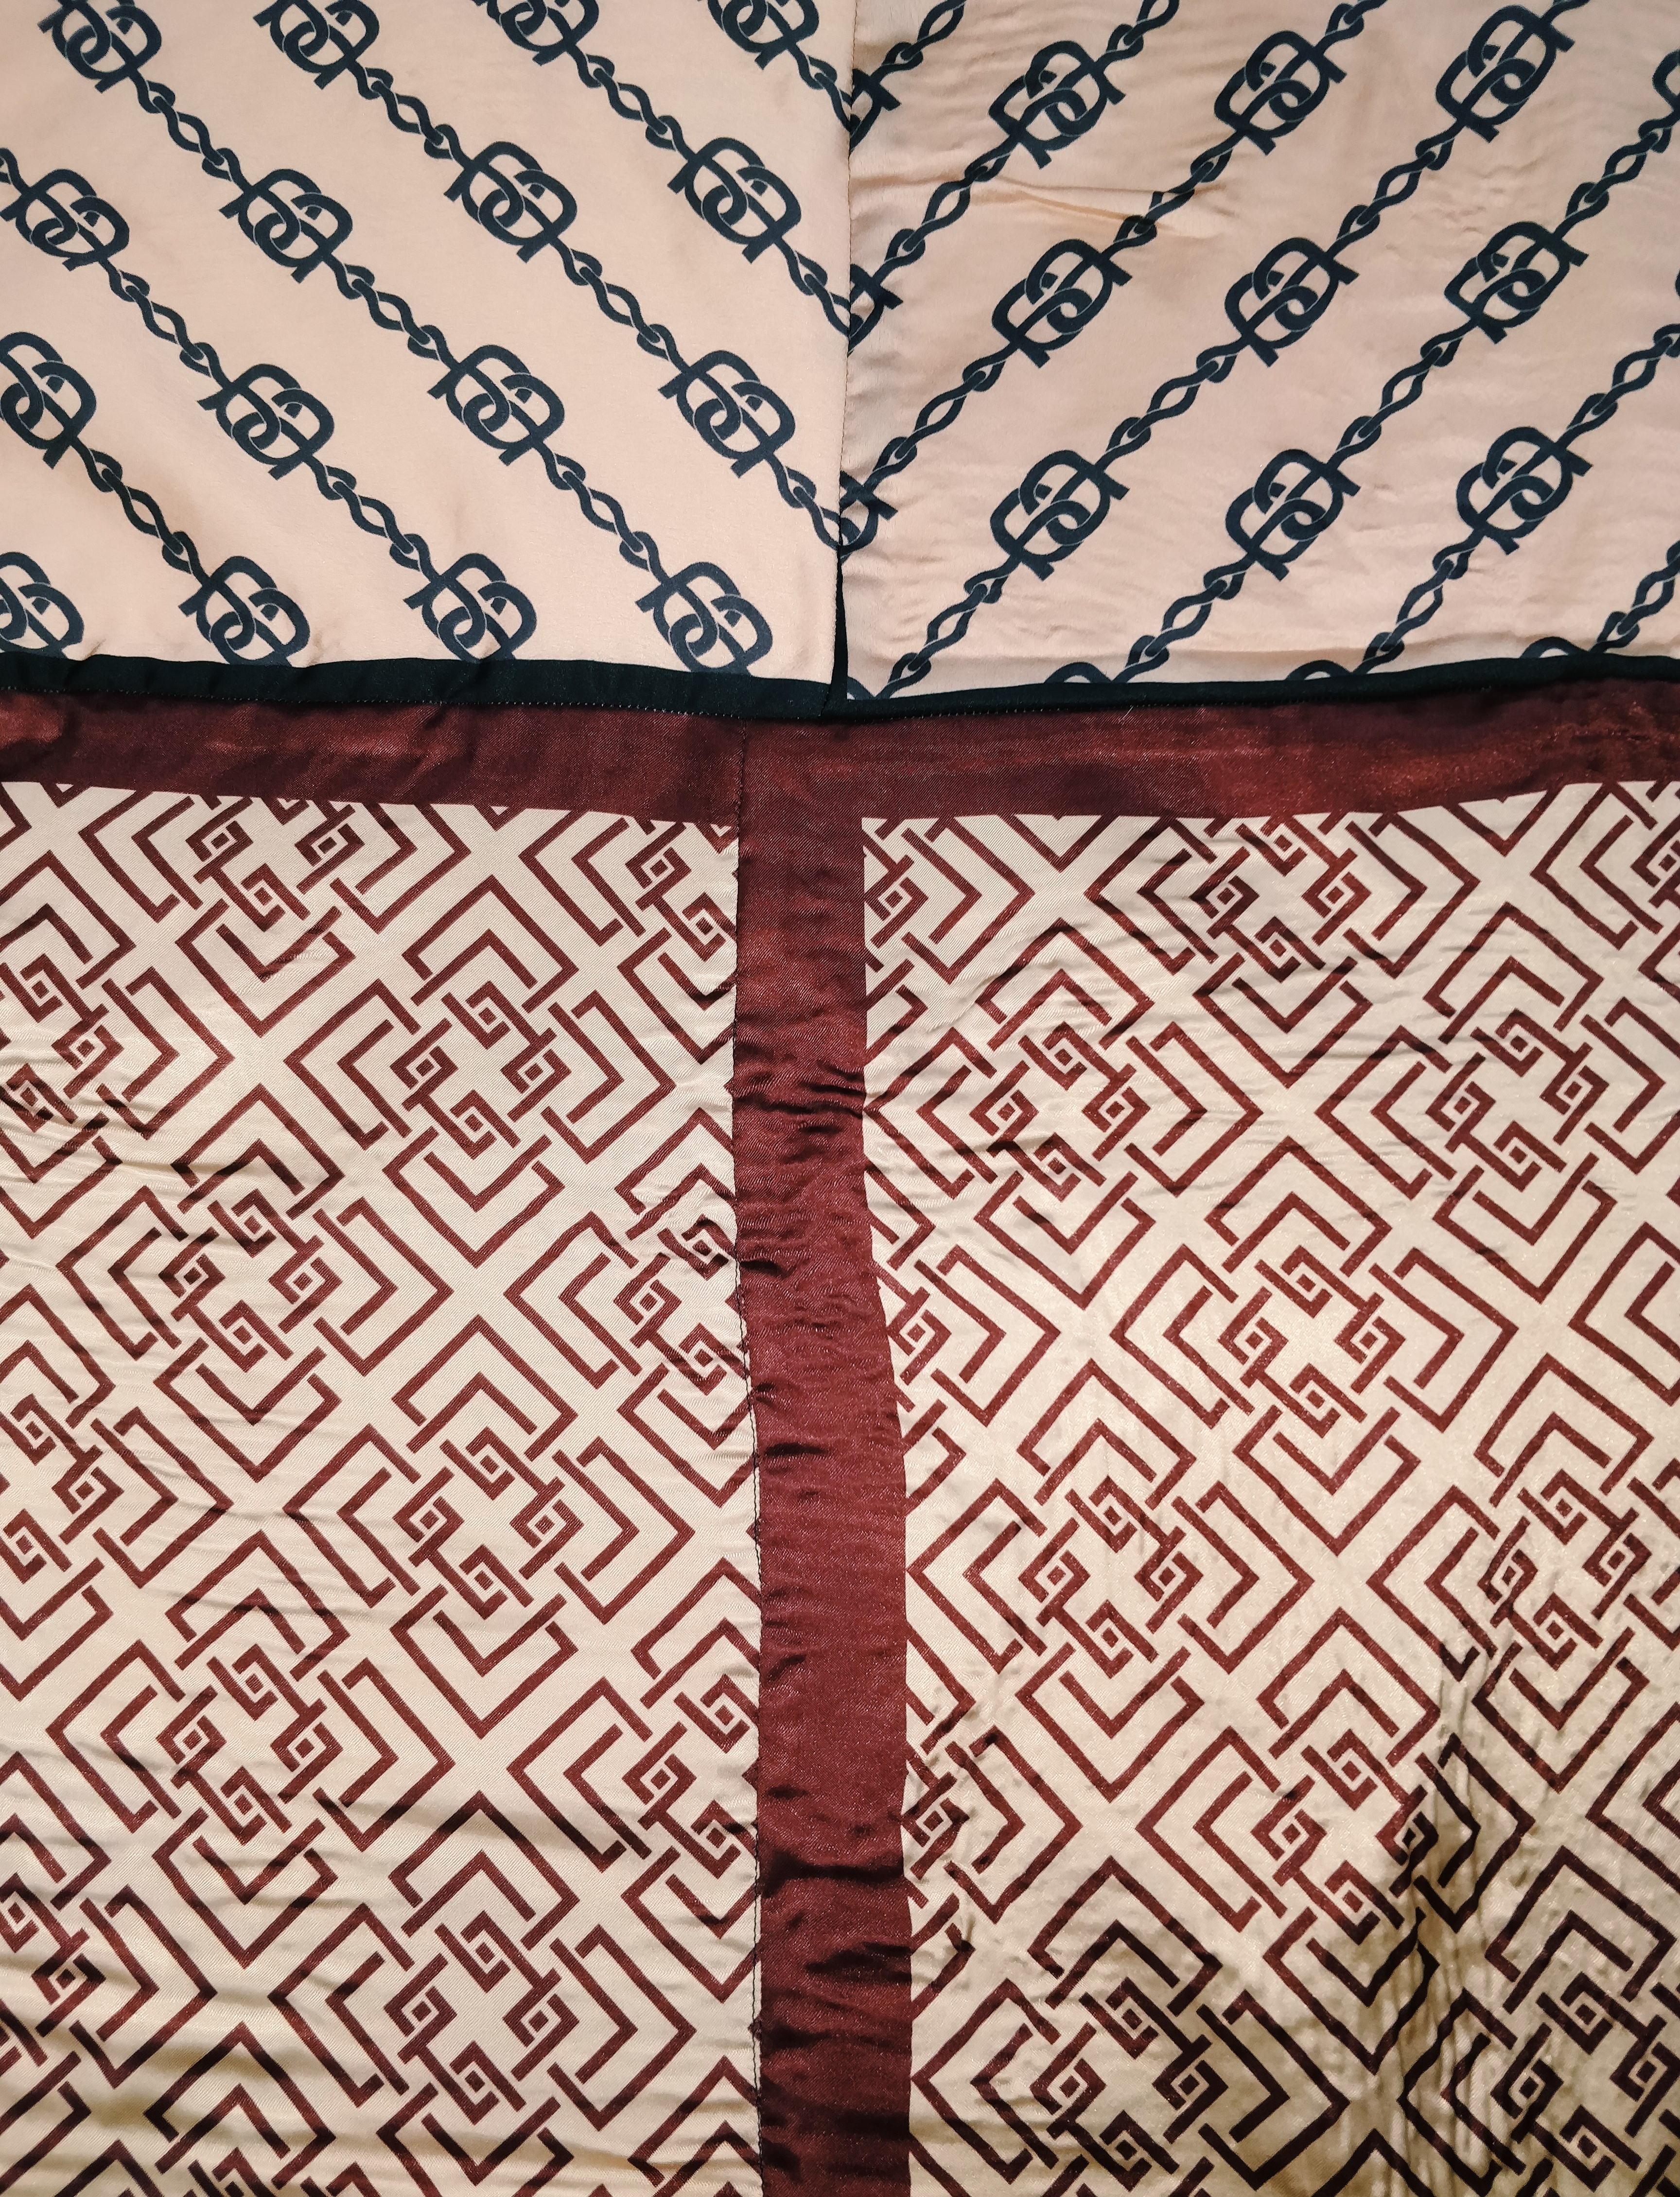
D. Patchwork completed with fused interfacing (Front on detail) 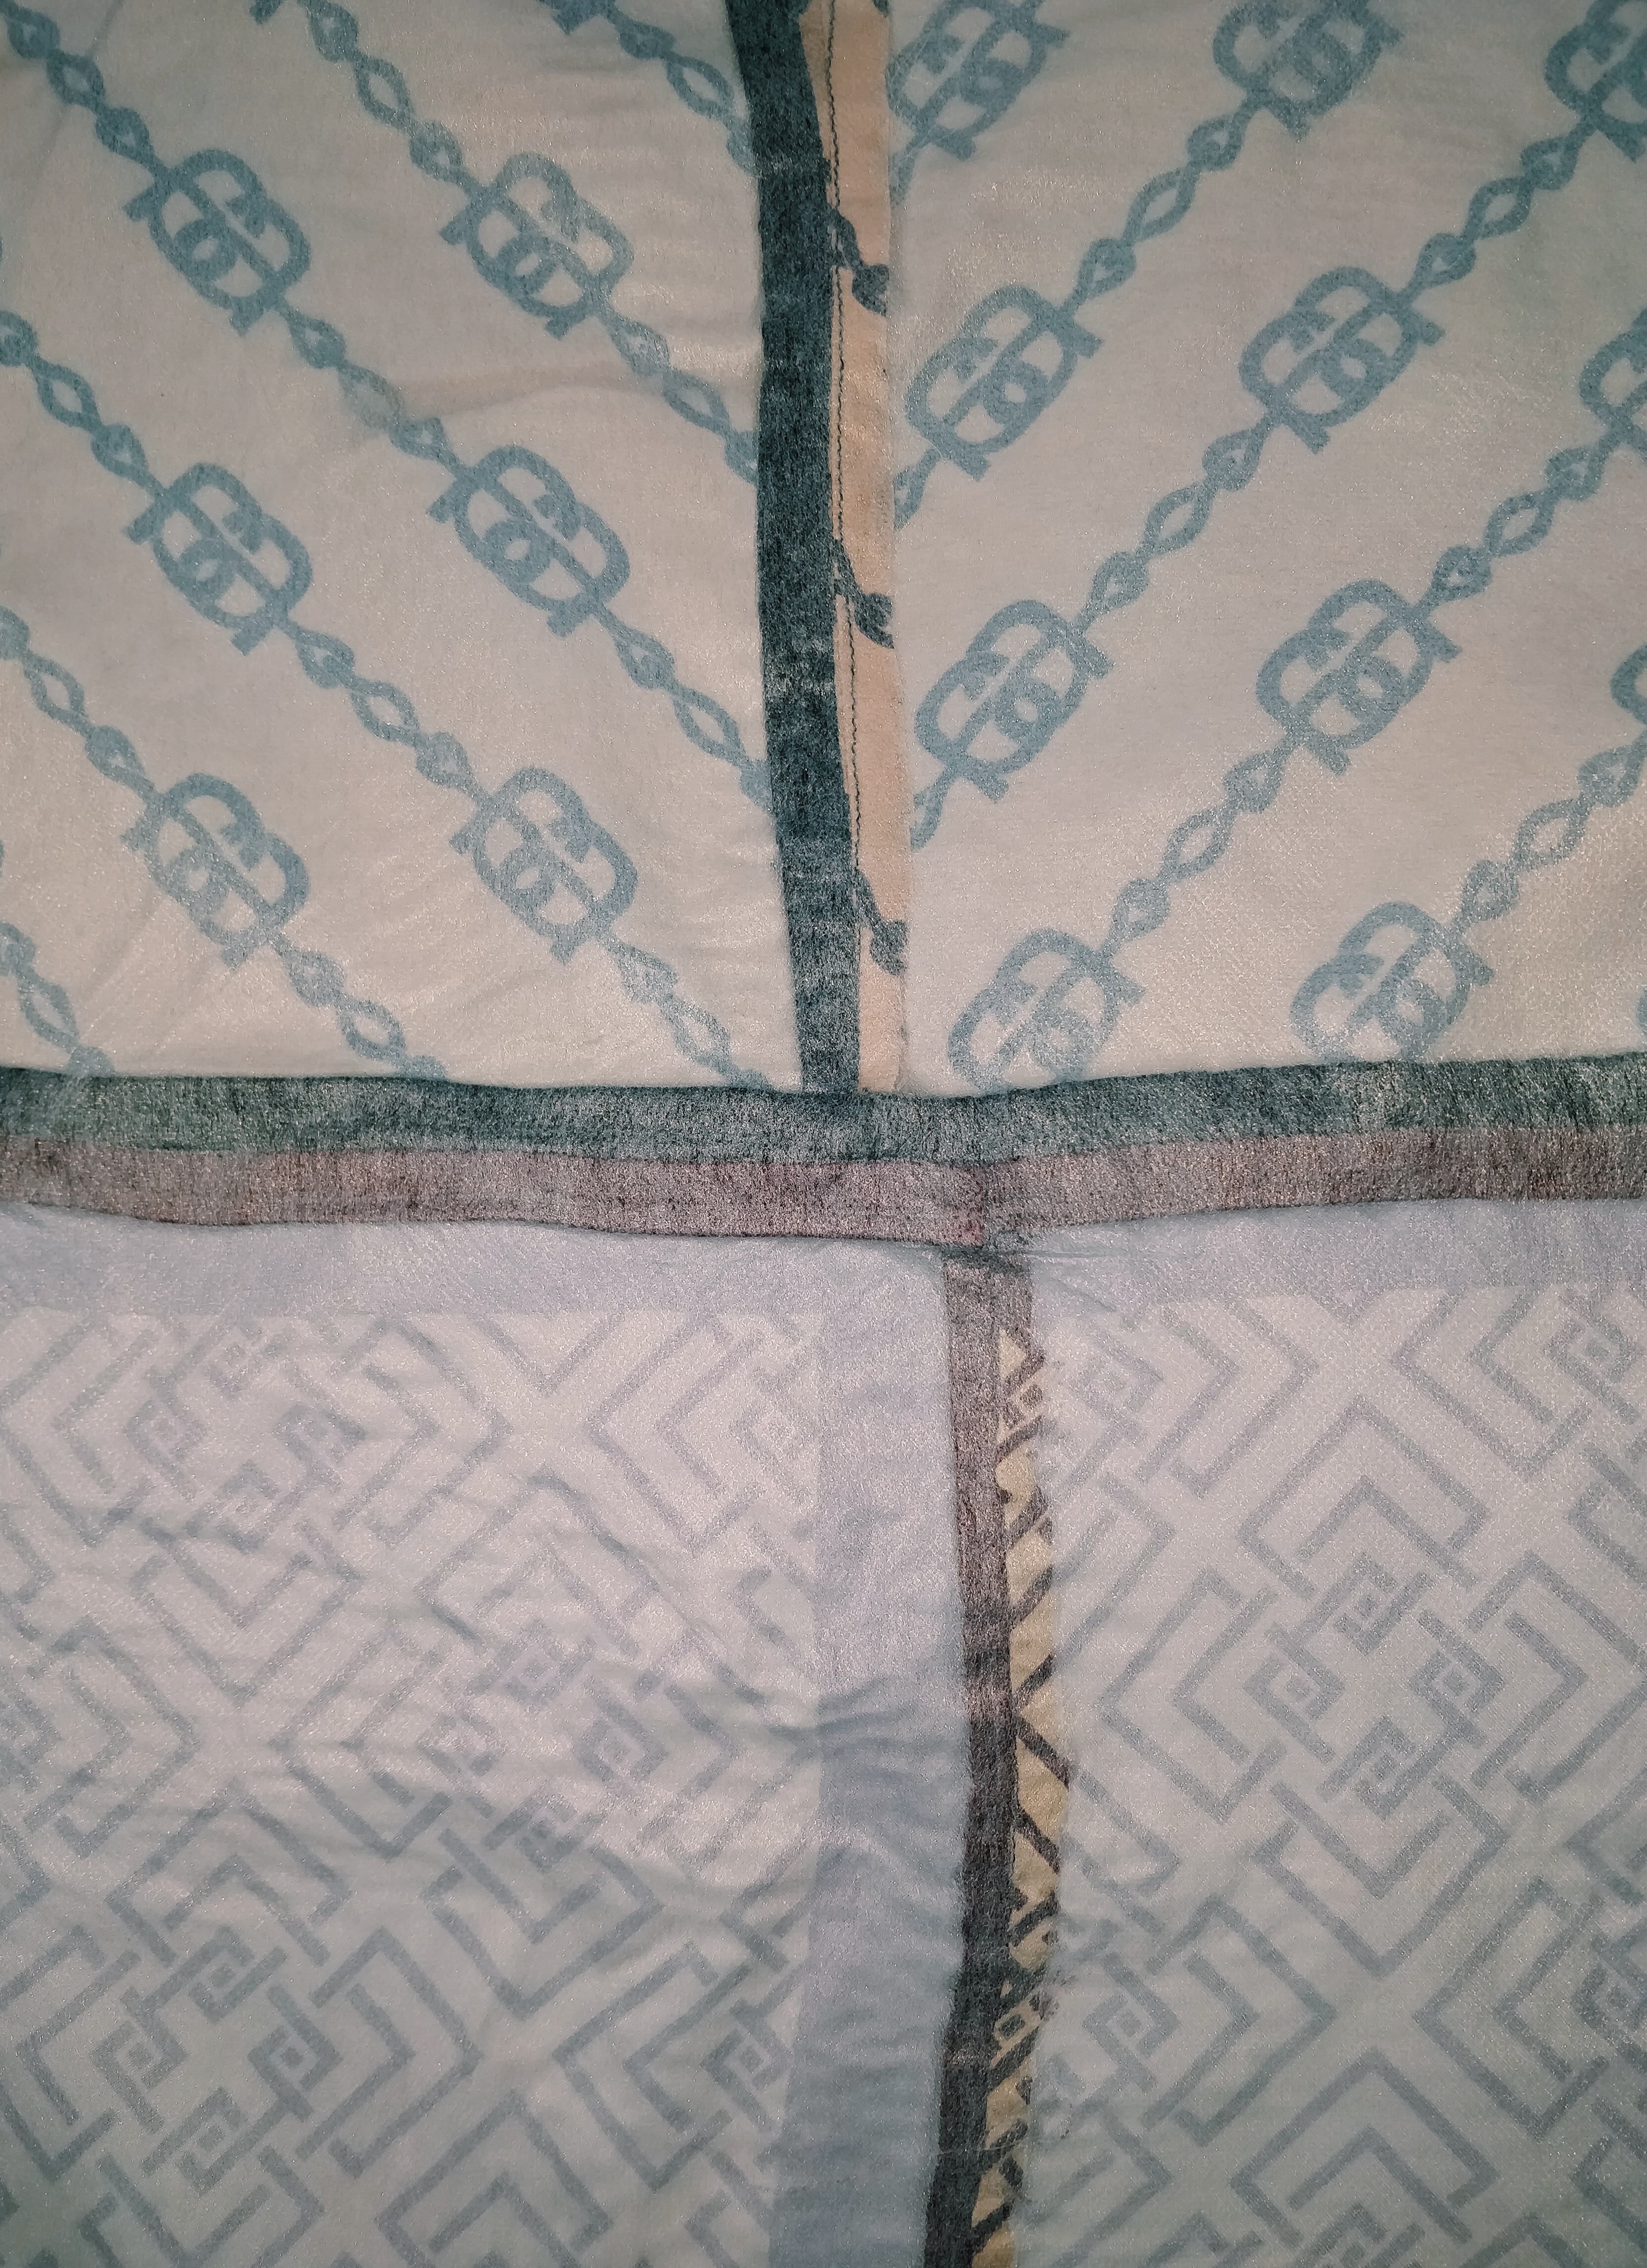
E. Patchwork completed with fused interfacing (Back on detail)
2. Now, you have to open and press the seams flat on the back of your fabric. Basic, simple and needed -specially because we need them flat in order of the next step to work.
3. This step is probably something you could skip, but I recommend not to. The fusible interfacing will not only make the fabric a bit stronger, but it will also help you secure your seams. Remember this fabric frays a lot and this will help too. The way to attach the fusible interfacing is by puting it over your fabric, then you iron it and it will melt its glue and attach to your fabric. You have to make sure that the side of the interfacing that is not smooth -according to me, it actually is not smooth because it has micro glue bubbles that you melt with the hot iron- goes direct with the wrong side of your fabric.
Note: I have to say that most people -as I understand- cut the pattern on the interfacing and then attach them to every piece of fabric already cut and make them match. In my case, I fused the interfacing on the whole fabric and then cut the pattern. Yes, you may waste a bit of interfacing, but I don’t think that it was that much and it was easier to me.
Advice for step 3:
- Take care with the hot iron and your fabric, however, you need the iron pretty hot so the glue melts and attach to your material, so test it.
- Start ironing directly over the seams or in the center of the fabric, that will stabilize the interfacing and help you get a better result.
- Iron this over a smooth surface, like a table. I didn’t do this -I did in on my carpet- and my fabric ended up having a lot of air bubbles. However, I liked the effect and kept going this way.
Note: As you can see in my patchwork piece and my finished shorts, the graphics and seams didn’t end up matching everywhere. I have to say that I could have try to make them match better, however, that was not my priority for this project and I like the look I got. However, if your priority is making every line match, go for it.
After this step, your patchwork is ready and your pattern is ready too. Here we are getting closer to the goal.
III. CUT THE PIECES OF FABRIC YOU NEED TO BUILD THE SHORTS
Now that we finally have our fabric ready, we are going cut it again. Here is what we need to do:
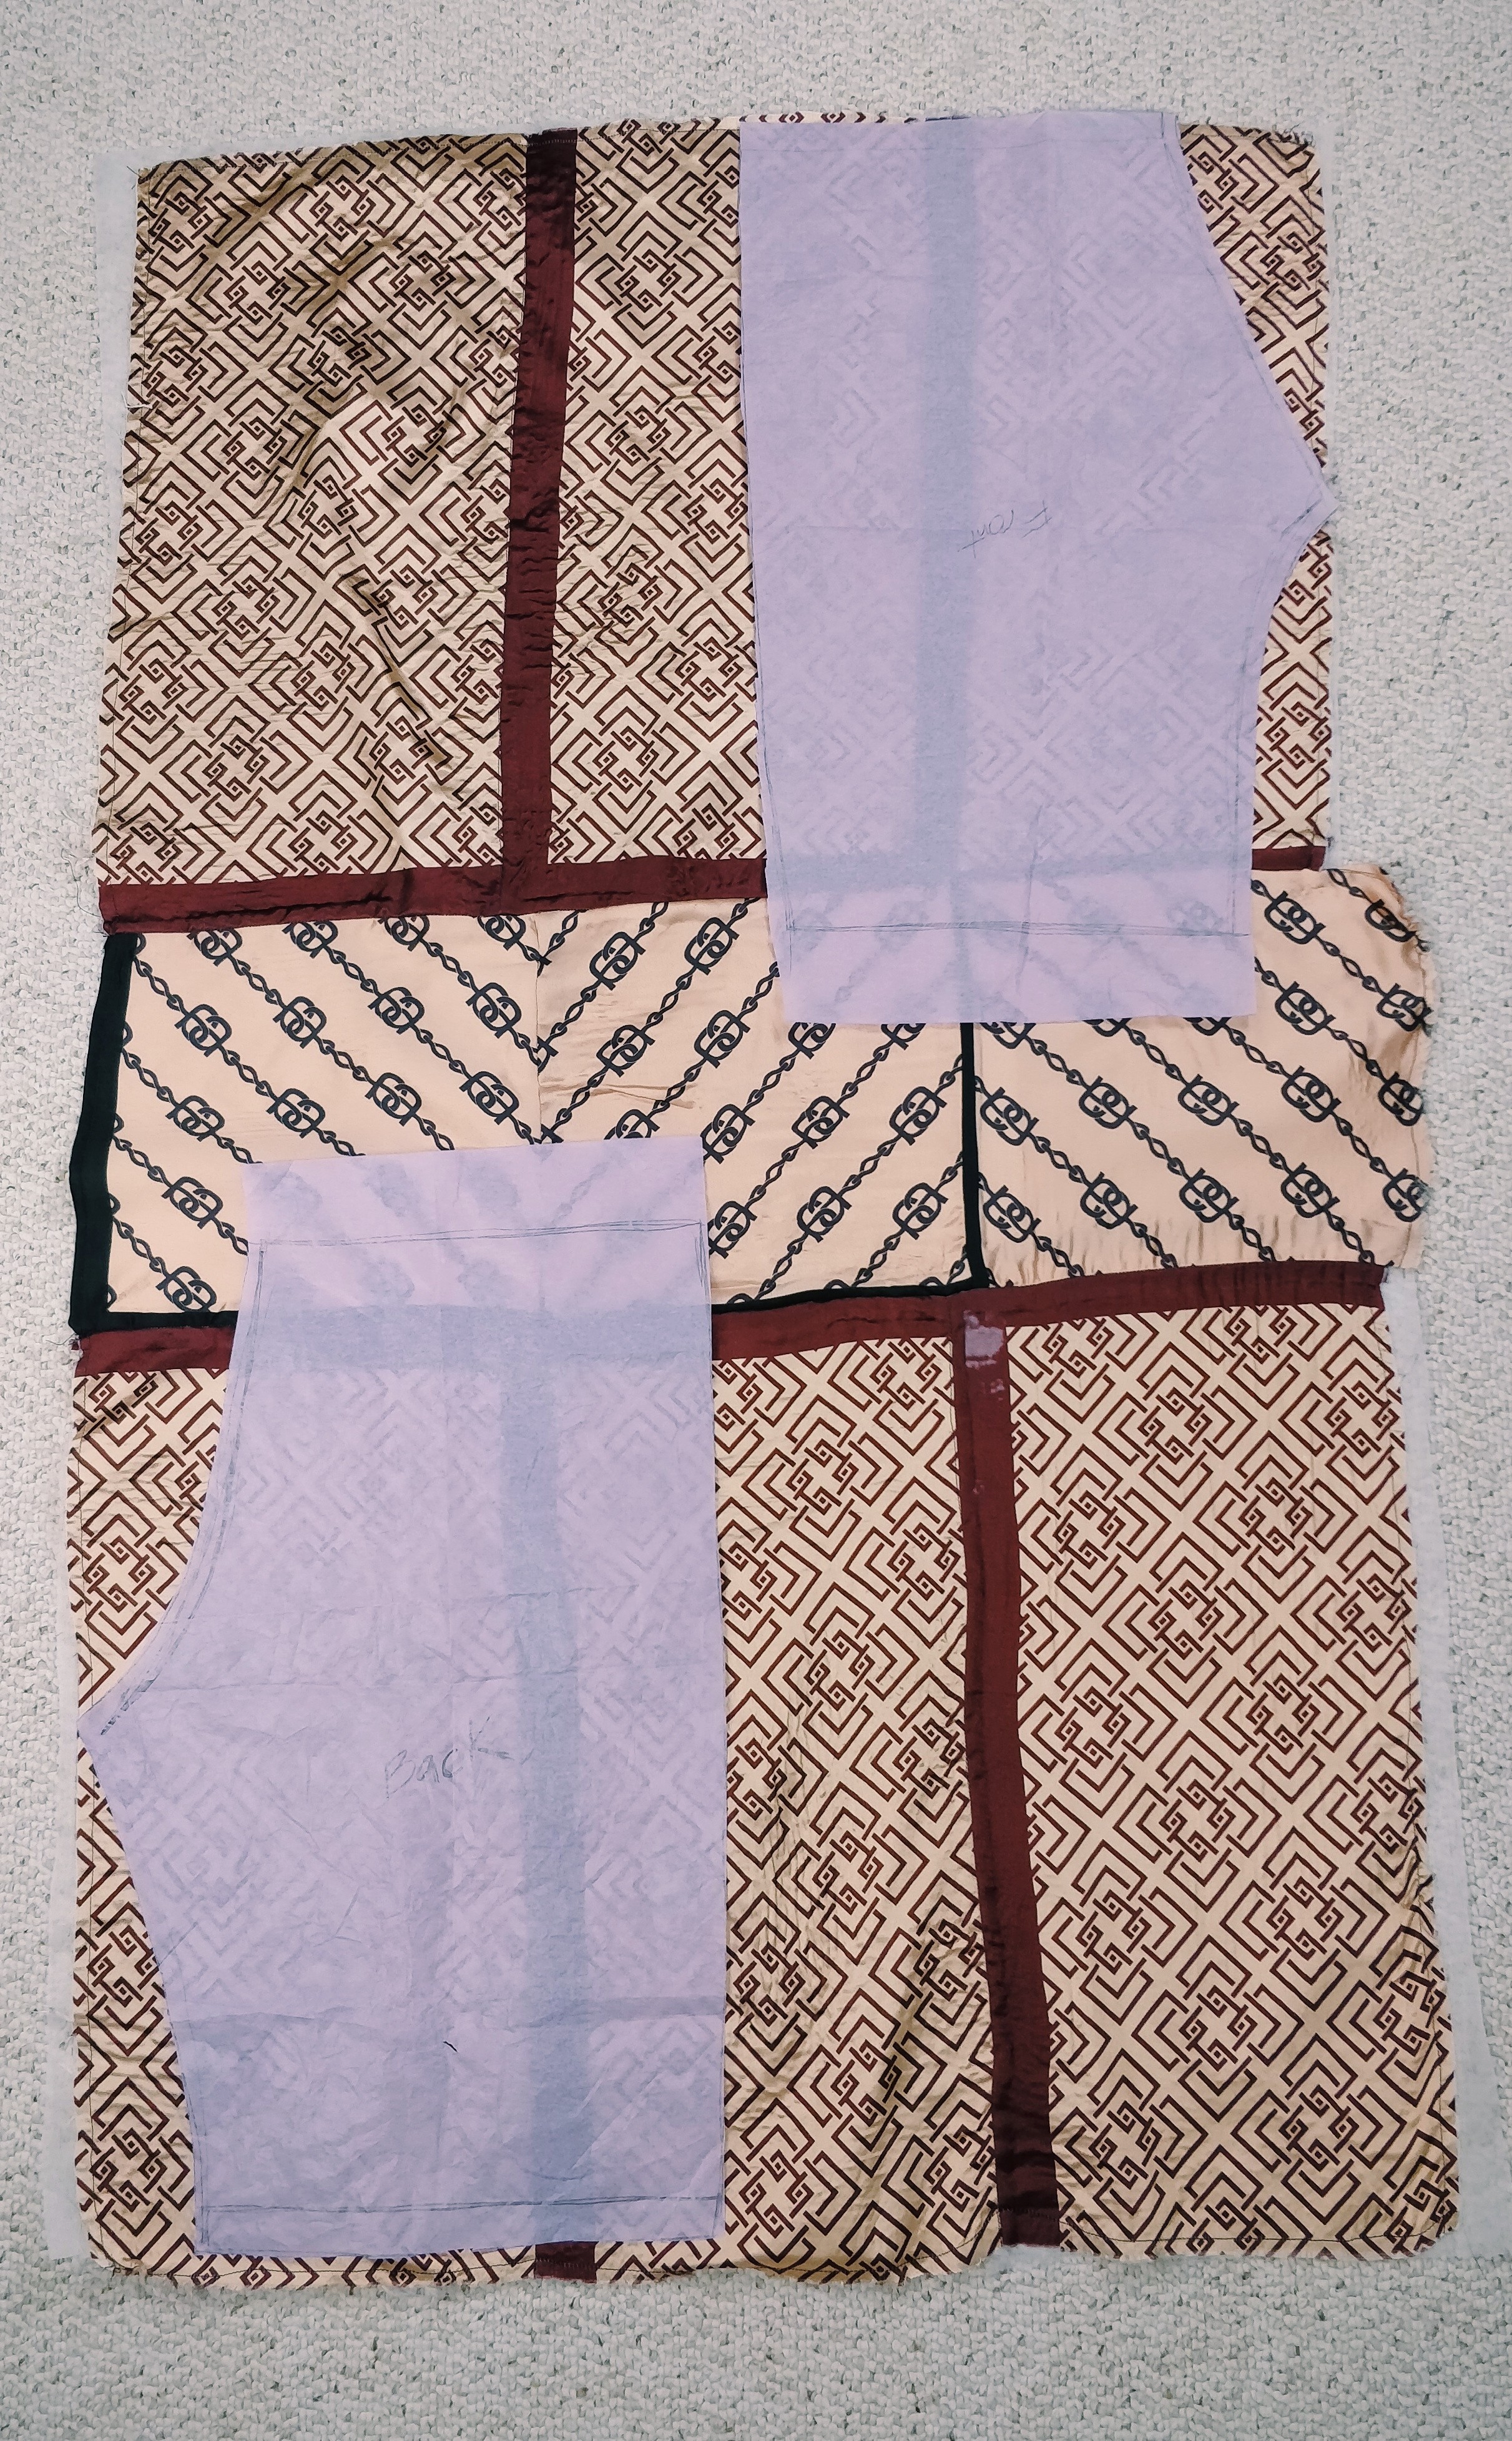
F. Place the pattern 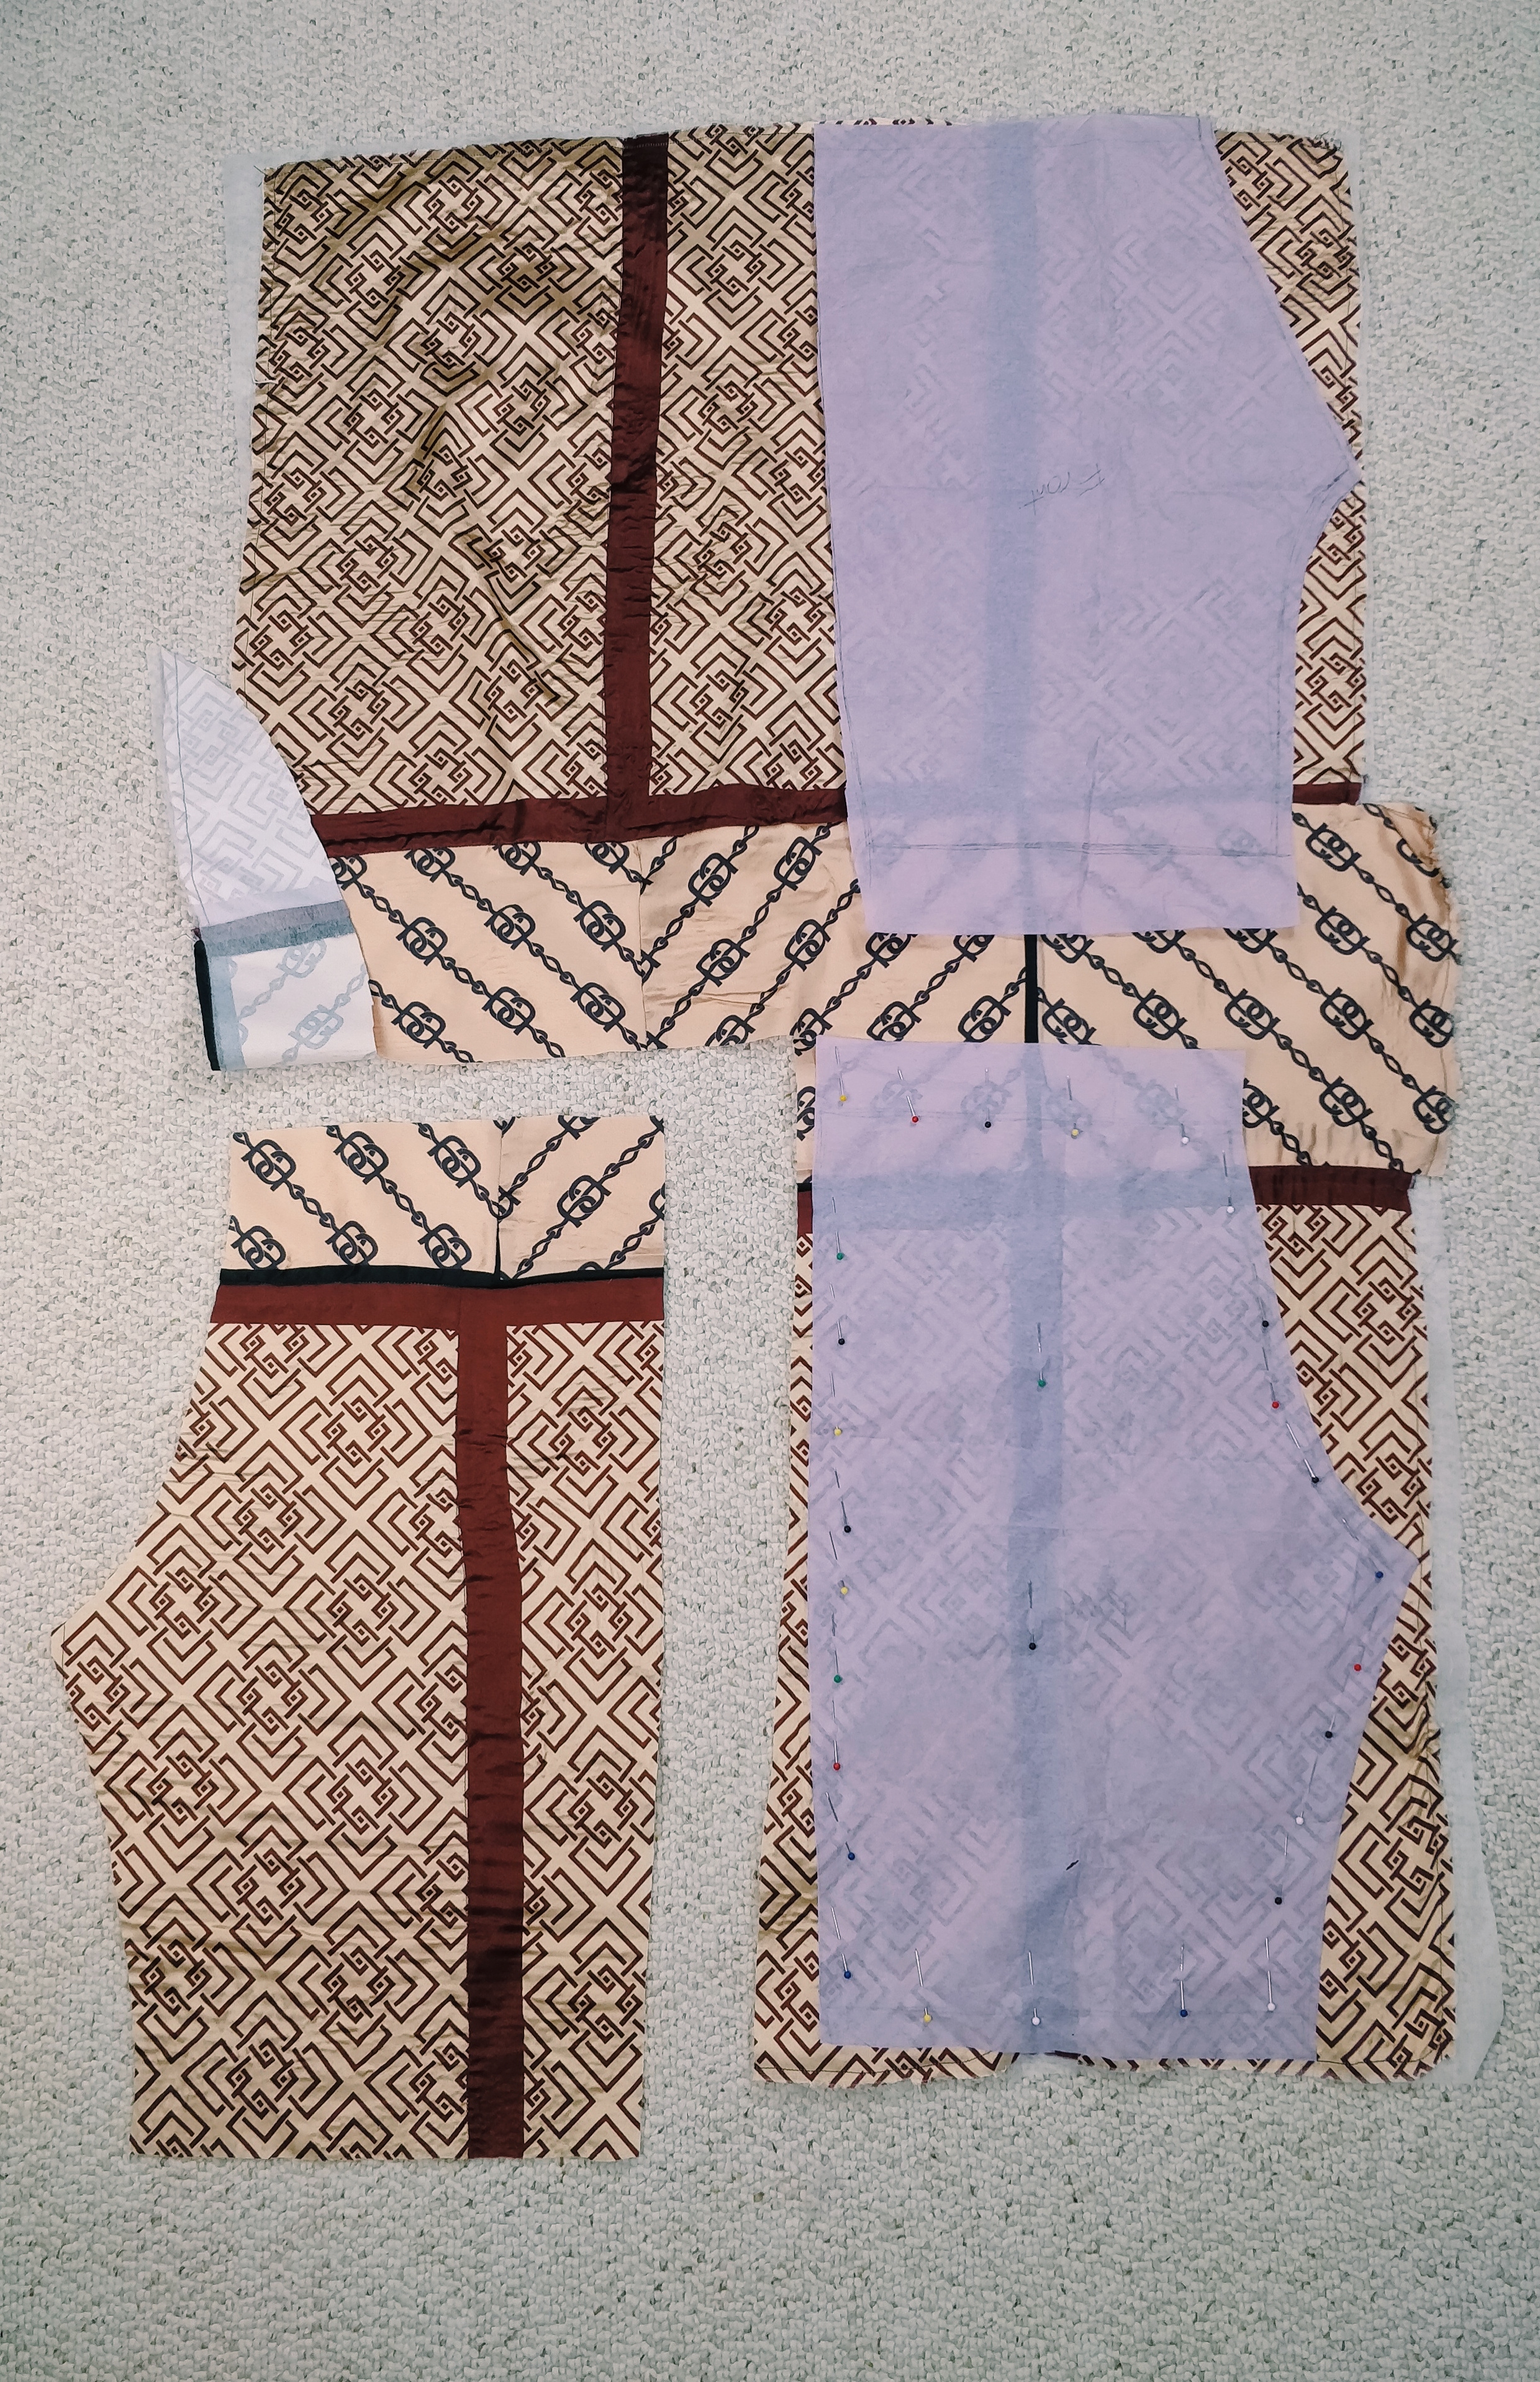
G. Cut the pieces
- (See picture F) Place the pattern over your fabric. Here, I was not sure yet what I was going to do, but I ended up going for the placement that made the most sense. In here, you have to take the decision of your own project. Only remember that you need enough space for 2 backs sides of pants and 2 fronts. Note: I cut the pockets from the extra panels I didn’t use from both scarves.
- (See picture G) Strategically pin the pattern pieces on the fabric and cut. Also cut the pieces of the lining.
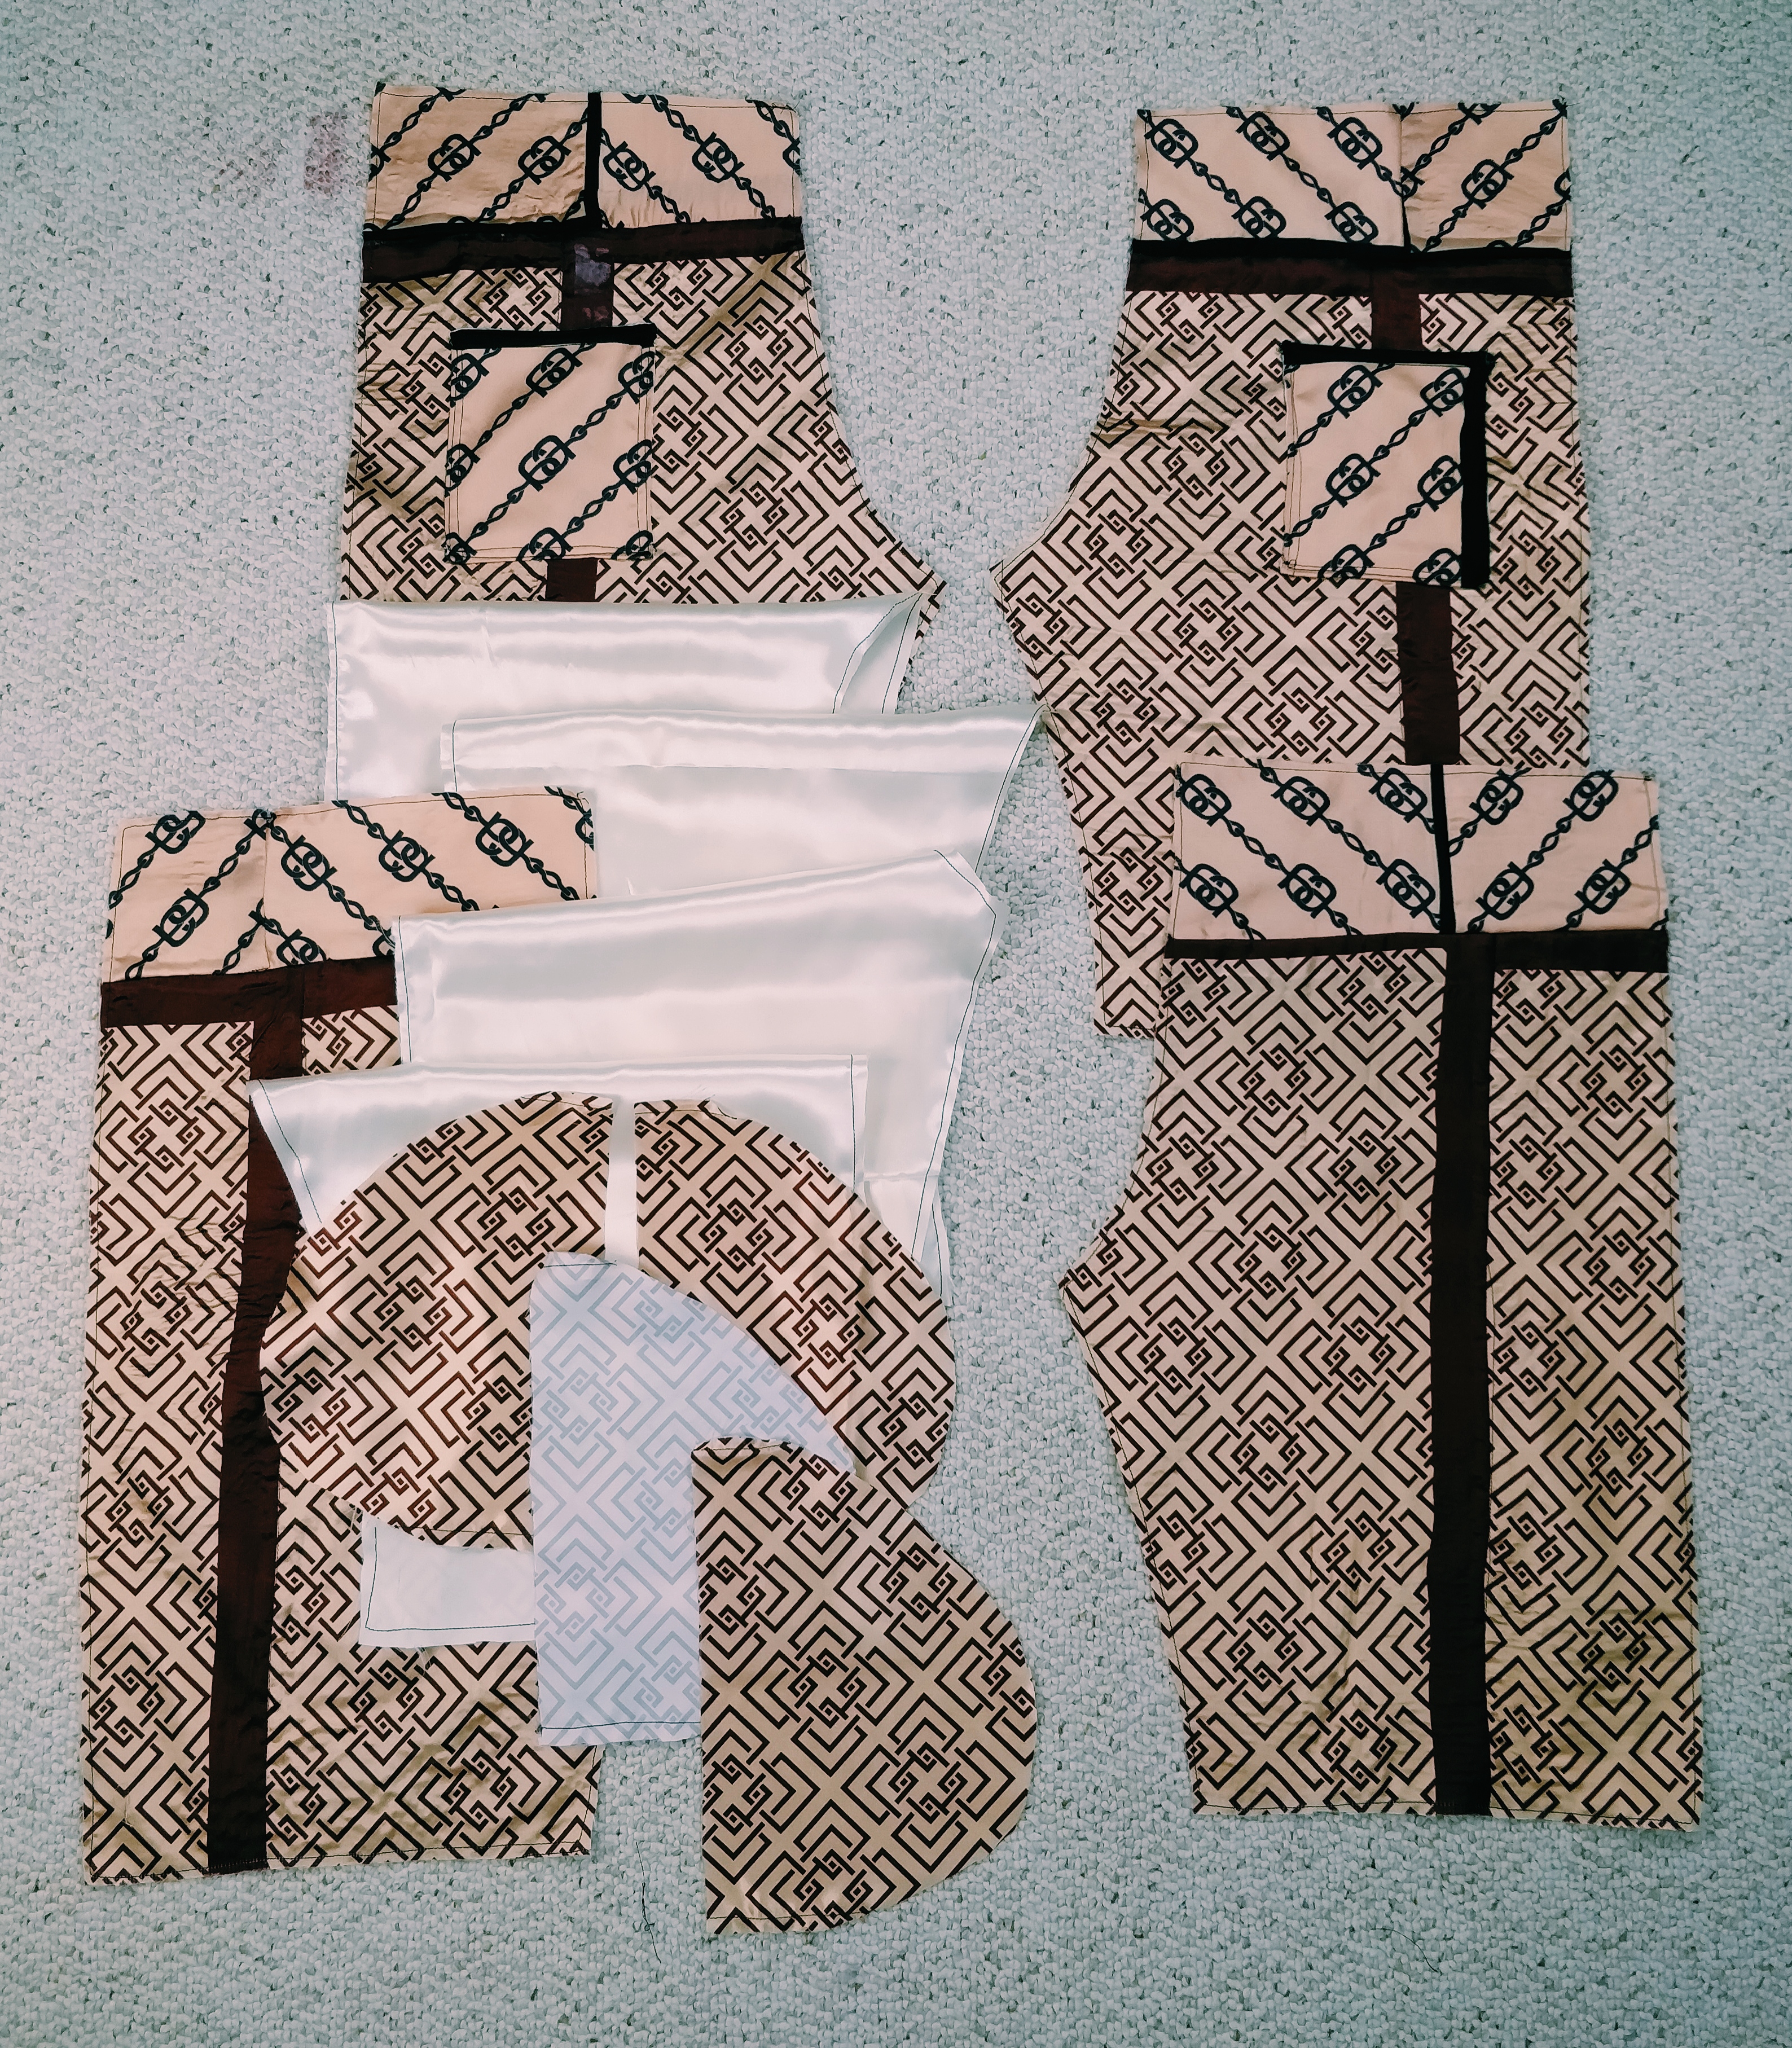
At the end of this section you need to have all of these pieces:
From the patchwork piece -or anything you are using as your front fabric:
- 2 front sides of the shorts, opposite directions
- Also, 2 back side of the shorts, opposite directions
- And, 2 back pockets
- And then, 4 side pockets -2 pairs in opposite directions.
From the lining
- 2 front sides of the shorts, opposite directions
- Also, 2 back side of the shorts, opposite directions
- And, 2 back pockets -the back pockets of the shorts have lining.
So, in total, 16 pieces. When you have them all, go the next section
IV. CONSTRUCTION
We finally have our pieces of fabric ready, let’s build the shorts in 6 steps:
Note: Before starting with this steps you should already have the back pockets with the lining and attached to each of the back sides of the shorts which were cut in the patchwork or your front fabric. So if you haven’t done that, do it now.

H. Pin and sew together the side seams 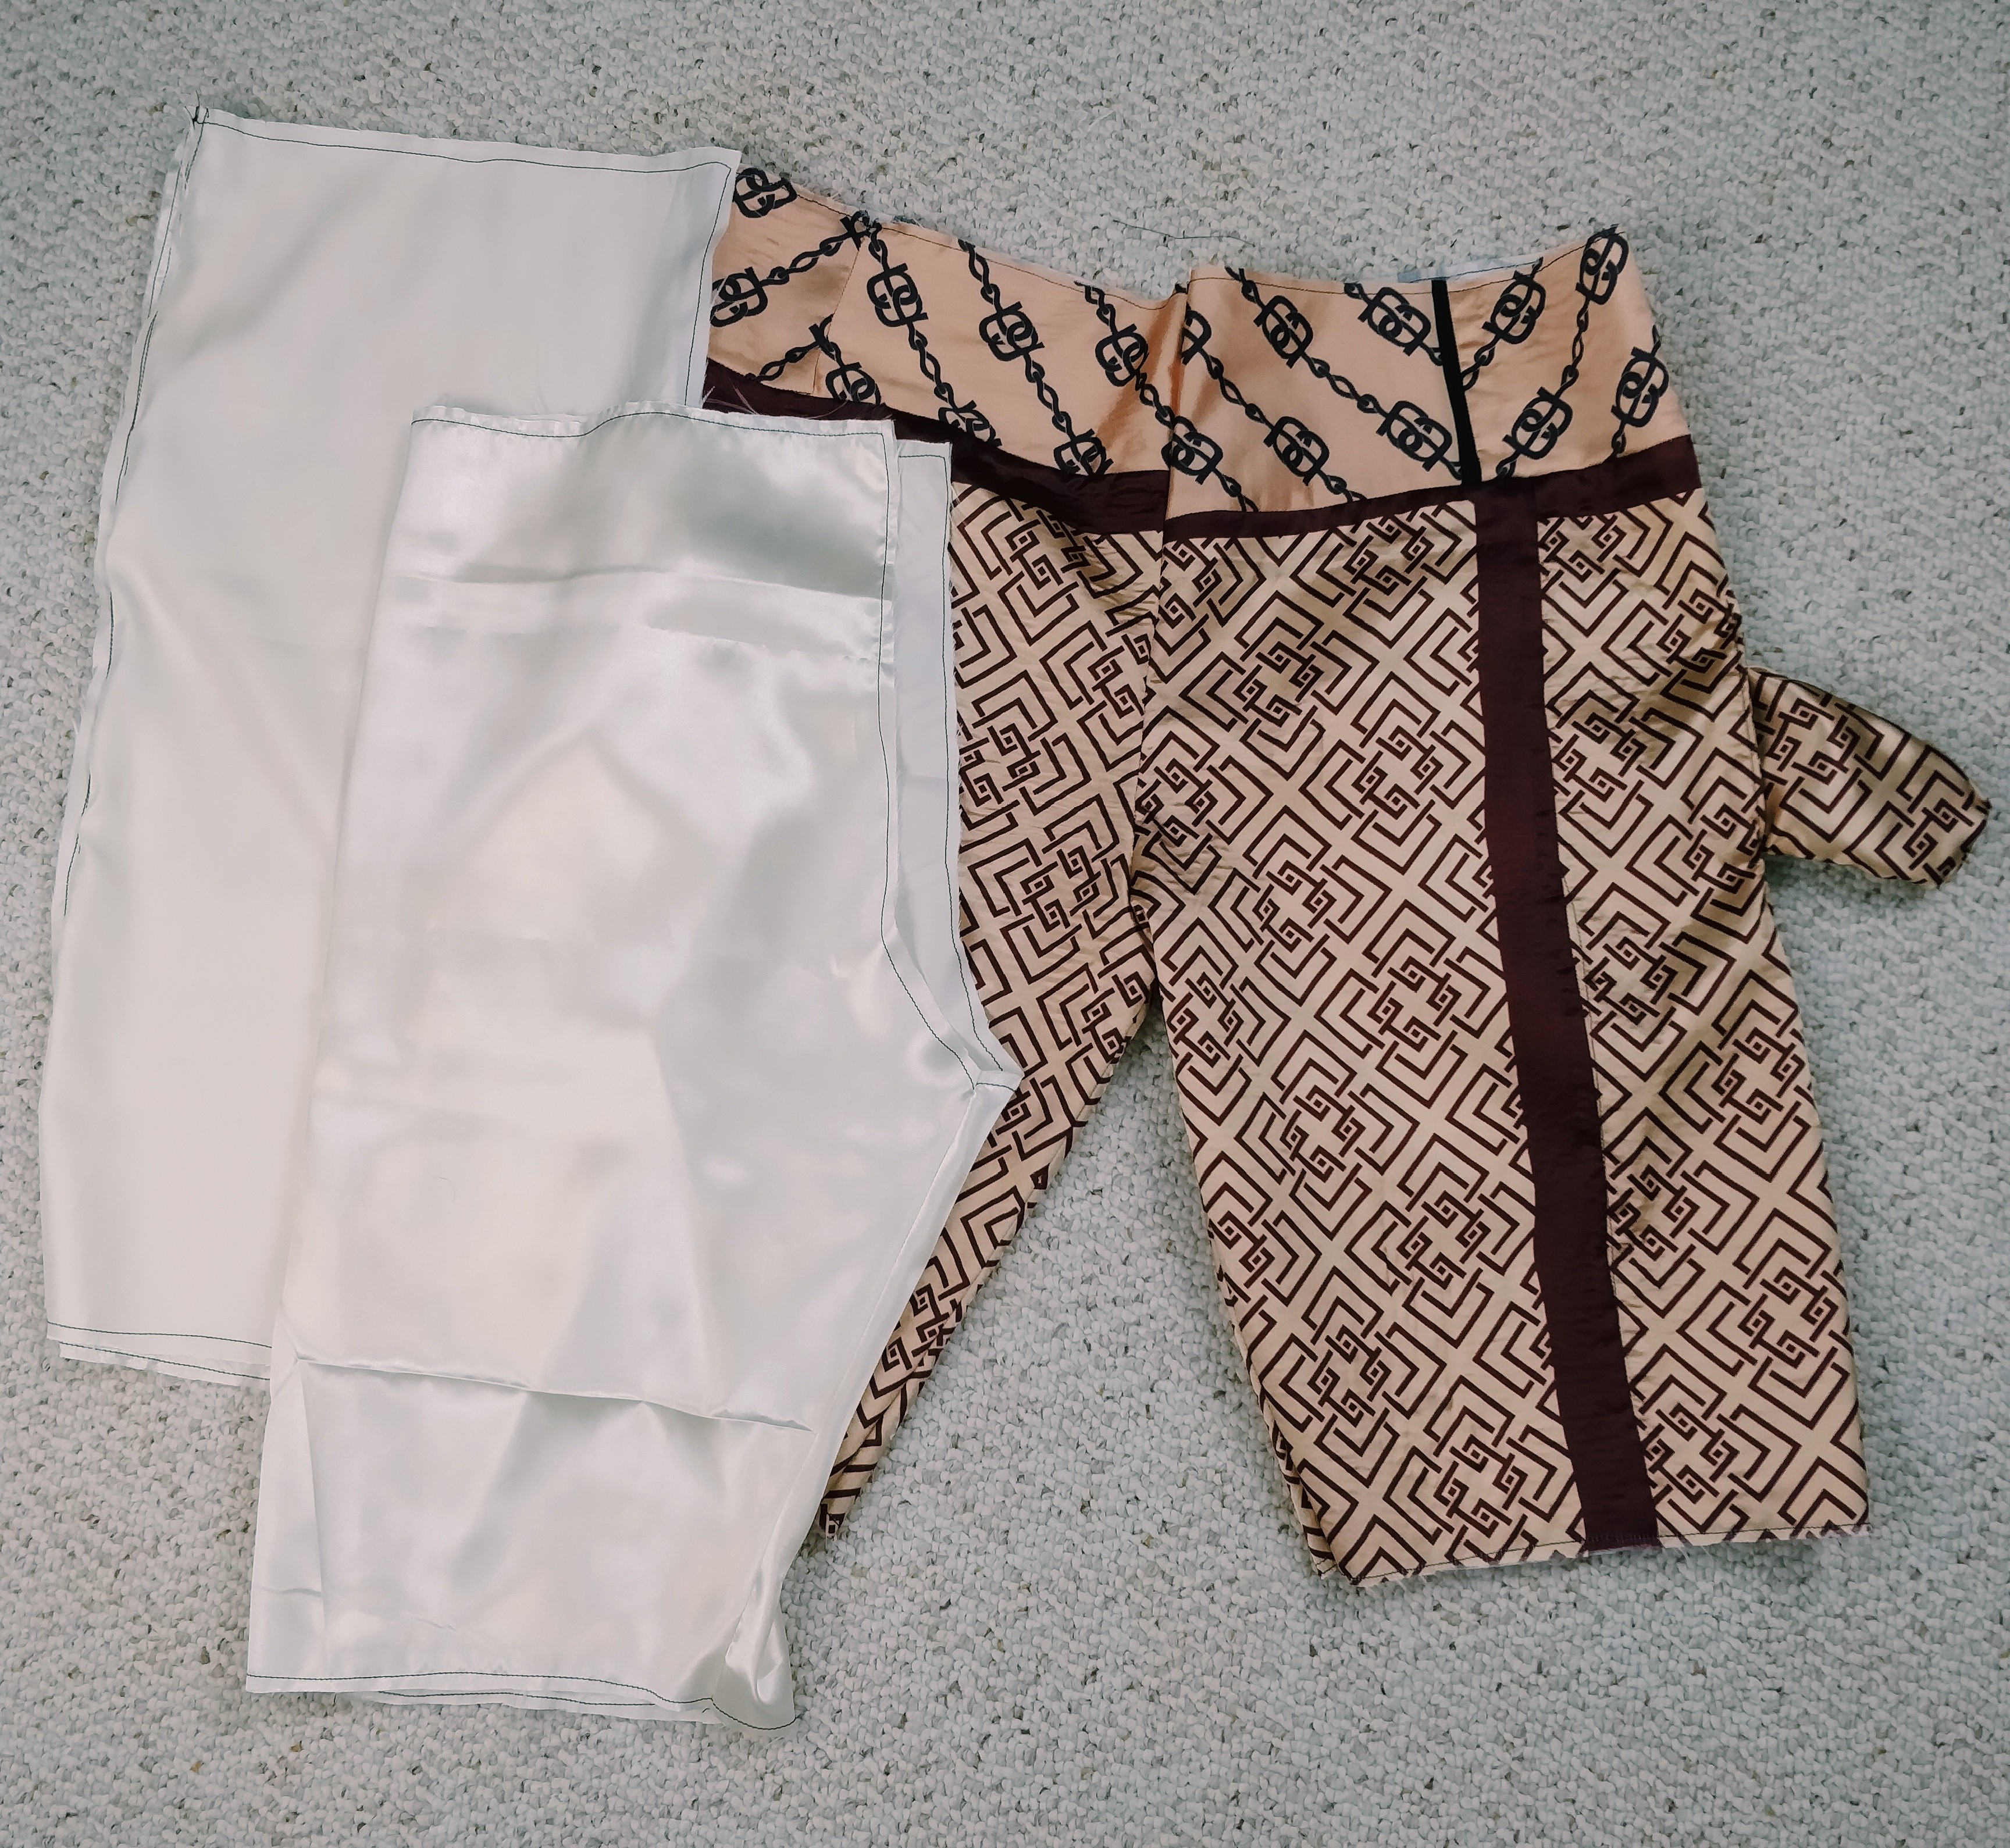
I. Connect the legs -only on patchwork 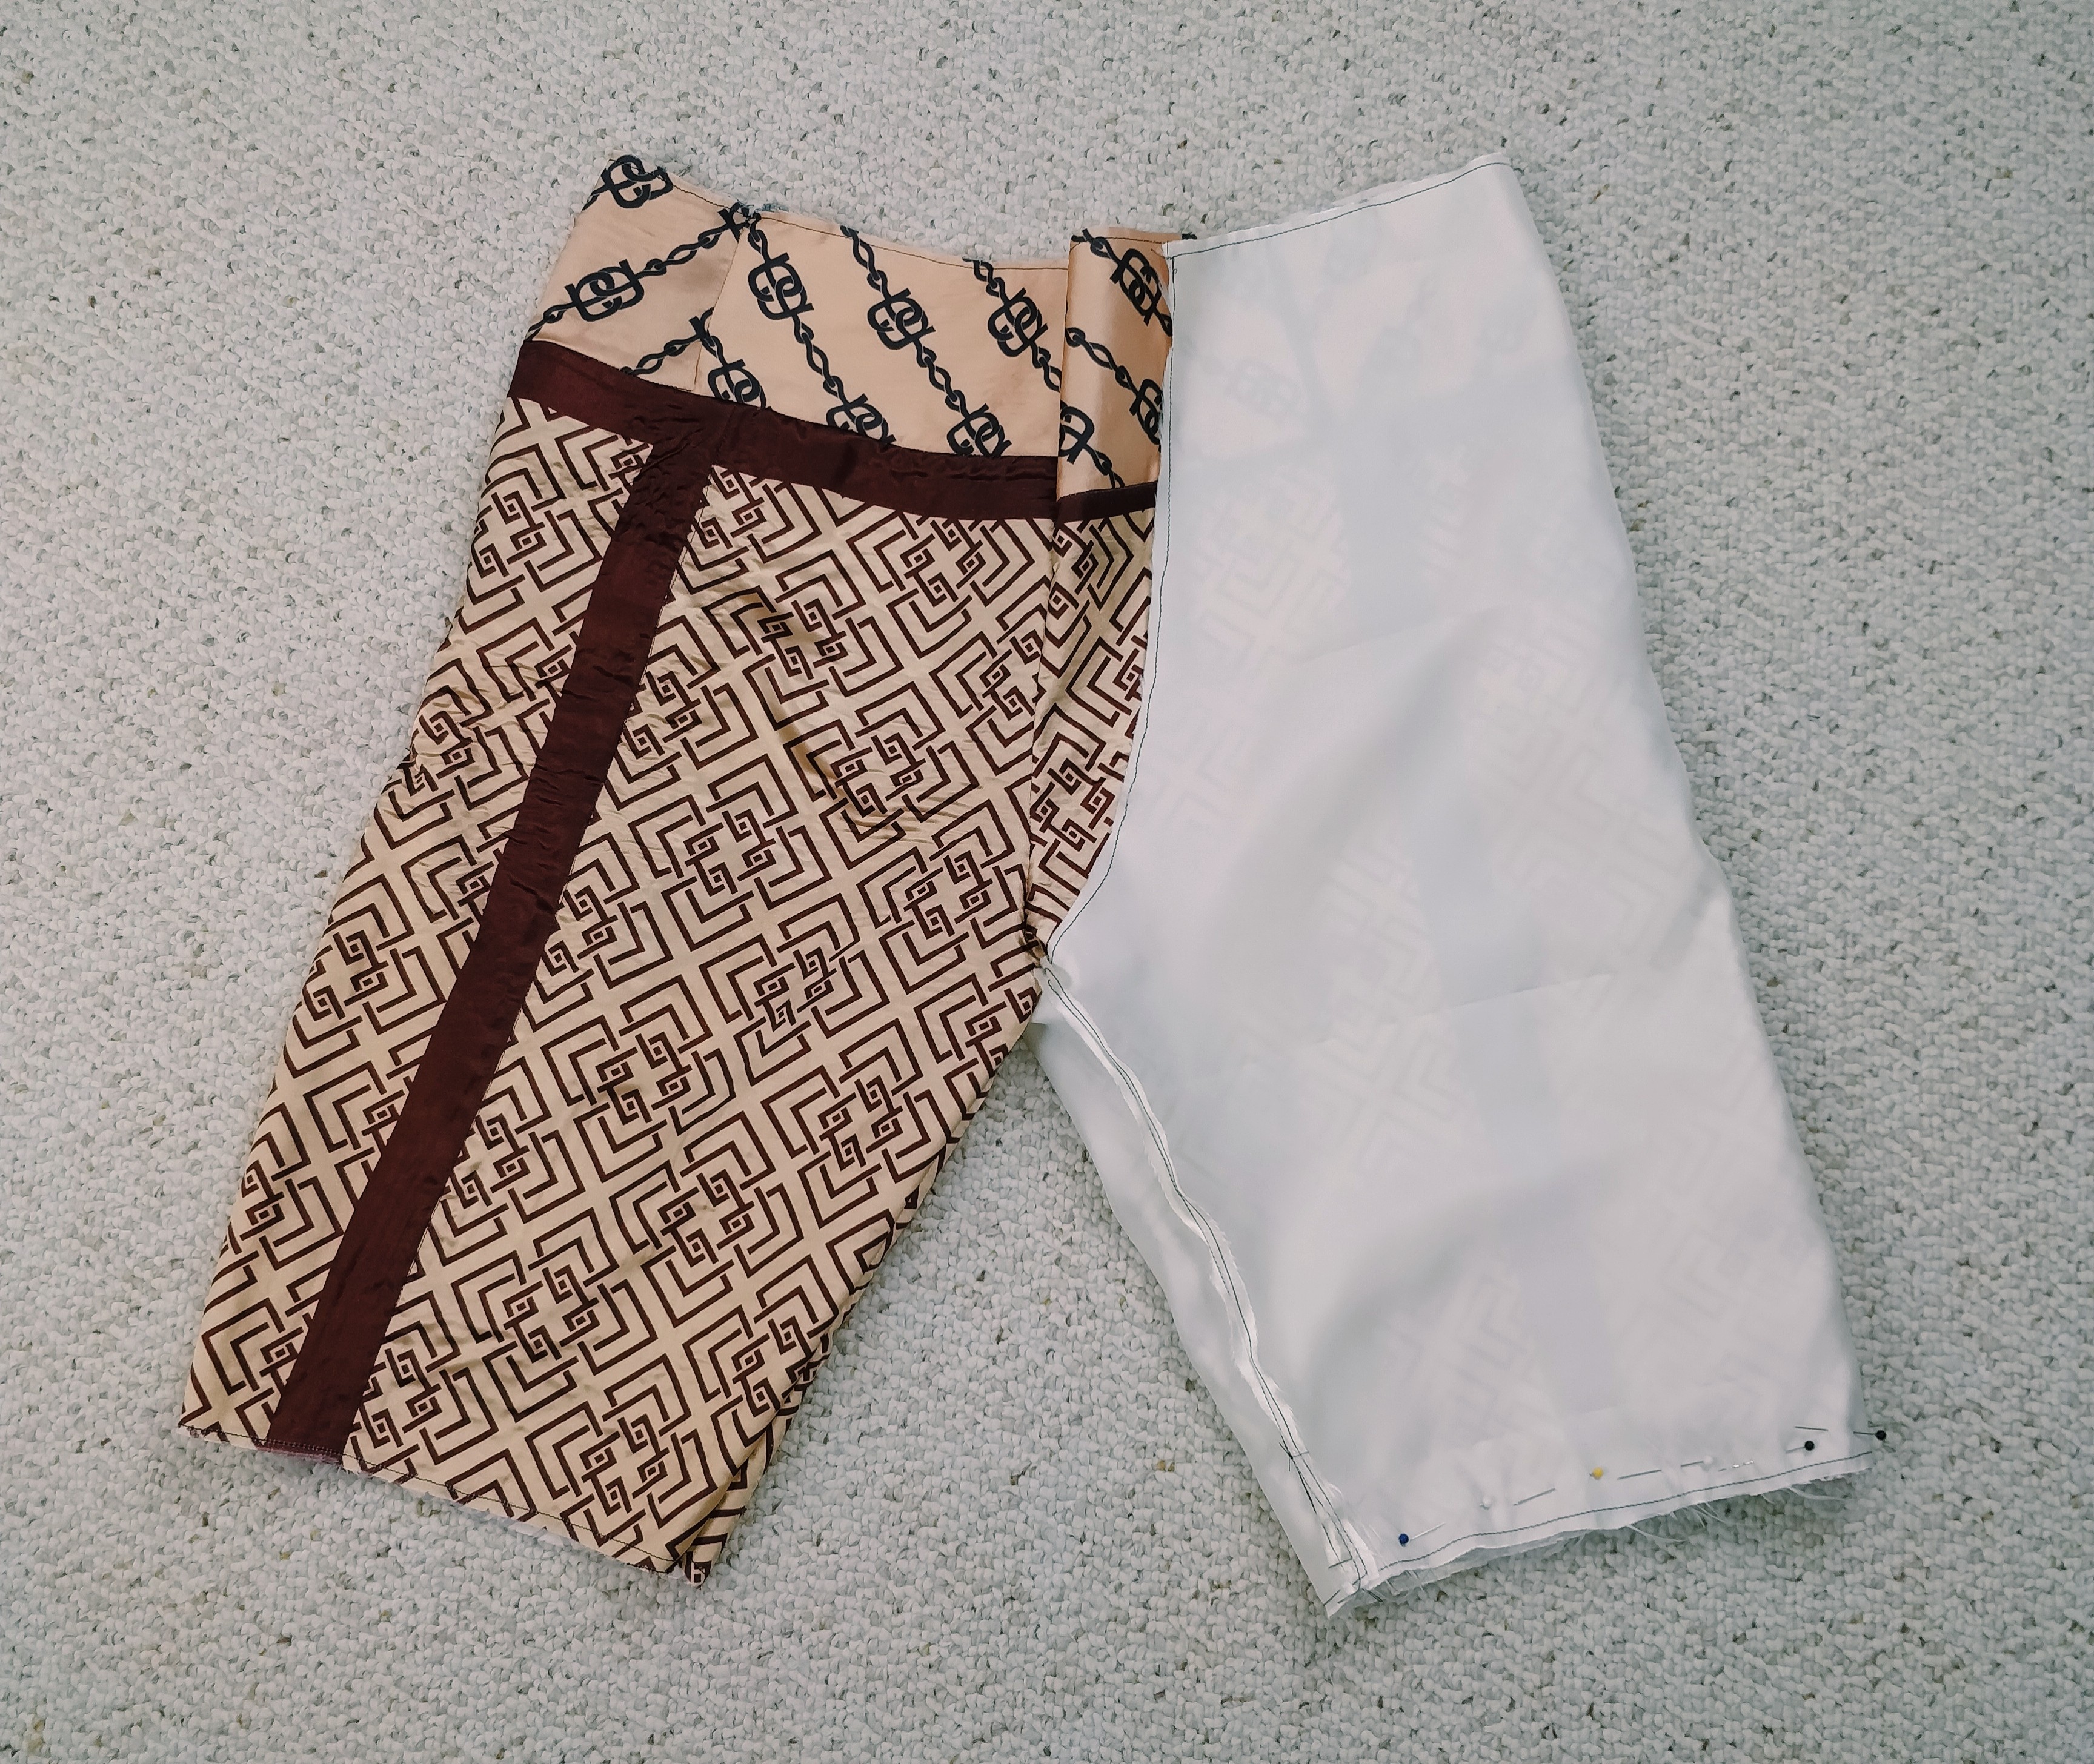
J. Sew the hems together 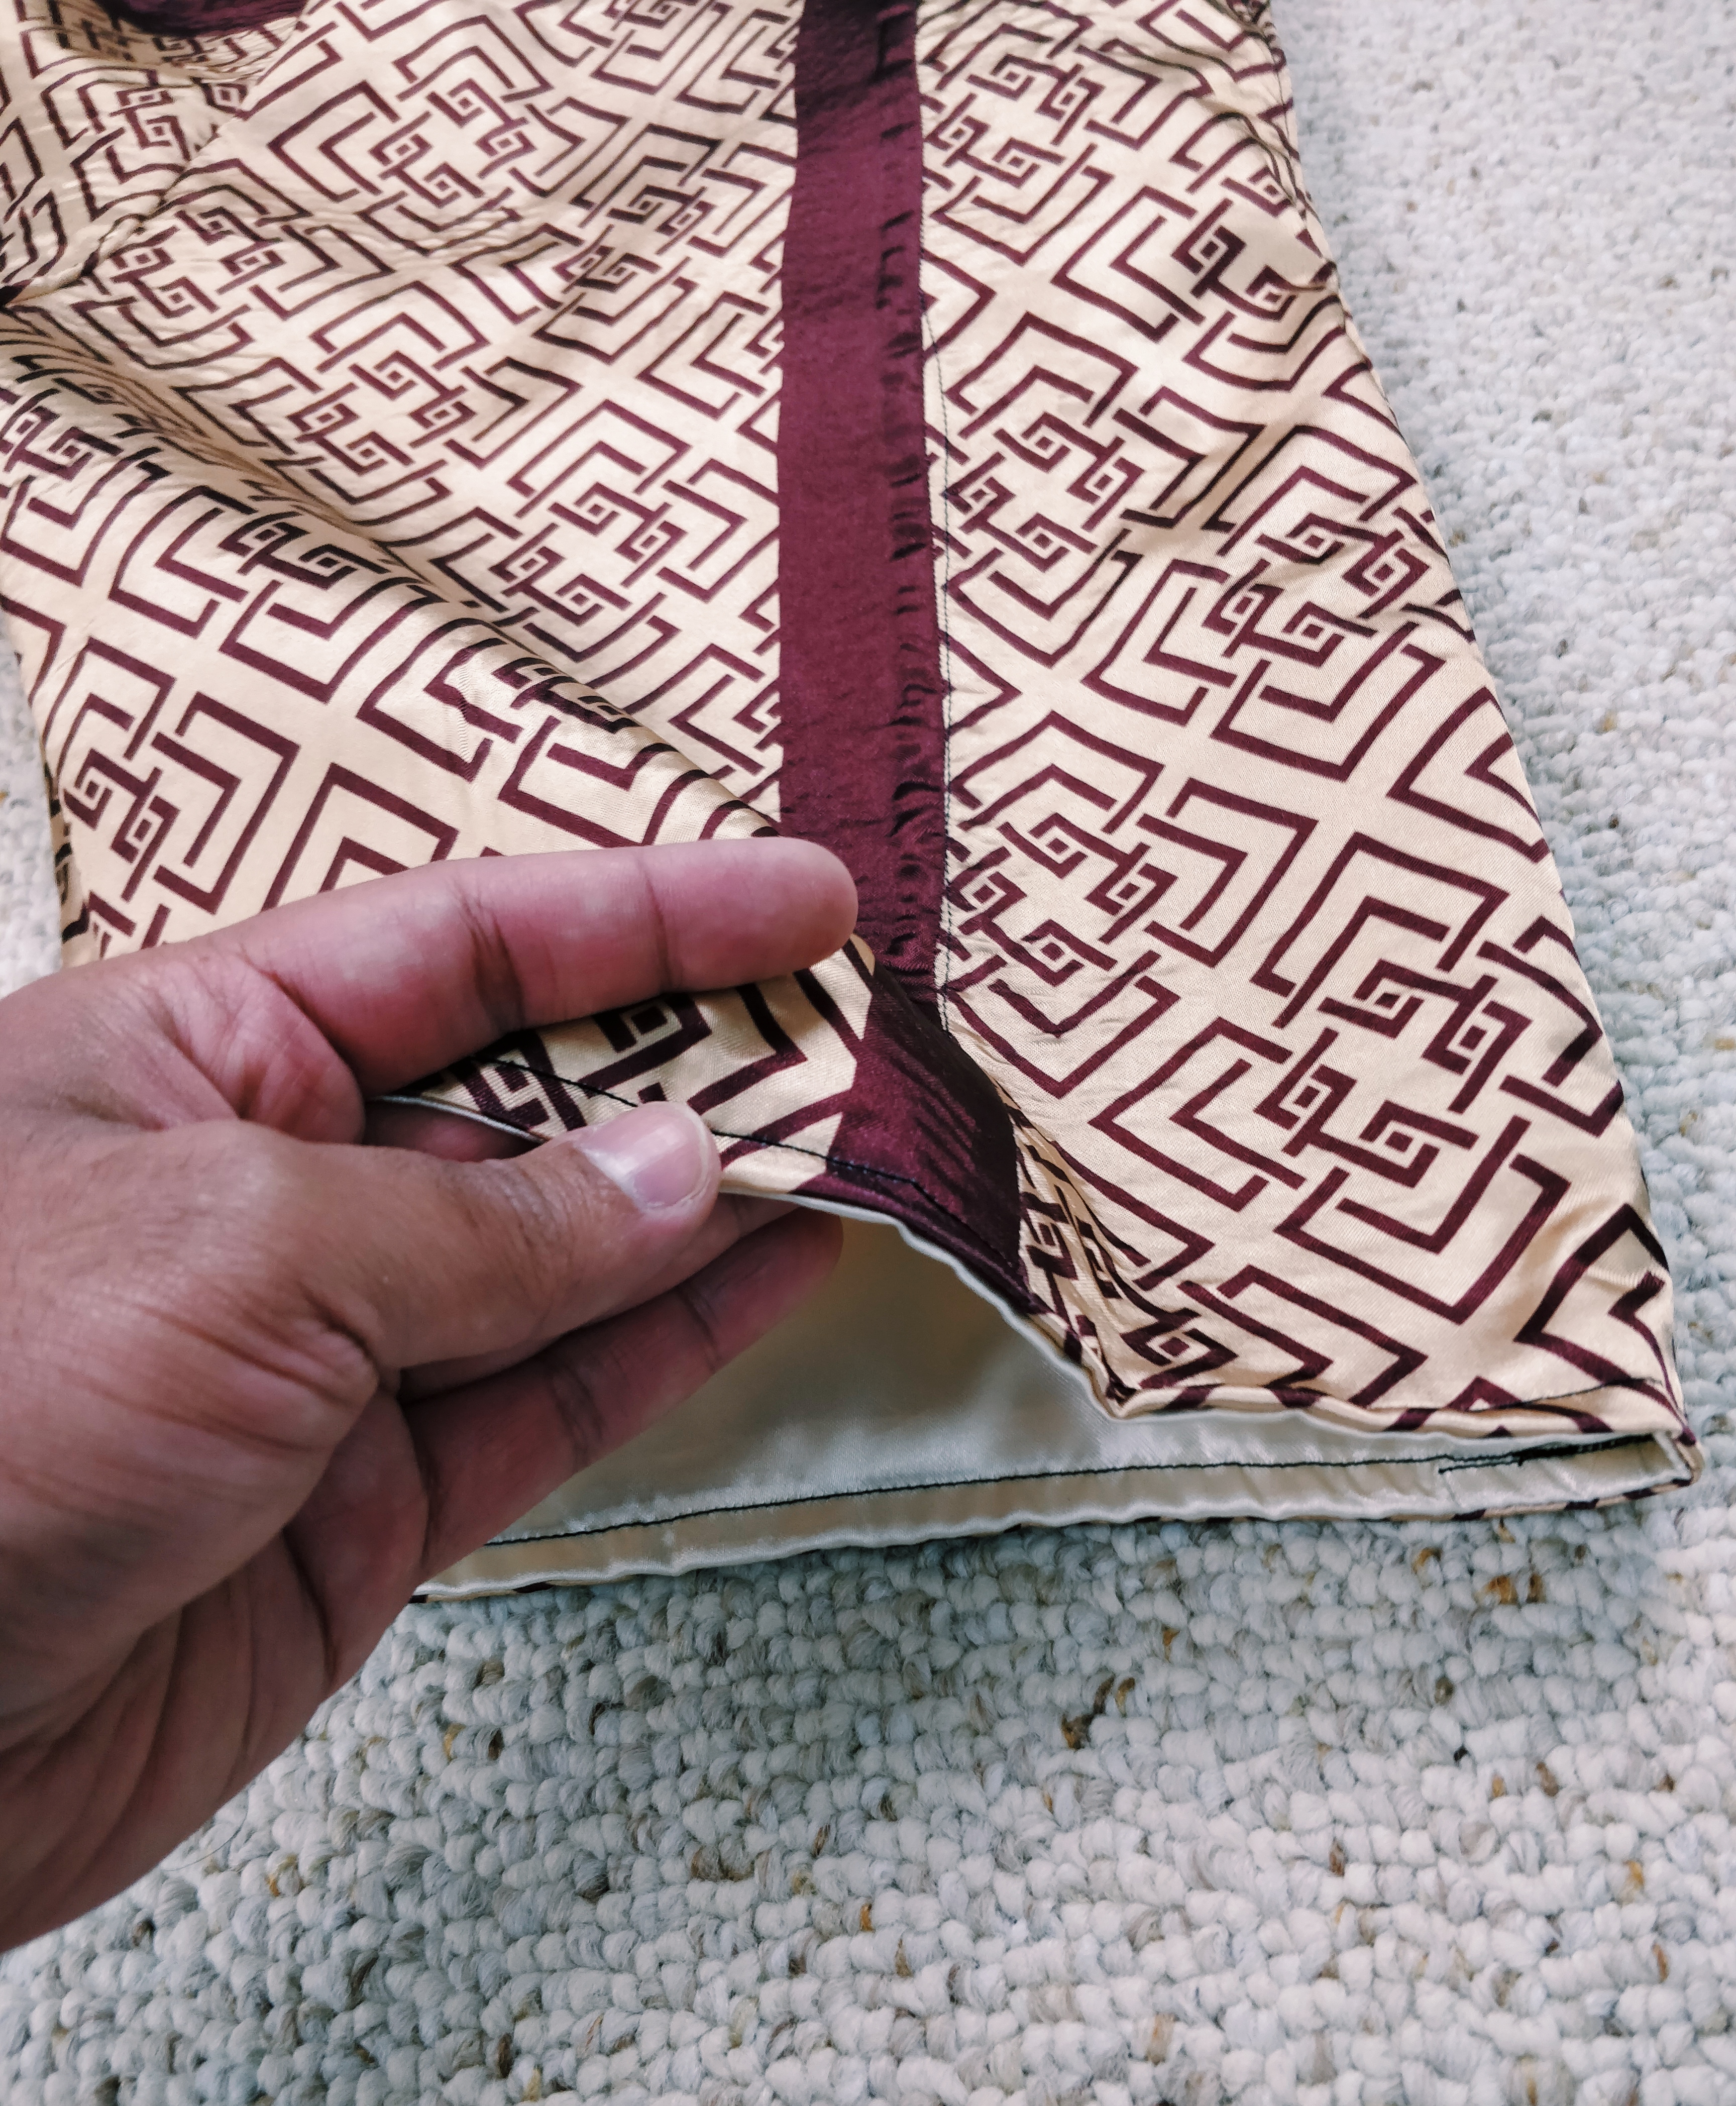
K. Sew the outside hem 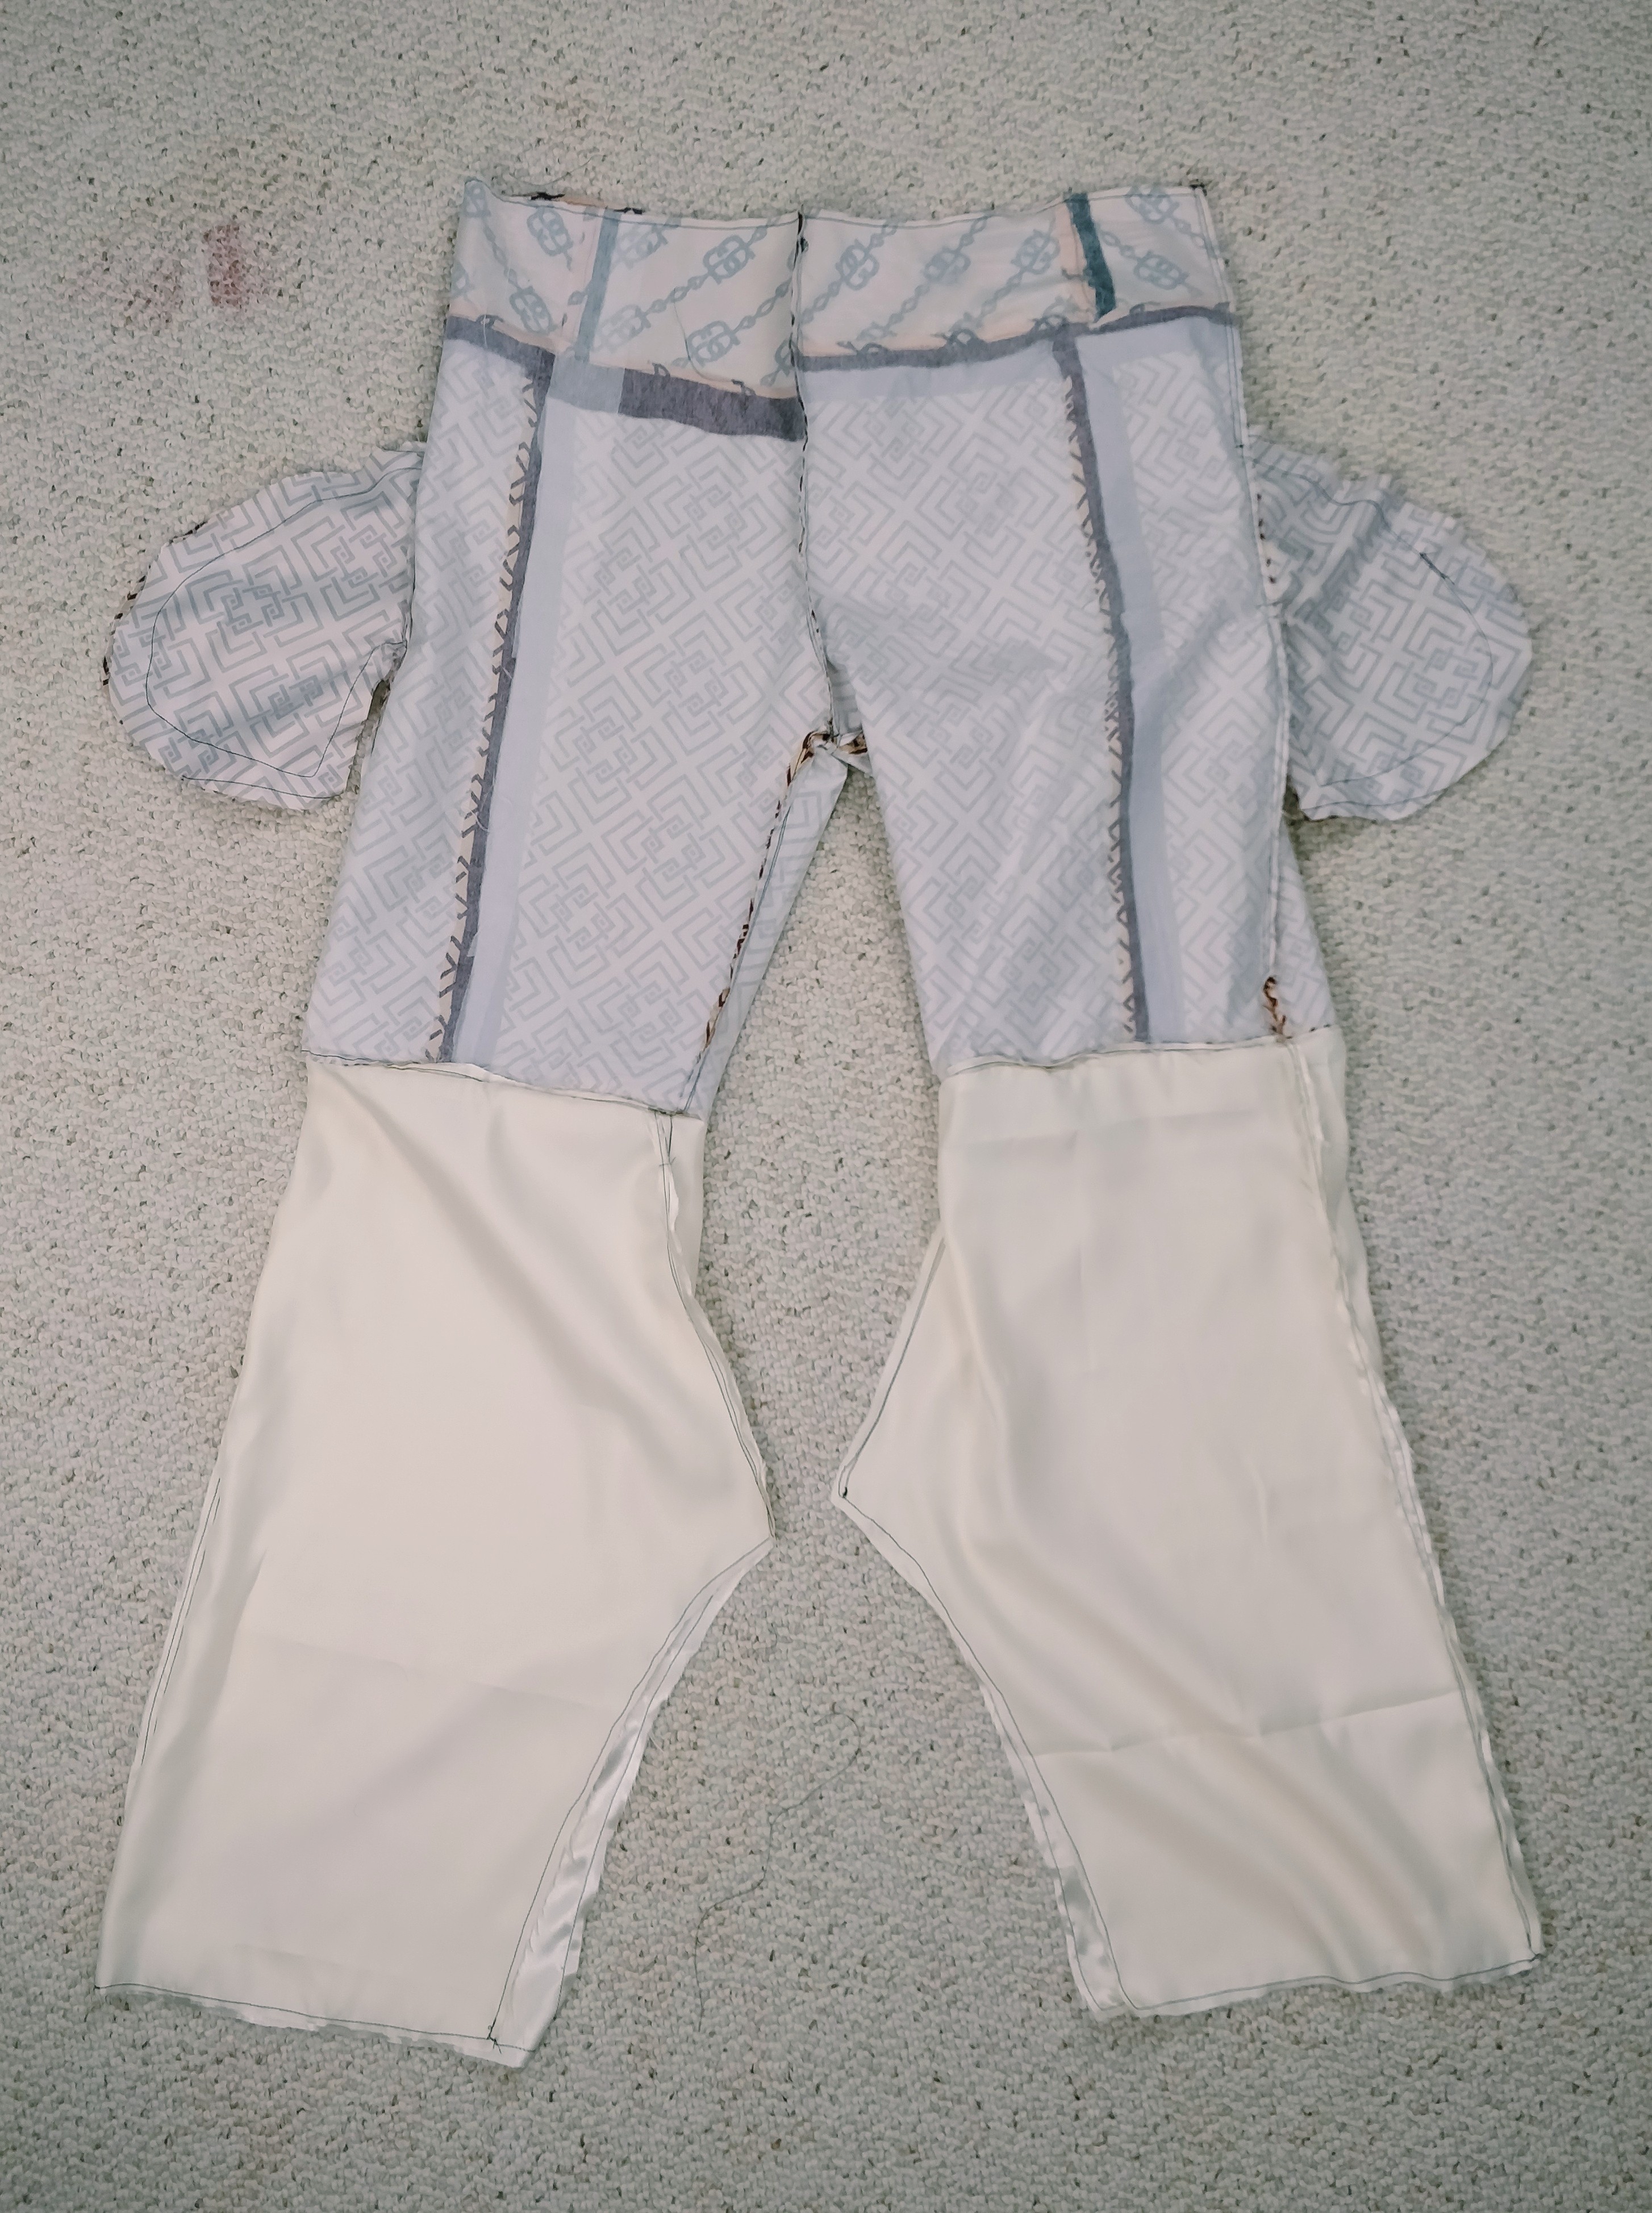
L. Hems sewn 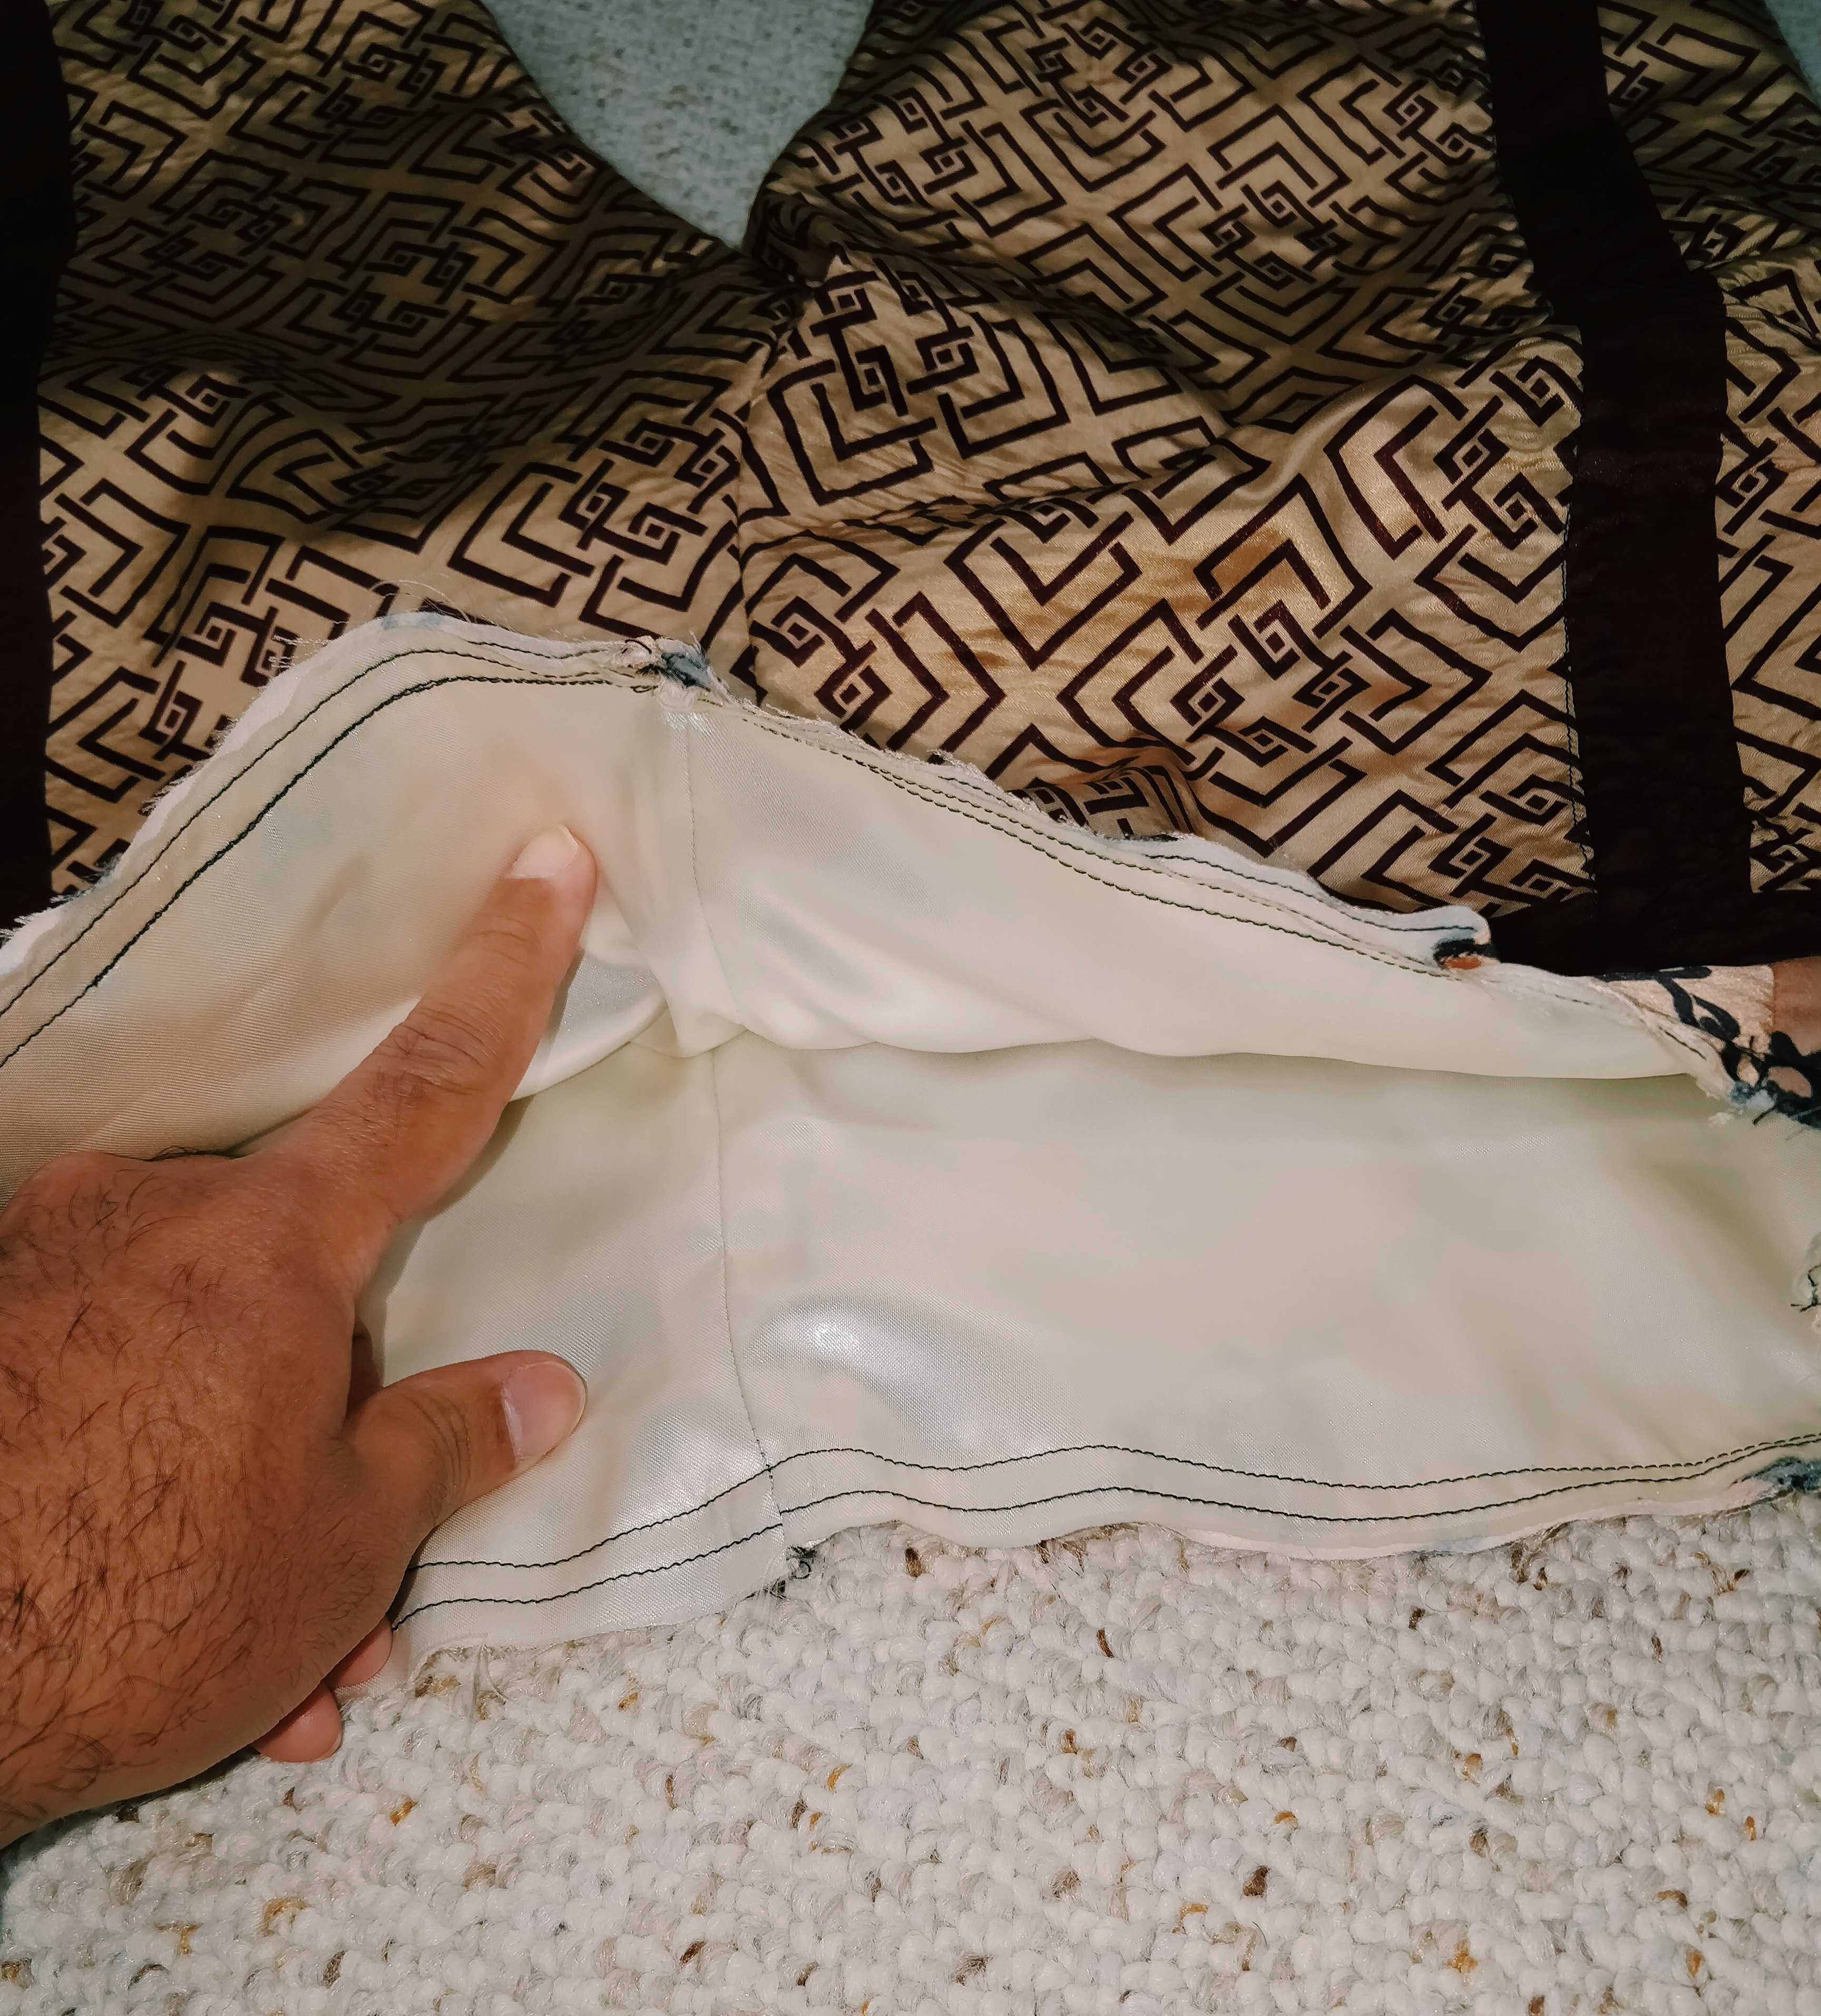
M. Tops sewn
- Pin both sides seams -as you see in picture H- for every leg in both your patchwork and the lining. Remember that when you are putting the legs together you have to match opposites: one front leg and one back leg; and repeat the process. At the end of this step you should have 4 legs -2 in patchwork and 2 in lining.
- Sew together both patchwork legs trough the center seam -right side to right side as you see in picture I. Lining legs stay disconnected. Also press all the seams flat inside.
Do steps 3 and 4 for each leg individually
3. Pin the hem of the lining to the hem of the patchwork pants -right side to right side as you see in picture J- and sew a simple straight stitch hem.
4. Then, turn the lining inside of the patchwork pants, press the border on the outside and sew again, now in the outside to create the outside hem -as you see in picture K. At the end you should have both linings connected to the hems of the pants -as you see in picture L.
5. With the lining legs inside of the pants connect the lining legs -you probably have to turn them to do this, but you have to connect them right side to right side of the lining. Press the seams flat and then sew together the top of the patchwork pants to the top of the lining making all the seams match. After this step your shorts should look as you see in picture M.
6. Add the elastic waistband. For this you have to measure the waistband with your or your model’s waist and sew it together. Now divide this circle in 4 parts and make then match to the side and center seams on the top of the pants -on the lining side- and pin. Then sew that together with a zig zag stitch. And to finish the project fold the waistband inside and sew again with a straight stitch.
And you are done!
Your upcycling shorts should look something this this:
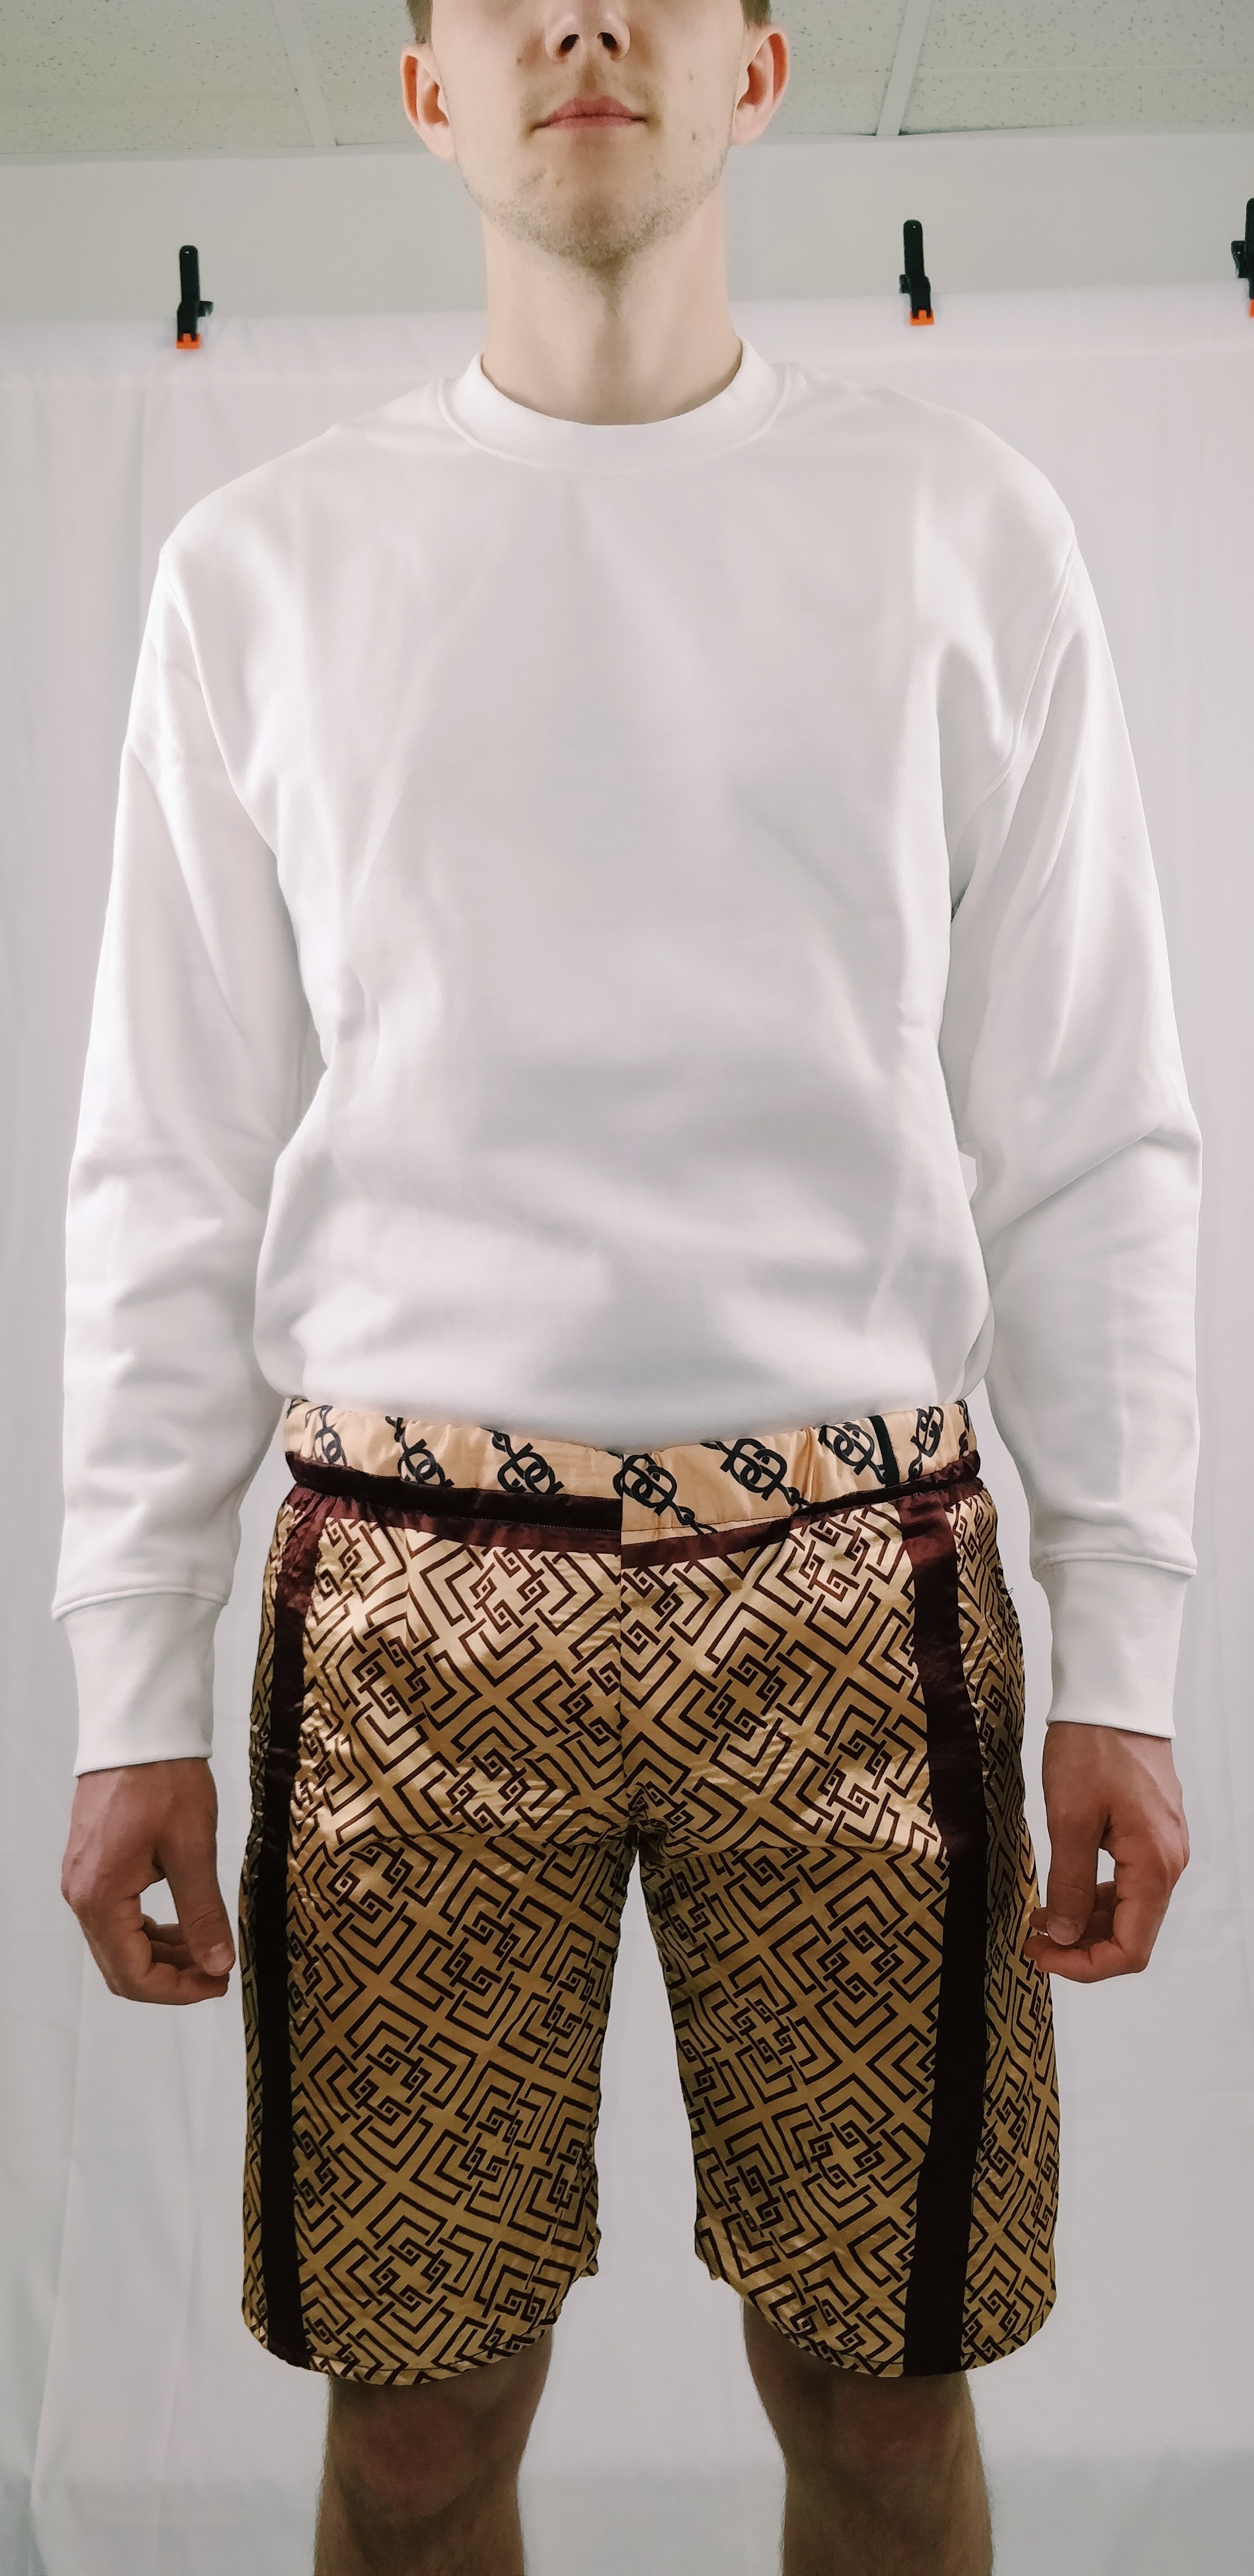
Finished shorts, front. The Fabrics Blog 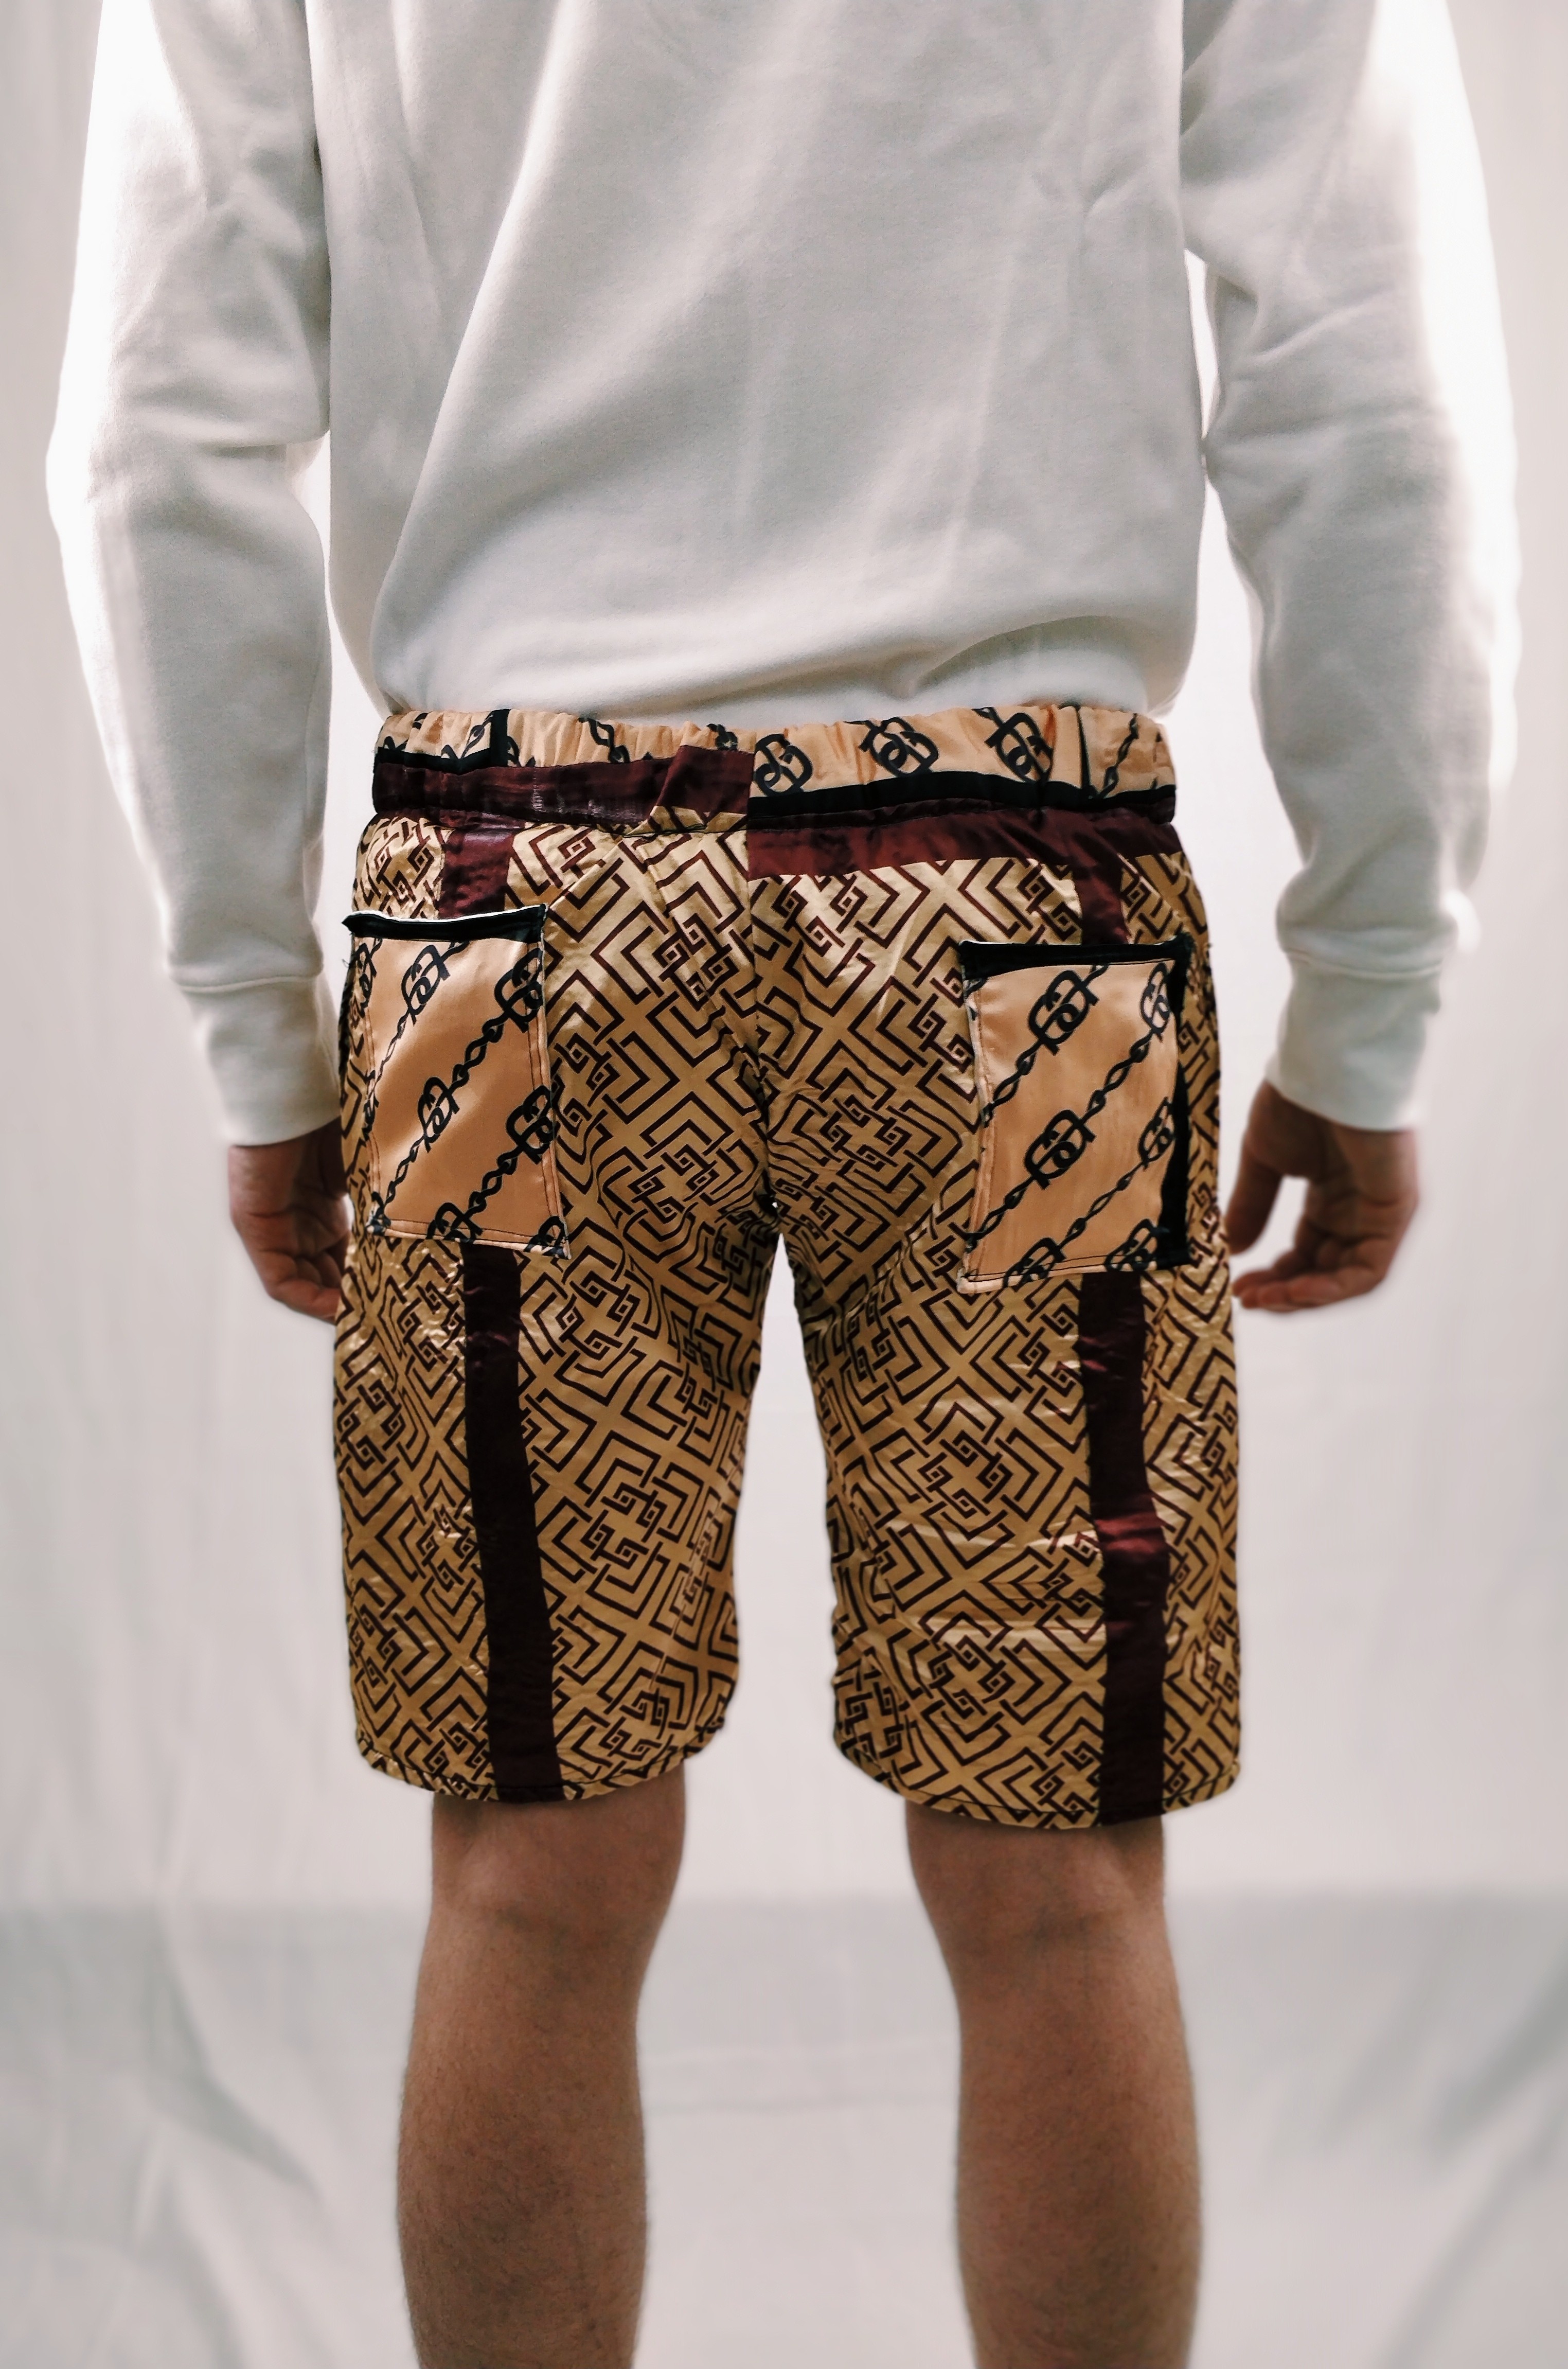
Finished shorts, back. The Fabrics Blog
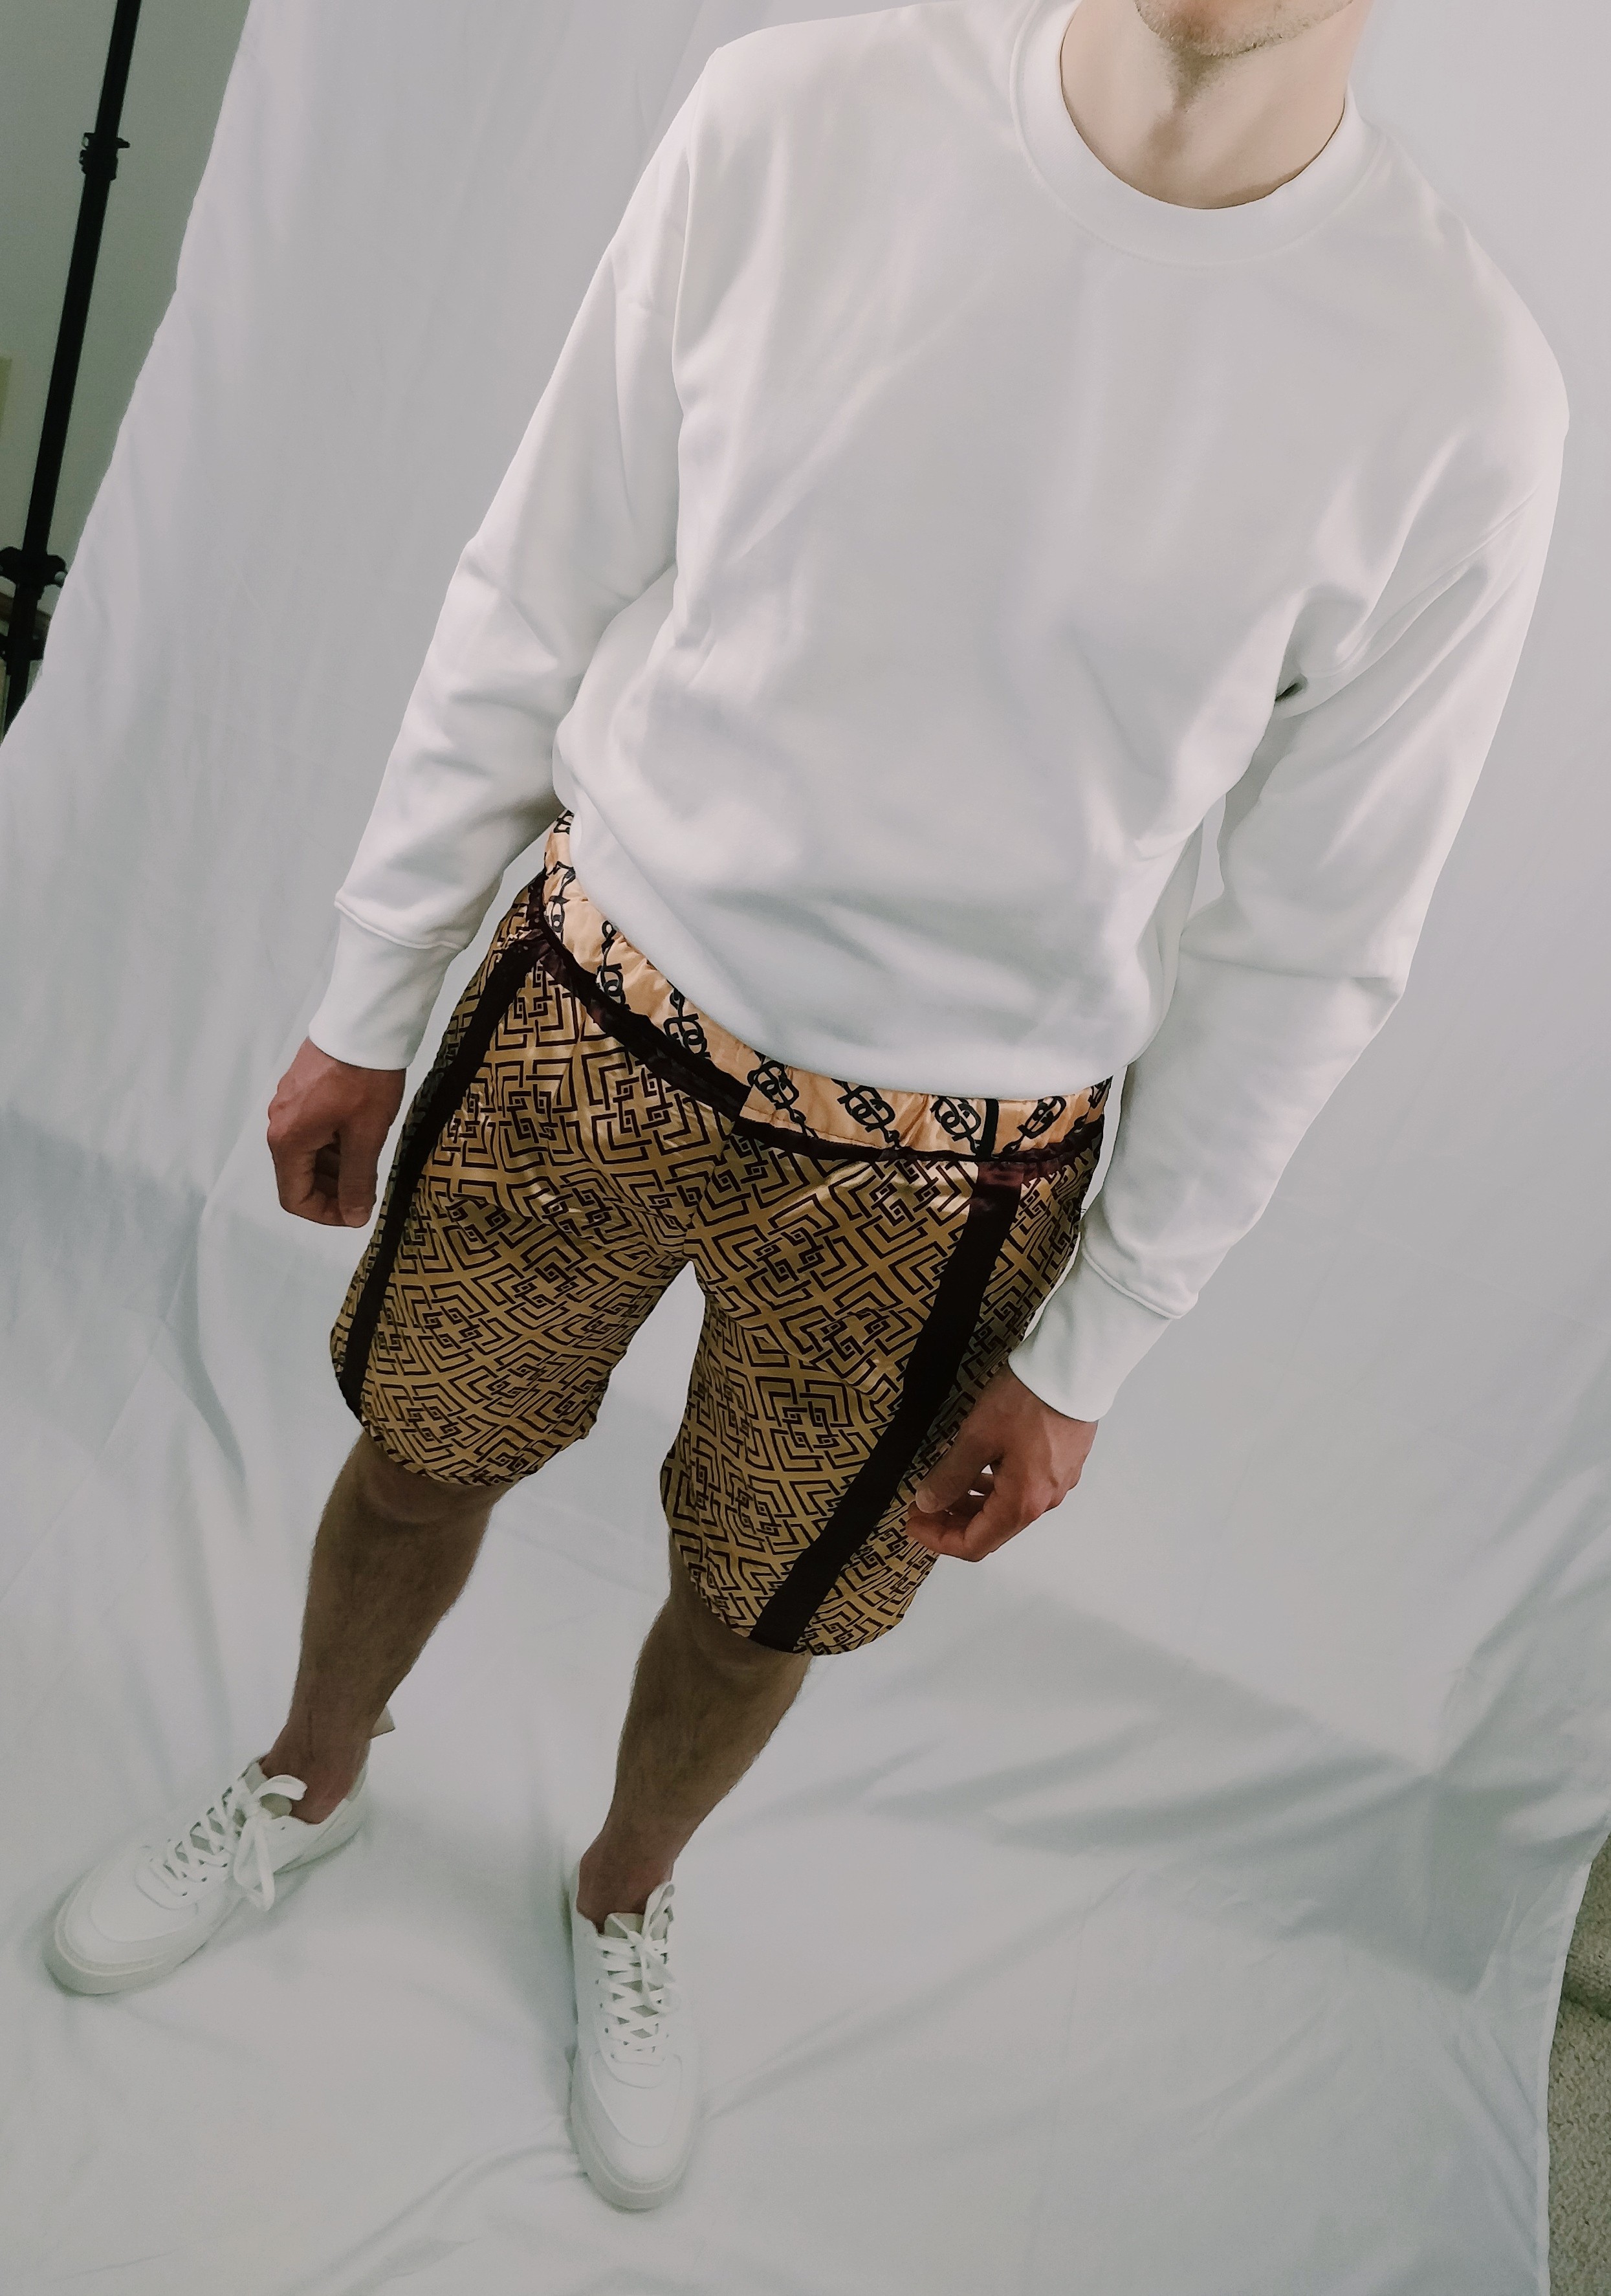
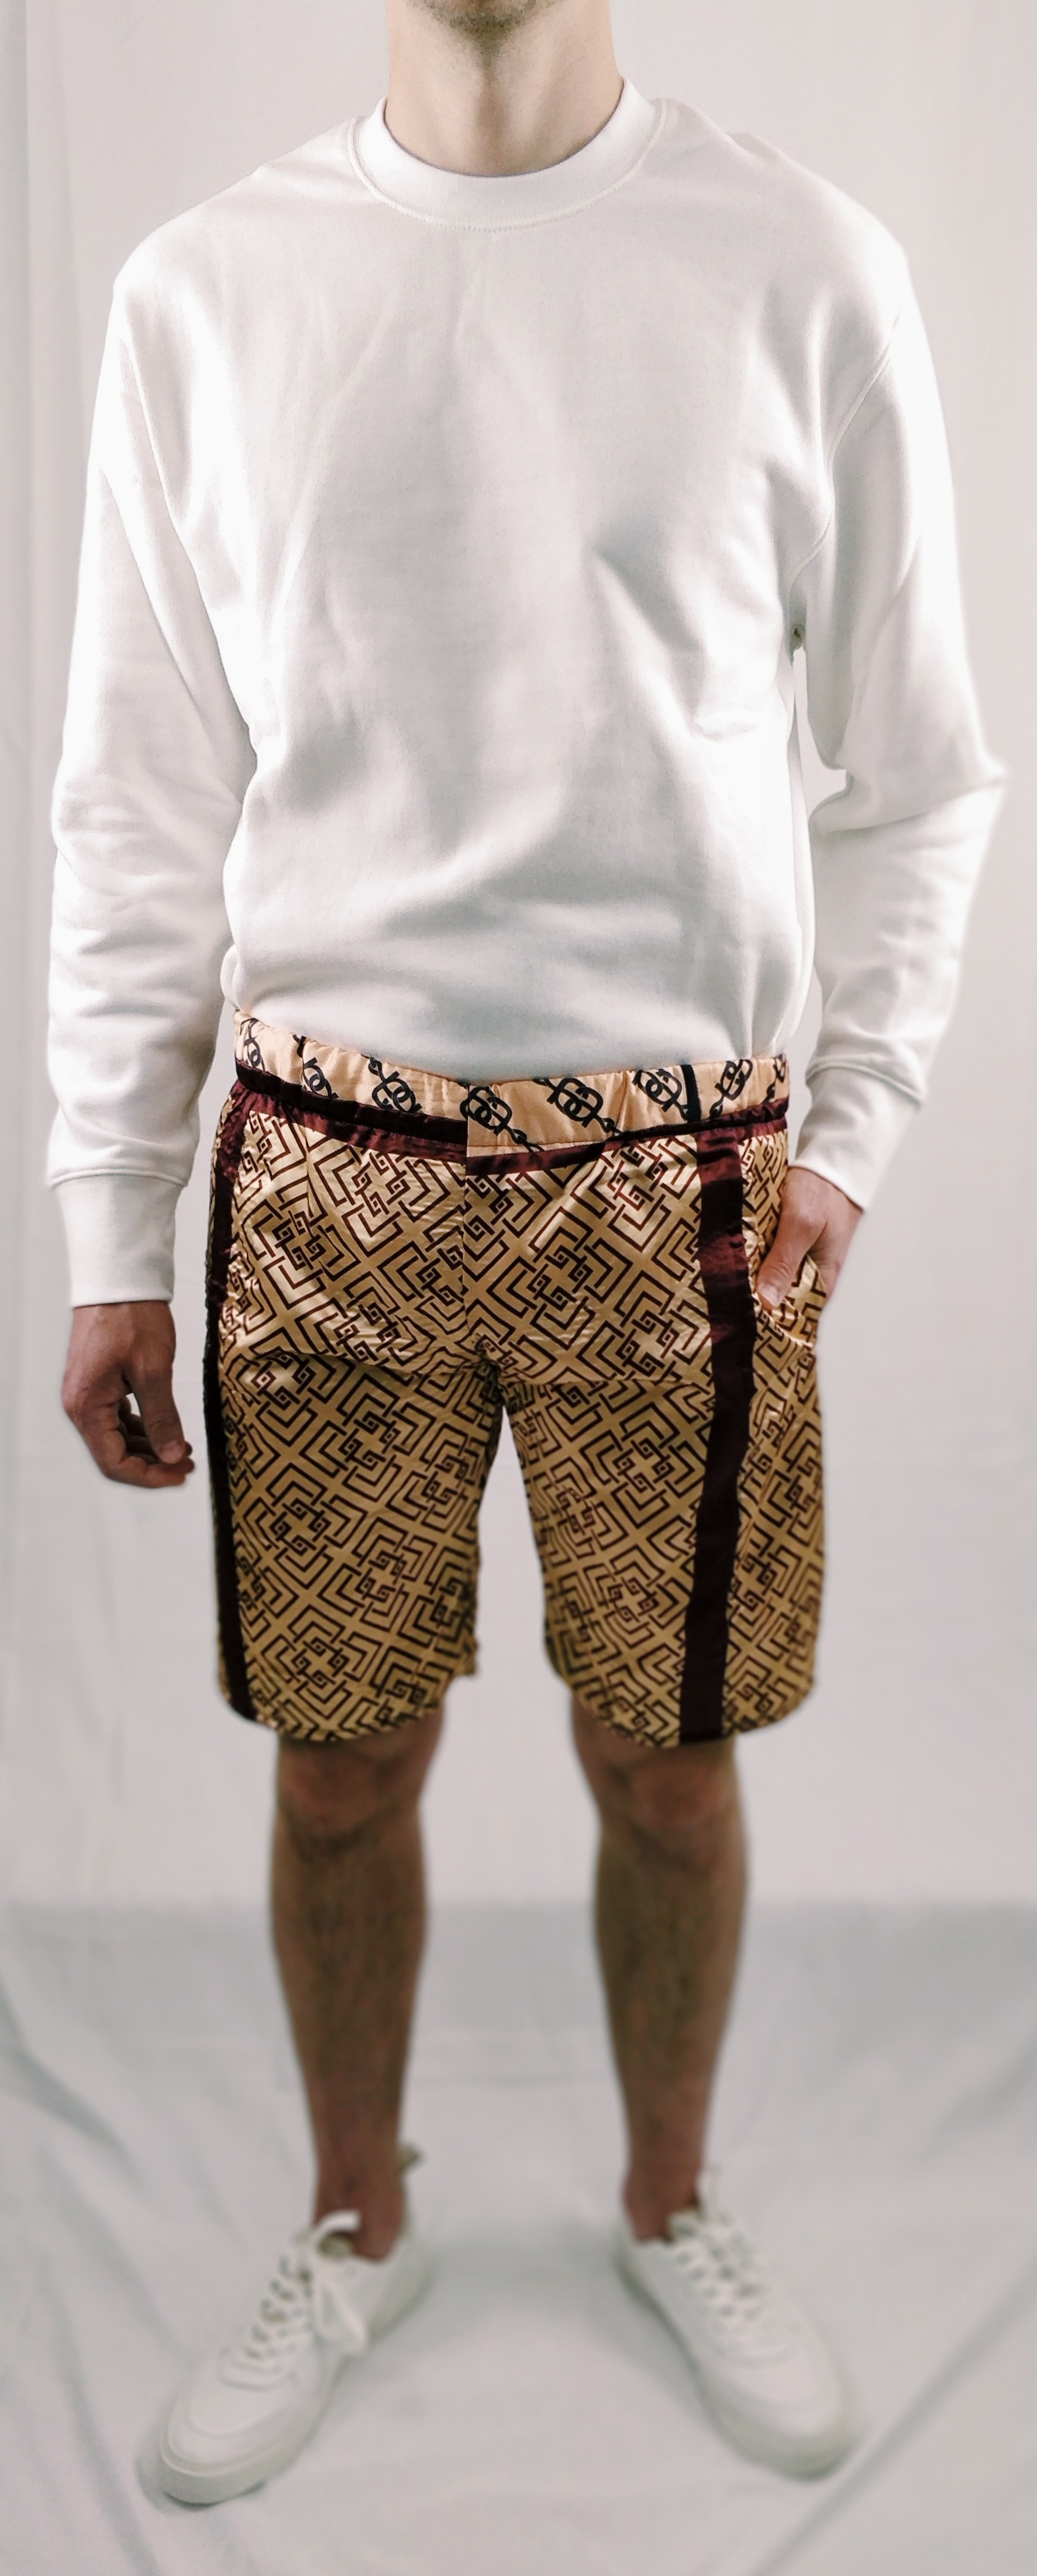
As you can see the shorts have errors -specially the back pockets-, but I am pretty pleased with the result in general. Here I have them styled with a basic white sweater and white sneakers. If you want more ideas how to style this type of shorts with essentials check this article and also this article about essential shoes for men.
What I didn’t realize until after a voice of reason told me is that actually these shorts are reversible. If you add pockets to the lining you have two pairs of shorts. So this is a tip: Instead of buying a fabric as lining for this upcycling project, buy or upcycle a second outside fabric and you have to pairs of shorts in one. Check here to check this shorts styled on the opposite side.
In conclusion, upcycling is not only chic, but also an act of responsibility that if taken seriously can save the planet. It is also pretty easy, and lets you be creative and unique. Win-Win-Win. And you can practically transform anything into anything to refresh your closet.
Have you done or are you planing to start any upcycling project soon? Tell me about it.
Related links:
Check another DIY project by THE FABRICS BLOG.
Also, check this Pinterest Board: UPCYCLING MENSWEAR IDEAS
And then, check this Pinterest Board: DIY MENSWEAR
What a great in-depth guide! The outfit turned out great. Congrats! 👏
Thank you! I’m so happy you like them.
[…] When I was making my upcycled shorts for the previous article on this blog, I have to recognize that I was not aware that these shorts are actually reversible -until my model showed me. Check the original version of this shorts and the tutorial to make them, here. […]
[…] shape makes me happy. I used another turtleneck of mine to trace it and create my pattern –click here to learn how to do that-, but I modified it so much to shape the front and corset-like back that I consider it pretty much […]
The insights shared in this article are thought-provoking. ❤️
This article is a gem, offering a comprehensive yet concise overview of this topic. The clarity of expression and well-structured arguments make it an enjoyable and educational read. ❤️
Cool content I’ll make sure to visit this site more. ❤️
wow porn gallery amazing porn galleries
Monetize your web presence Affiliate Discord
Join affiliate marketing community Affiliate Marketing
Learn about affiliate marketing Affiliate Marketing
Monetize your web presence Best Affiliate Community
Learn to make money online Top Affiliate Marketing
Increase your earnings Affiliate Marketing Community
Monetize your web presence Affiliate Marketing
Learn about affiliate marketing Affiliate Marketing
Join affiliate marketing community AffRip
It’s fascinating how quickly content creation is evolving! Managing risk with new tools is key, though. I’ve been exploring AI – especially the Nano Banana Generator – and its accessibility on any device is impressive. Responsible use is vital, of course!
Downloaded the 77winapk on my phone. Pretty smooth experience. Games load fast, didn’t have any crashes. Not gonna lie, I spent way too much time on it last night! Might be worth a look, grab the 77winapk.
Interesting read! Understanding bankroll management is key, and platforms like bwinph download are making access easier for Filipino players. KYC processes are a smart move for security, too! Solid advice overall.
Gave meolucky a spin and it definitely caught my eye! Its got a unique charm to the game play that keeps you wanting more! Give it a try: meolucky
Found this keo88bet site. Looks interesting, but I’m always skeptical. Any thoughts? Any experiences to share? Here is the link: keo88bet.
gkbet https://www.gkbeth.org
balato88 https://www.balato88u.com
phwin25 https://www.phwin25g.net
peso99 https://www.repeso99.net
tongits go https://www.yatongits-go.net
philucky https://www.usphilucky.org
tayabet https://www.yetayabet.net
phtaya01 https://www.phtaya01.org
okebet3 https://www.okebet3u.org
ph123 https://www.adph123.com
[9908]iGOTechnology: Secure Login & Register, Official App Download, and Philippines’ Best Slot Gacor via Official Link Alternatif Experience Philippines’ best slot gacor at iGOTechnology. Secure iGOTechnology login & register via our link alternatif. Get the official iGOTechnology download app for big wins and safe gaming today! visit: iGOTechnology
That’s a great point about balancing risk & reward! Thinking about image editing, tools like AI Nano Banana are changing the game – making pro results accessible on any device, no downloads needed. Super cool!
[824]Gobetplay Casino Philippines | Login, Register & Slot Games App Join Gobetplay Casino Philippines for the best online slot games and betting. Register or login today to enjoy secure gaming and big wins on our official app. visit: gobetplay
Hey! Giving l666bet a shot today. I’m liking the vibe so far, the platform is user-friendly and easy to get around. Worth a go if you’re looking for some online action. Find fun stuff right here l666bet!
Yo! Just jumped over to mbet1. Quick registration process and decent odds. I’ve seen worse. Give it a try, you might just end up winning! Check it out yourself mbet1!
What’s up, gamers? Been messing around on mv99 and it’s a solid option. Good selection of games, responsive customer support. Worth a punt! Check it here mv99!
This upcycling project brilliantly demonstrates how creativity transforms existing materials into unique pieces. In entertainment, we see similar innovation—taking classic concepts and reinventing them for modern audiences. Just as upcycled fashion tells a story, sustainable gaming platforms like gogojili online casino show how responsible practices can enhance user experience. Truly inspiring work!
diflucan over the counter
diflucan over the counter